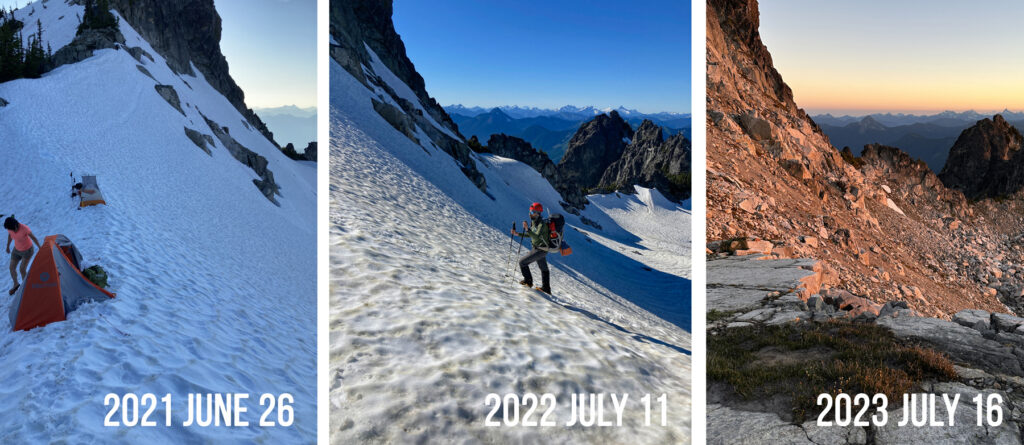
Some hikers ask me, “Do I hike in the summer?” Yes. Despite my focus on winter backpacking and my dislike of mosquitoes and hot weather, I try to get out year-round, even in the summer and early fall when there is minimal or no snow. The goal is to camp on snow whenever possible even in July and sometimes in August. This usually means going farther and higher up, but it allows our group to experience some excellent views. It also provides a comfortable clean surface and allows us to leave no trace where we stay.
In August and September, large wildfires can close trails and create poor air conditions. This hazard can make trip planning difficult but not impossible. And, by late September, early snowstorms above 3000 feet provide relief and the opportunity to get back out into the wilderness after the summer crowds are gone.
Summer Gear
Before leaving for the trailhead, I recommend laying out your gear and doing a visual check using a written checklist.
One Night Kit
One Night Snow Camping Kit (2024)
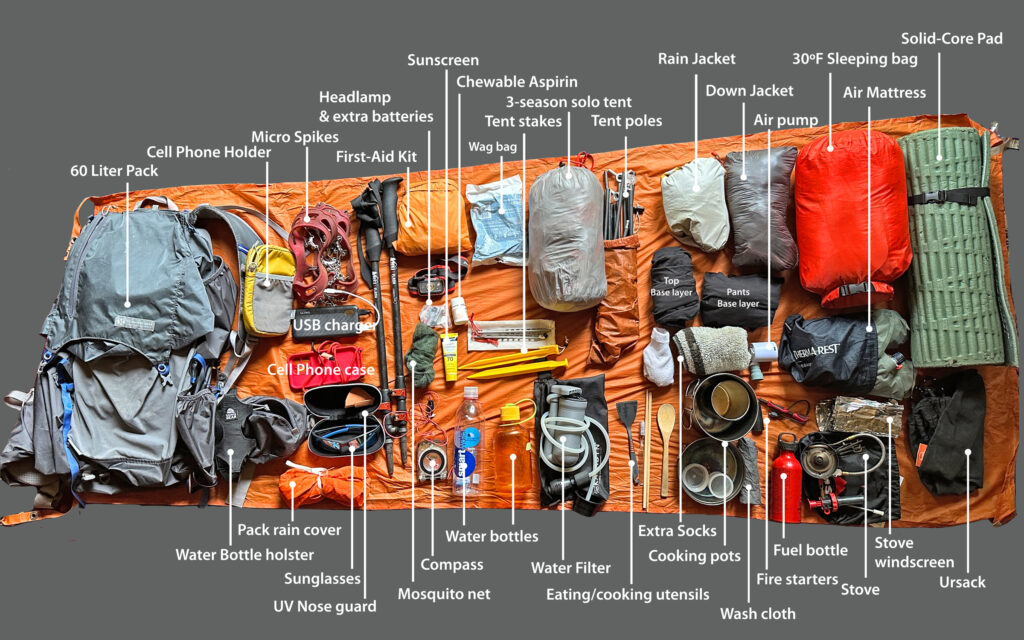
Five Night Kit
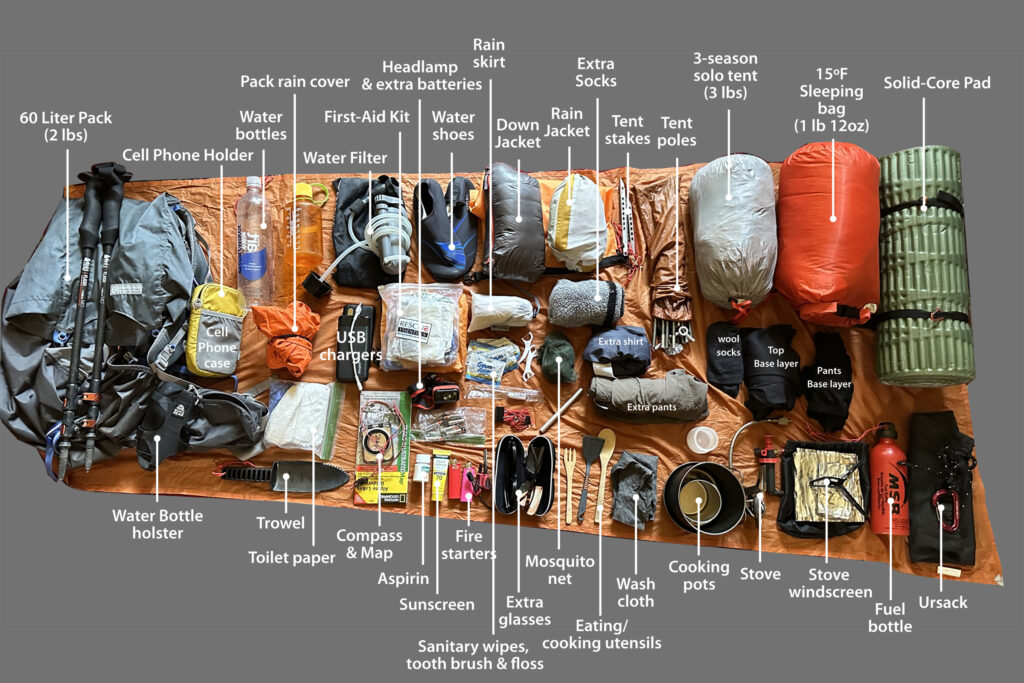
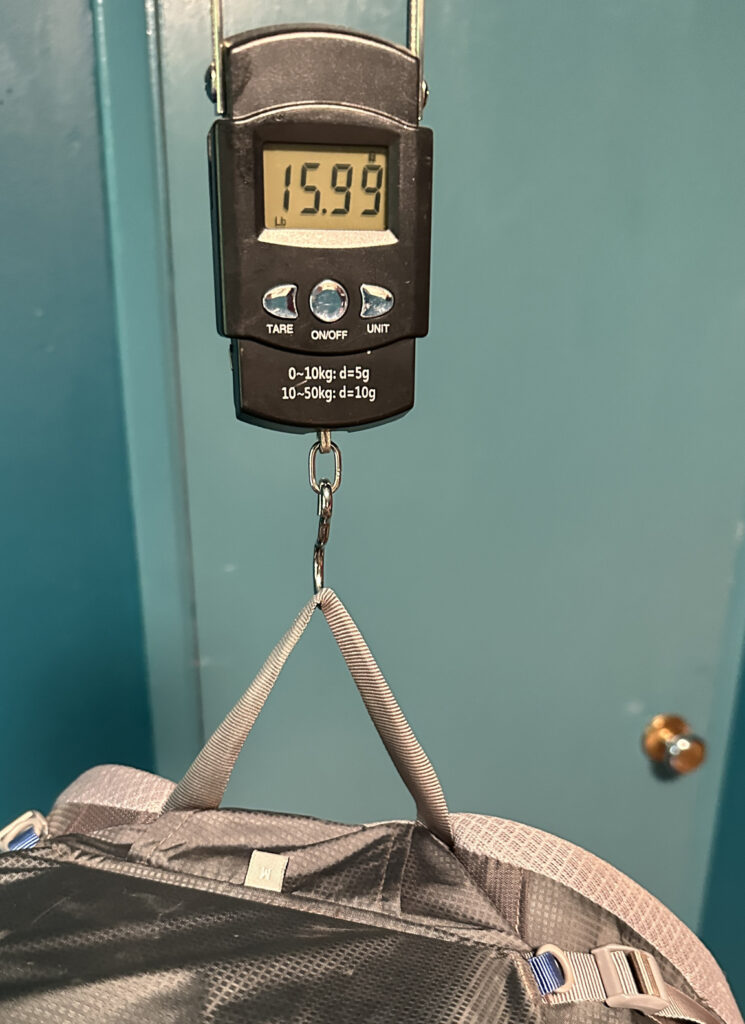
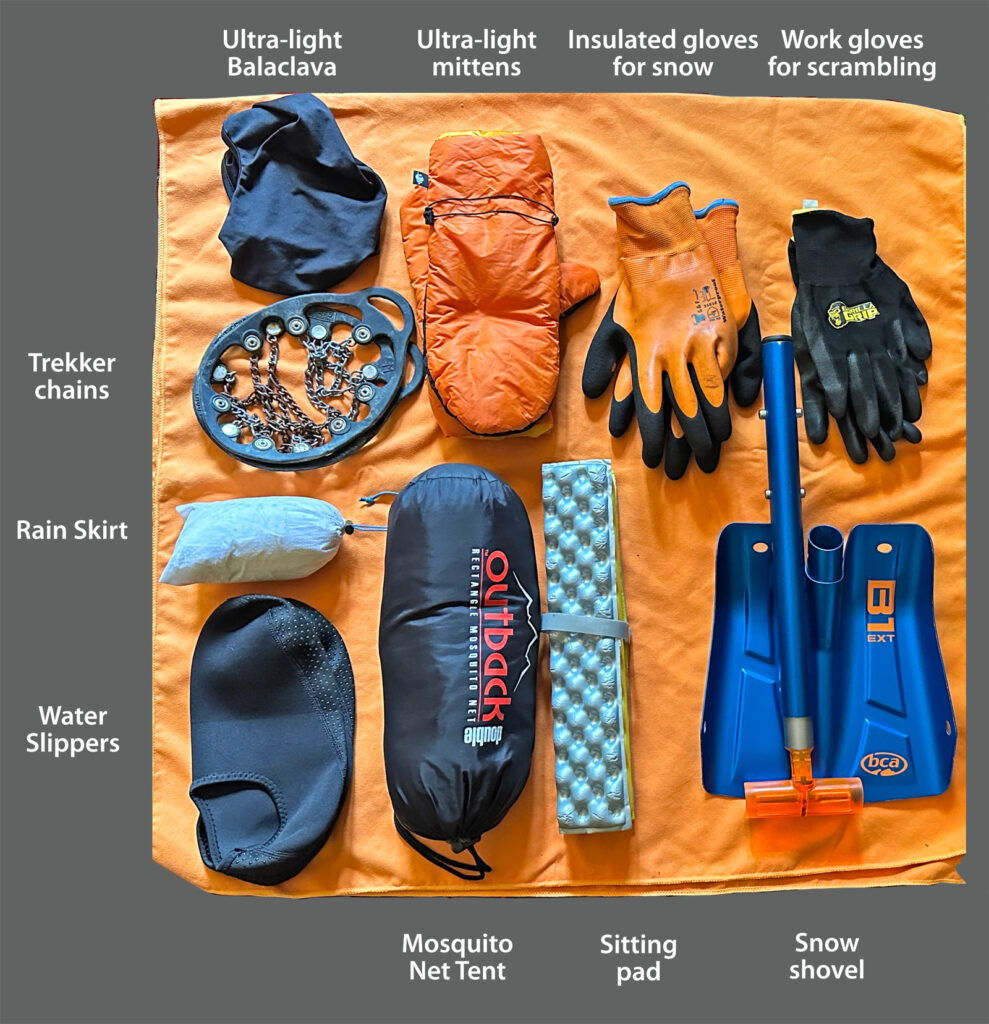
The main gear, shown here and listed below, contains what I am most likely taking on a summer or early fall trip when snow on the ground is still possible. Overall, I try to keep my pack light. An ultra-light backpack is said to be a base weight of less than ten pounds. Despite trying, my lowest base weight is around 15–16 lbs. So I don’t come close to that level. It is, nonetheless, a substantial reduction from my winter gear. For a weekend trip, with water, fuel, and fresh food, I can expect my total summer pack weight to be in the 20–24 pound range, depending on the terrain requirements.
Why So Heavy?
There are several barriers preventing me from going ultra-light. First, I like to camp up high, often on snowy or rocky terrain where stronger winds are frequent. For that reason, I’m using a free-standing tent. I also use a liquid-fuel stove. I like it and can’t adjust to the waist of the canisters. I also like to cook fresh food and on a short 2–3 day hike, I’m going to bring fresh food and the gear to cook it. If I could give up those things, I could probably get closer to being ultra-light. In the near future I hope to try out some lighter packs and tents and will review the results for you when that happens.
Different Gear for Different Situations
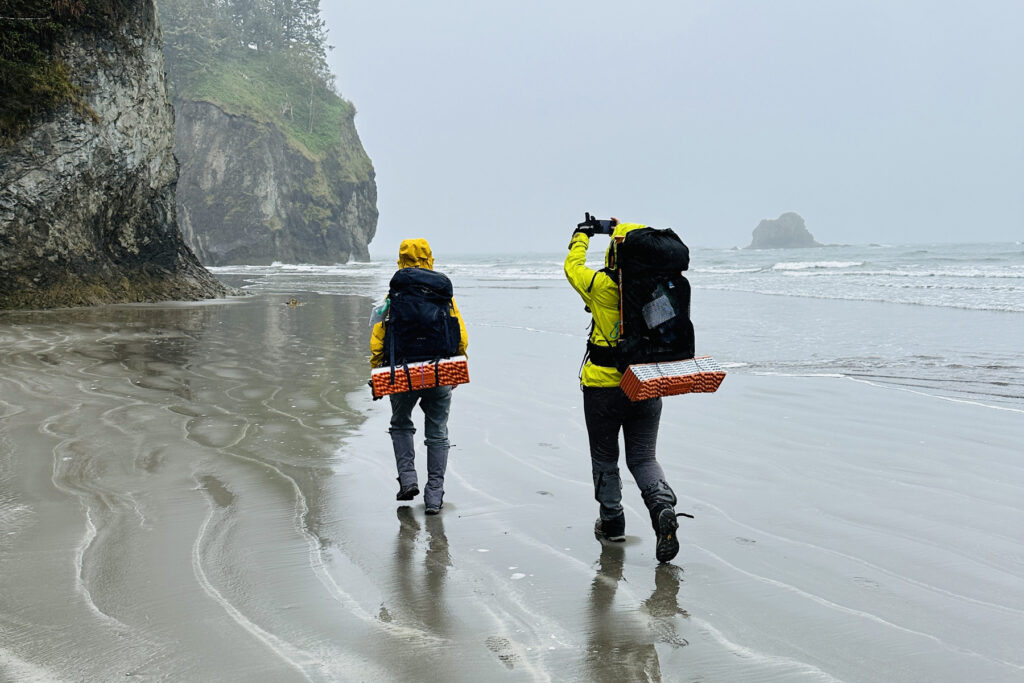
Gear will vary depending on weather and trail conditions. If I’m likely to encounter snowfields or compacted trail snow, I’ll pack micro-spikes. If I’m hiking on the Pacific Coast, where there are miles of slippery rock shorelines and boulders, I’ll leave the microspikes and take Trekker Chains.
Mosquitos and Flies
The main difference between winter and summer gear is that there is a lot less of it in the summer. There are only a few additions for summer, such as a water filter and maybe river shoes and mosquito netting. Trying to deal with mosquitos can add the most weight. A head covering net is light but if you want a net big enough to protect a group, that can add around a pound (14.7 oz).
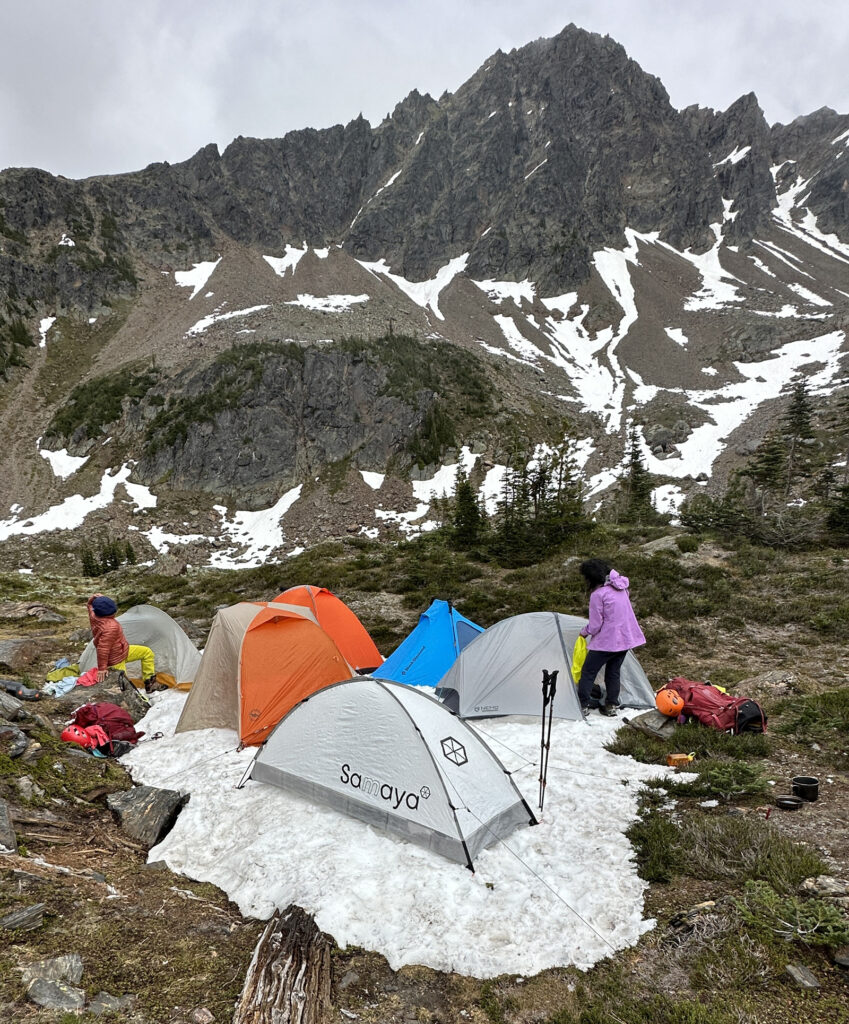
Mosquitos and biting flies are one of the reasons I prefer to hike in winter. With the snow gone, so goes the communal cooking pit, which is one of the great facilitators of our wilderness social life. For that reason, if mosquitos are anticipated, I sometimes take a large mosquito net tent to create a common cooking area. Otherwise, everyone is trying to stay zipped up in their tents to avoid the bites.
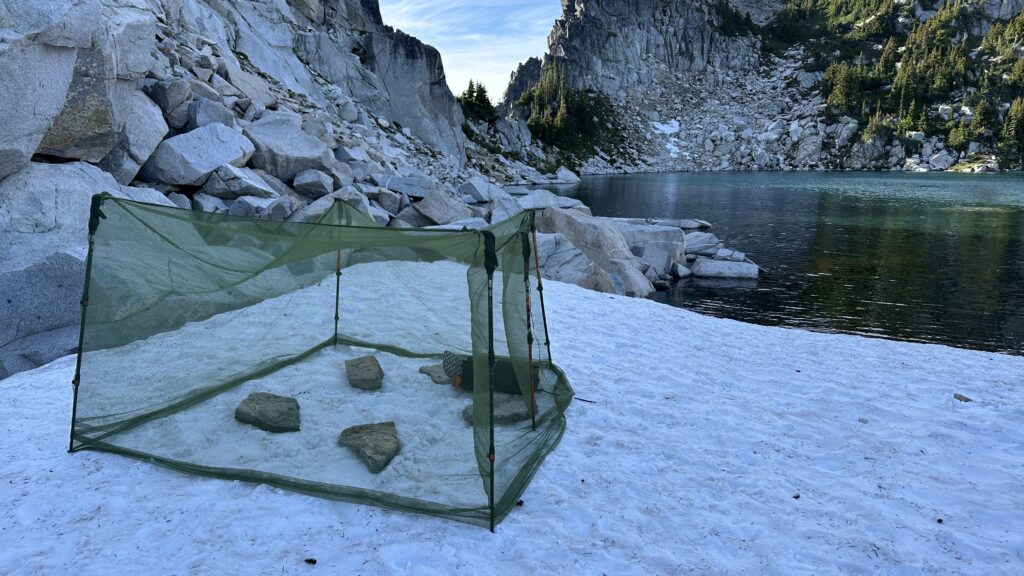
No one really wanted to use this tent, but the mosquitoes were persuasive.
Gear Tips for Camping on 3-Season Snow
It is not unusual for winter backpackers to prefer sleeping on snow rather than dirt because it is cleaner and more comfortable. No ground cloth is necessary. It also means there are more places to camp and in better locations than many established campsites. The added coolness in summer is also refreshing.
There are a few things you should know about 3-season snow, especially summer snow.
- The snow is hard. In the winter you can level snow without a shovel, but in the summer a shovel may be necessary. When using a snow shovel to level the snow on a steep slope do not use the snow shovel to pry up hard snow. You must chop the snow with the shovel blade and then shovel away the loose snow. Prying the snow like a garden shovel will break the welded aluminum joints.
- Be aware of snow sublimation. This is when snow is warmed by sunlight or wind and turns directly into gas without converting to liquid. Sometimes you can see a mist a few feet above the surface when this is happening. This creates several issues: 1) This moist air can soak your gear, sometimes slightly, sometimes completely. It doesn’t matter if you are camping on the snow or near it. Either way, your gear can get drenched. This often occurs around sunset and last for a few hours. To protect your gear, use the fly on your tent. This means you need to bring the tent fly even if the forecast indicates that the sky will be clear. Keep your sleeping bag and extra clothing in a waterproof stuff sack until you need them. Usually, you can remove the tent fly after the stars are out without being at risk of getting soaked. 2) The evaporation can reduce the snowpack over the course of the night so much that your tent pegs will be laying on the snow in the morning. If you are using a tent that relies on trekking poles (non-free-standing tent), the poles will become loose and the tent will collapse on you at night. The best solution is to use a free-standing tent and burying the snow pegs (deadman position) deep in the snow. If you brought an ice axe and the snow if still deep enough, use it to secure the tent corner facing into the wind.
- The snow will be hard and slippery in the morning. It may be slushy when you went to sleep but in the morning it may be difficult to stand up on. Keep a trekking pole near the entrance of your tent and microspikes for going out in the morning. Don’t assume you can get by without microspikes because summer snow will be slushy. It becomes hard-packed and icey on the trail as hikers walk over it. This makes the trail slippery and dangerous on short patches of snow covering the trail. It is also hard and slippery in the morning. So always bring microspikes for high-elevation trails.
- The snow can be wet. Use your rain pants and rain jacket and solid full-length pad to insulate yourself from the wetness. Full length pads provide better protection than small seat pads when snow camping. If nothing else, at least bring a seat pad.
- The ultraviolet light is more intense. The UV light reflecting from the snow in the summer can burn you in unexpected ways, such as the underside of your nose and lips. Use sunscreen, lip gloss, sunglasses or glacier glasses, and cover up to protect yourself.
The Summer Checklist
This checklist includes typical items in my 3-season backpack. Some items are weather and terrain specific. Use this list to remind yourself when packing.
The Essentials
For more about the essentials, especially in winter, see The Fifteen Essentials for Winter Backpacking.
First Aid* 4.00 oz.
- Bandage roll (4.5″ x 4YD)
- ABD pads (2 quan., 5″x9″)
- Triple layer pads (3 quan., 3″x4″)
- Large band-aids (3 quan., 2.5″x3″)
- Band-aids (3 quan., 3 inch)
- Band-aids (2 quan., 2 inch)
- Antiseptic towelettes (2 packs)
- Iodine prep pad (1)
- Alcohol prep pad (1)
- Antibiotic ointment pads (4)
- Burn cream (3 pk)
- Burn jell (1 pk)
- Hydrocortisone cream (1 pk)
- Ibuprofen tablets (4)
- Moleskin (5 pre-cut pieces)
- Leukotape (1–2 feet cut in 3–4 inch pieces)
*All items packed with labels and expiration dates. Burn cream/jell because of stoves. Moleskin and/or Leukotake because of blisters. ABD pads or large bandages because of potential injuries (esp. ice ax, crampons). I build my own first-aid kit. Small packable sizes can be found online at sites such as Rescue Essentials (https://www.rescue-essentials.com/).
Extra First Aid Gear
- Scissors (0.55 oz.)
- Tweezers (0.30 oz.)
- Duck tape 2×50″ (0.60 oz.)
Hygiene supplies
- Wag bag or Biffy Bag (2.55 oz.)
- Extra toilet paper (0.55 oz.)
- Sanitary wipes (2 single-wipe packs per day) (0.45 oz.)
- Latex glove
- Toothbrush + paste (1.40 oz.)
Repair kit
- Sewing repair kit (0.50 oz.)
- Air Mattress repair kit (1.05 oz.)
- Tent pole repair sleeve
- Stove maintenance kit (partial) (0.55 oz.)
- Snowshoe clevis pin
Navigation gear
- Compass (2.55 oz.)
- Map (3.30 oz.)
- Altimeter watch
UV Protection
- Sunglasses (1.15 oz.) or Glacier Glasses (category 4)
- Sunscreen (1.10 oz. available in 1 oz containers)
- Chap-stick (0.14 oz.)
Lumination
- Headlamp with batteries 2.55 oz.
Fire-starters (take two types)
- Flint (1.15 oz. or 31 grams)
- Lighter (full .80 oz.)
Cooking Supplies
- Bear vault food container (32.00 oz.) or Ursack (7.6 oz)
- Spoon (Bamboo) (0.40 oz.)
- Cooking pot (4.40 oz.)
- Pot lid skillet (2.30 oz.)
- Spatula (0.35 oz, for quesadillas)
- Cup (2.10 oz.)
- 2 oz Sauce container (0.80 oz., occasional use)
- Hand towel (0.3 oz.)
Stove Kit (29.05 oz.)
- Stove (8.65 oz.)
- Fuel pump (2.35 oz.)
- Windshield & base plate (2.65 oz.)
- Stove kit bag (0.65 oz.)
- Fuel bottle (11 oz capacity) (12.40 oz.) or
- Fuel bottle (20 oz capacity) (18.80 oz.)
Water Supply gear
- Narrow Nalgene bottle (16 oz. capacity) (3.65 oz.)
- Smart-water bottle
- Water filter (Katadyn Hiker Microfilter, 11 oz.)
Wind and rain protection
- Balaclava (2.65 oz. Ultralight version)
- Rain jacket (10.65 oz.)
- Rain skirt (2.9 oz. Easy to put on and breaths better than pants. However, pants are better in cold and windy weather.)
Packed clothing
- Ultra-Light Down jacket (18.55 oz.)
- Base-layer underwear—leggings (4.4 oz., nylon)
- Base-layer shirt (3.55 oz., Capilene )
- Liner socks (1.60 oz.)
- Socks (thick 2.60 oz.)
- Fleece Liner gloves (0.90 oz.)
- Gloves: Waterproof thermal gloves (4.65 oz.)
- Beanie (2.4 oz., synthetic)
- Waterproof stuff sack (0.40 oz.)
- Mosquito net head cover (0.5 oz.)
The Big Three
Backpack
- Backpack, (2.03 lbs, Gossamer Mariposa 60 liter)
- Pack rain cover (1.95 oz.)
- Water bottle holster (1.83 oz., fits on hip belt)
- Cell phone case with lanyard (This provides added security for your phone in the wilderness. One hiker leaned over to collect water and his phone went straight into the stream never to be recovered. A lanyard case could have saved his phone.)
- Cell phone holder (1.35 oz, attaches to shoulder strap)
Sleeping system
One sleeping bag based on summer weather forecast:
- 30º Sleeping Bag (1 lb. 3.8 oz., REI, lower limited rated 30º I use it for 45–65ºF weather)
- 15º Sleeping Bag (1 lb. 12.2 oz., REI Magna, lower limit rated 16º. I use it for 25–45ºF weather. )
- Dry sack or plastic bag to protect sleeping bag (0.40 oz.)
- Sleeping pad (air, 6.9 r-value) (17.50 oz.)
- Solid-core foam pad (Therm-a-Rest Ridgerest Classic, 2 r-value, 13.75 oz., regular size)
Tent
- 3-season free-standing solo tent There are many good options such as a Hornet OSMO Ultralight 1P Tent, Big Agnes Copper Spur UL1, or North Face Stormfront (for higher winds).
- Tent poles with pole sack (14.50 oz.)
- Tent stakes (x4) (5.95 oz.)
- Guylines for rocks (x6) (o.70 oz.)
- Stuff sack (0.65 oz)
Traction
- Snowshoes (4 lbs, Spring)
- Micro-spikes (13.45 oz., Shoulder seasons)
- Crampons (1 lb. 12.5 oz., Spring)
- Ice axe (14.35 oz., Spring)
Luxury gear
- Air-mattress pump (3.15 oz.)
Circumstantial / Miscellaneous Gear
Many of the items on my gear list above will only be included in my pack depending on weather and terrain conditions. Here are some other contingent items:
- Extra fuel (As a safety measure, I recommend every team member have a stove, extra fire starter, and extra fuel)
- Mosquito Net Tent: (14.7 oz.) Sometimes a large mosquito net tent (square type) is useful for communal cooking.
- Ice Ax (16.50 oz. Important for some destinations, especially in the shoulder seasons, but also in winter. Sun and wind can create very hard and icy slopes at any time of the year. Not useful in early-season fresh or deep snow.)
- Crampons (28.00 oz. Important for some destinations in the summer and shoulder seasons.)
- Bear-resistant food container (32.00 oz. A generally helpful tool that is now required in much of Washington State beginning April 2023.)
- Seat pad (2.15 oz. Optional. I take this if it is unlikely the full-size pad will be needed.)
- Water filter (13.75 oz. Useful in the summer and shoulder seasons. Problematic and not recommended in freezing weather.)
- Pants, extra. (10.00 oz. Recommended if river forging and/or wet weather is anticipated. Sometimes, rather than take a baselayer for when I’m sleeping at night, I take extra lightweight hiking pants and t-shirt. I always want some sort of night layer that is fresh to stay warm and keep the sweat and grim off the sleeping bag.)
- Alkaline batteries (extra, recommended for all trips. Lithium batteries are not recommended for avalanche transceivers because of sudden battery death without warning.)
- Bear spray (12.30 oz. If you want self-defense, this non-lethal tool is the only method I recommend. There has been only one fatal black bear attack in Washington State and that was 40 years ago. The entire state of Washington has an estimated 2000+ cougars and over the past *century*, the state has experienced only two fatal cougar attacks. Accidental hunting incidents in Washington state between the 1950s–2010s were 1,811, most by hunters aged 10–29. A report published by American orthopedic surgeons Randall Loder and Neil Farren in 2014 showed that between 1993 and 2008, 35,970 firearm-related injuries involved in hunting were reported to U.S. hospitals or about 2,400 per year over the 15-year period of the study. If you are concerned about safety, wear bright clothing, and don’t run or bike on trails.)
- River shoes for river crossings (6.15 oz.) or water slippers (1.1 oz.)
- Trekker Chains: Similar to microspikes, but with chains and no spikes. These are useful on coastal hikes that have long stretches of large slippery shore rocks.
- Dry sack or plastic bags for boots and camera when crossing rivers. This assumes you already have a dry sack for your sleeping bag and extra clothing.
- Cathole Trowel (2.85 oz. Better to pack your poop out with a Wag Bag. On some routes, a Wag Bag is required, such as Mount Rainier, Mount Adams, Ptarmigan Ridge, etc.)
- Pack cover (3.15 oz.)
- Tent ground cloth (4.45 oz. Not necessary on snow but helps your tent longevity on dirt and rock surfaces.)
- Snow Shovel: Sometimes worth taking in the summer to dig a cooking pit. Keep in mind that snow shovels are not made for hard snow. You chop the snow first before lifting. Do not leverage the shovel in hard snow.
Clothes Checklist (wearing)
Rather than search for hiking clothes the morning you will be leaving for the trailhead, use this list or your own list to gather everything you need in one place the day before the event.
- Briefs (2.80 oz.)
- Convertable hiking pants (14.70 oz.)
- T-shirt (4.25 oz.)
- UV shirt with hoody (known as a “fishing shirt” 7.85 oz.)
- Thermal shirt base layer 3.60 oz.)
- Liner socks (polyester, 1.60 oz.)
- Thick outer socks (wool or polyester) (2.60 oz.)
- Belt (2.00 oz.)
- Cap (1.75 oz., I recommend a “jogging/running” cap because those are lighter and made of nylon, meaning they will dry off quicker.)
- Gaiters (6.30 oz., Useful in rainy and muddy conditions in the summer.)
- Boots (Rigid type for Crampons, more flexible type for microspikes)
- Hiking poles (15.65oz. Attach to your pack to make sure they get to the trailhead the day of the hike.)
Camera Gear (optional)
- Camera (wearing) (1 lb 12.90 oz.)
- Lens cover & harness (4.06 oz.)
- Extra battery (1.75 oz.)
- Extra Flash card (0.15 oz.)
- Plastic bag for the camera (0.40 oz.)
Regular Extras
- Cell phone (4.00 oz.)
- Cell phone USB charger (6.85 oz., 10,000mAh)
- Keys (0.70 oz.)
- Wallet (1.25 oz.)
- Glasses (+ extra 1.60 oz.)
For the Car
- After-hike car clothes
- Shoes
- Socks
- Shirt
- Plastic bag for boots
- Gas money
- Forest/Park/Snow pass
- Cell phone charger cord
- 30″ bow saw (for downed trees on the road)
- Tow straps
- Tire chains (+pliers and gloves)
- Flashlight
Comments: Please leave comments below. I like hearing from other hiking and wilderness enthusiasts. Help me improve my content with your suggestions. Be aware I get a lot of AI-generated spam. You have to be specific so I can recognize your comments as genuine.
2 replies on “What’s in my Summer Backpack”
Always appreciate your thoroughness and thoughtfulness. Your approach will definitely assist a new comer and also help old timers take another look at what their carrying. Keep it coming!
Thanks Daniel. I appreciate your responses.