When I started out backpacking as a teenager, my first “stove” was a series of home-made paraffin burners (cardboard rolled into empty food cans and covered in wax). Eventually, I acquired an Optimus Svea stove which I really enjoyed. It sounded like a jet plane, but it worked well and was reliable. The simplicity of the design makes the Svea perhaps the most reliable liquid fuel backpacking stove. I eventually gave it away, but later in life when I returned to backpacking I decided on an MSR Whisperlite International, which is also a liquid fuel stove and the one that I still use.
Why did I switch from the Svea to the Whisperlite? I’ll explain that later at the end. My purpose here is not to review different liquid fuel stoves in detail, but to talk more generally about why liquid fuel stoves work better for winter backpacking. I will also discuss some tips for operating the more common Whisterlite stove (either International and Universal models).
“In the most extreme conditions, your best bet is a liquid fuel stove. The remote fuel bottle allows you to manually maintain the stove’s pressure in any conditions for reliable output.” —MSR, 2020
Liquid fuel stoves are not the lightest stoves, nor the cheapest, so they cannot win in the ultra-light category, nor on price. Those points aside, liquid fuel stoves have many important advantages, but there are four that stand out:
- Liquid fuel stoves work well in very cold conditions because the hand pump allows you to maintain fuel pressure. The temperature really doesn’t matter. It can be 45º F, 10ºF, or –30º F, the stove still works the same. This is the foremost important point about liquid fuel stoves. They work in the cold. It works when other stoves don’t. When you find yourself in really cold temperatures, that’s when you need a stove most to restore your water supply, cook meals, and create hot water bottles for the night.
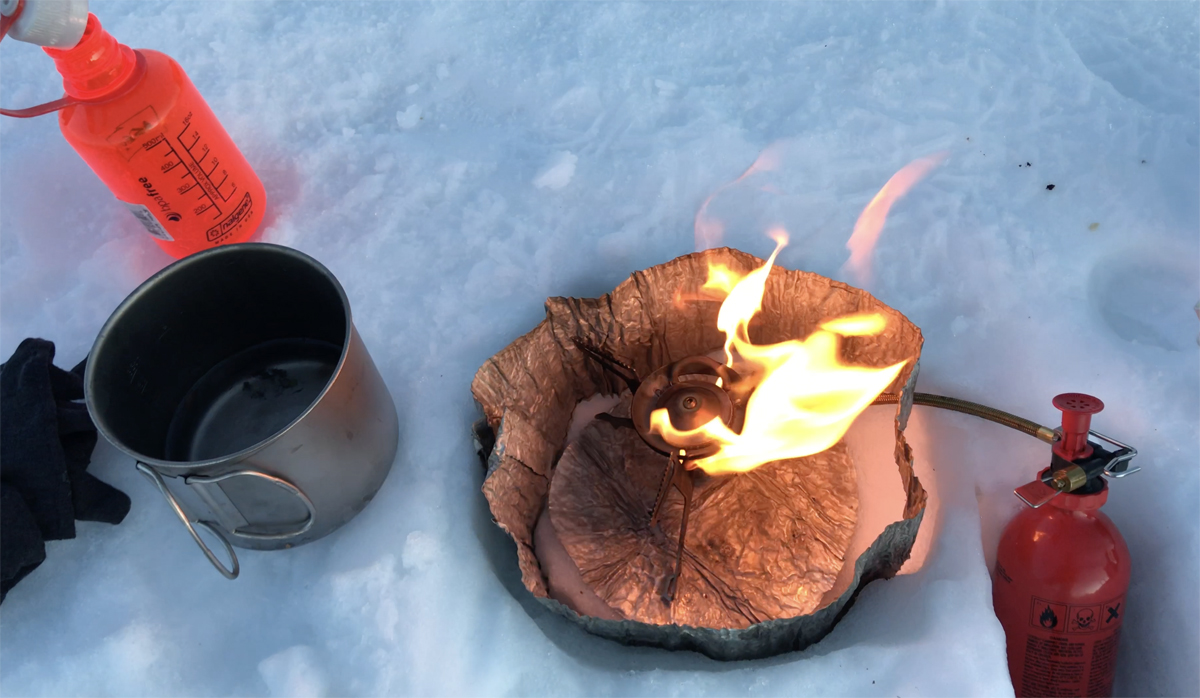
- The stove can be shielded from the wind, which is critical to efficiency, and this can be done without putting the fuel bottle at risk of explosion.
- It can be serviced in the field. This is true for both the Svea and the Whisperliter. The Whisperlite stove also has “Shaker Jet™ technology” (an internal needle in the value) that allows self-cleaning with a gentle shaking motion. But when that’s not enough, you can do basic repairs in the field—clean all the fuel pathways, replace any damaged seals, lubricate the pump cup, or swap out the main value. MSR has useful tutorials for routine maintenance of the stove and pump. You can practice at home so it is less difficult when you have to do it in the cold, windy, dark of the night.
- The fuel bottle is refillable. It is also easy to look inside and check the fuel level. This also means you don’t have stacks of empty canister cans laying around.
Some hikers will argue that the liquid fuel stove’s greatest advantage is that it can run on different types of fuel if white fuel is unavailable. That is, fuel can be found in almost any place around the world, but canisters for backpacking stoves, not so much. This point, however, has never been an issue for me. Fuel for liquid fuel stoves is cheaper too, but I don’t think the cost difference is so major that most people care.
Another advantage is stability. The liquid fuel stoves have a lower profile and that makes them less likely to tip over on the snow. That said, attachable canister stands exist that help solves the canister stove stability problem. So I tend to just point to the above four main advantages: works in cold temperatures has a windshield, can be serviced in the field, and is refillable. These features make the liquid fuel stove the best choose for cold winter conditions.
Bring extra fuel
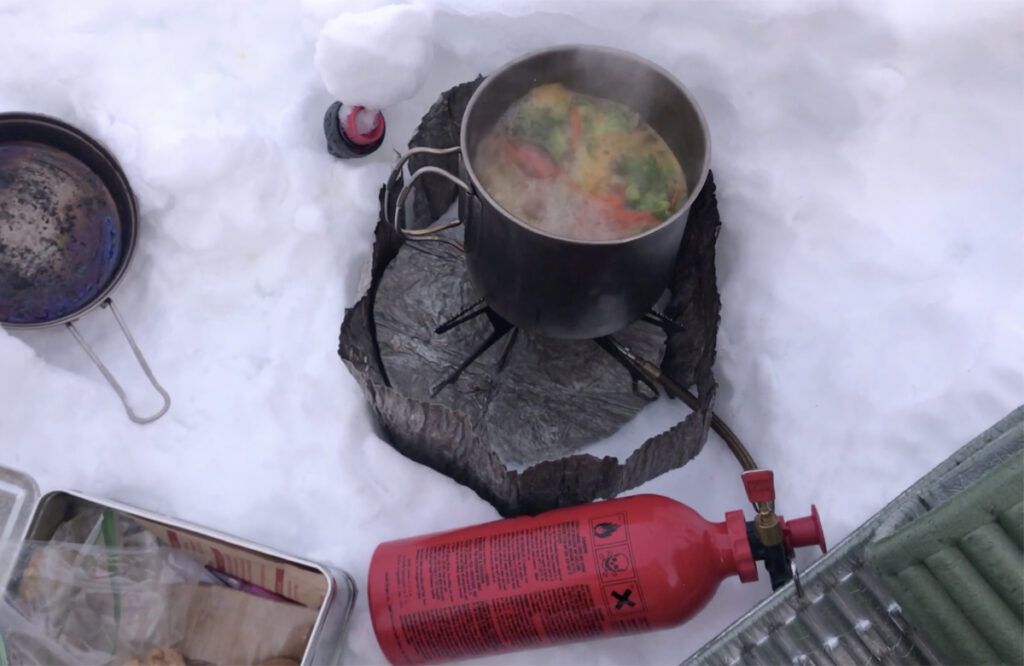
You will use more fuel in winter. Avoid taking the minimum amount to save weight. If you’re on a 1–2 night trip have two full canisters of fuel or if you are using a liquid-fuel stove, bring a full 20-ounce fuel bottle. Fuel consumption will depend on how cold it is, how much snow you melt, how many meals you make and hot water bottles you make. Usually, you’ll be chatting in the cook area in the evening and drinking miso or tea and putting hot water bottles inside your jacket. We have had as many as four hikers show up on one trip without enough fuel.
Reliability
For the longest time, my Whisperlite stove performed well with no maintenance. I did nothing to maintain it and never bothered to carry any tools. I just assumed it would always work. The first time my stove failed, it was not the stove, but me. I forgot the stove pump. I had failed to do a proper visual gear inspection before packing. Thankfully, someone with a canister stove helped me. The second time it failed, I didn’t have any tools to clear the fuel pathway. Once again, someone with a canister stove assisted me. The stove has failed maybe three more times, but each time I used a maintenance kit to clean the stove and get it back into service. I have always been able to get it working even in harsh conditions.
Hikers using canister stoves have helped me out, just as I have helped them. No group should rely on just one stove. For safety in winter conditions, everyone should carry their own stove.
Although I have the Whisperlite International, I think now that the Universal may be a better model for use in groups, simply because this would likely mean everyone in the group could share fuel. That is, if a canister stove failed, that person could at least attach their fuel supply to the working liquid fuel stove.
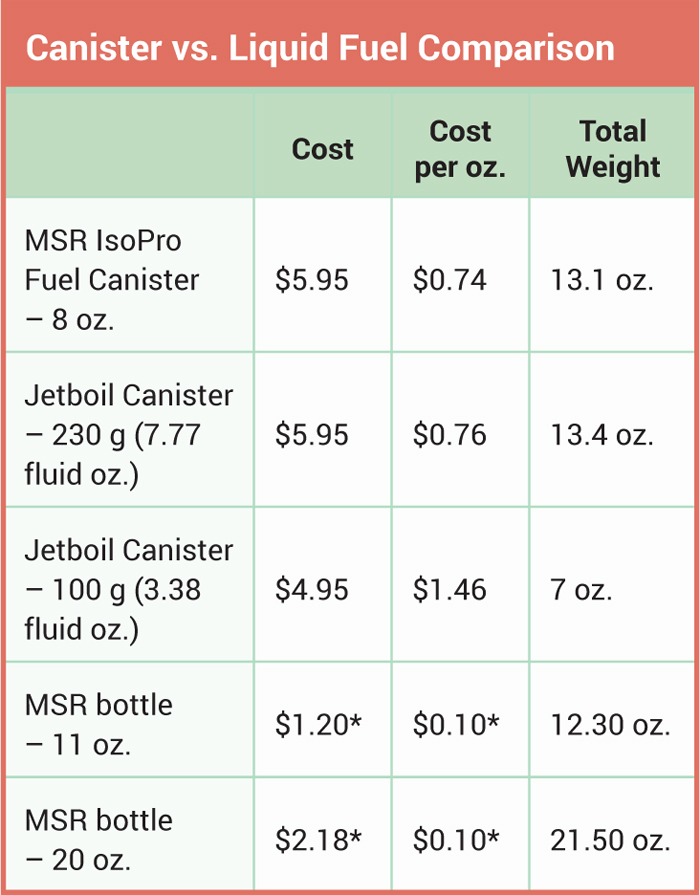
Because I can’t attach a canister to my stove, I do carry extra fuel in case someone’s stove fails. An 11-ounce bottle is more than enough for one person on a typical 2-day weekend trip, which usually involves melting snow 2–3 times:
- One snowmelt/boil to refill Nalgene bottle or flask for drinking and cooking in the evening.
- One snowmelt/boil to create a one liter Nalgene hot-water bottle for staying warm at night.
- One snowmelt/boil to refill a Nalgene bottle or flask for drinking and cooking in the morning.
If an 11-ounce container of fuel will burn for 60 minutes and it takes even 6–10 minutes to boil a liter of water in cold conditions, I can expect to boil 6–10 liters. In warmer conditions, it is supposed to be able to boil just over 14 liters.
Recently, I started carrying a 20-ounce fuel bottle because it often happens that I need to help others out. Sometimes I will be heating water for as many as three different hikers in our group who all have canister stoves that are not working. For reliability, I give the Whisperlite a very high score. I need to be confident I can resupply my water from snow when necessary.
Tips on how to operate a Whisperlite Stove
There are two things that you may not notice when you first starting operating the stove if you do not try to understand the functionality of the design.
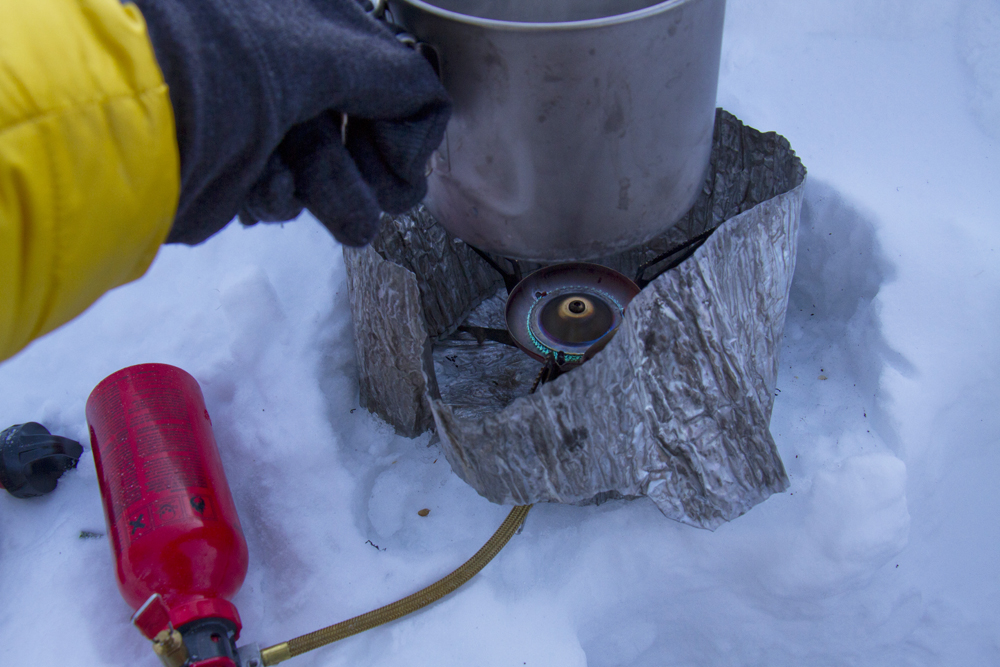
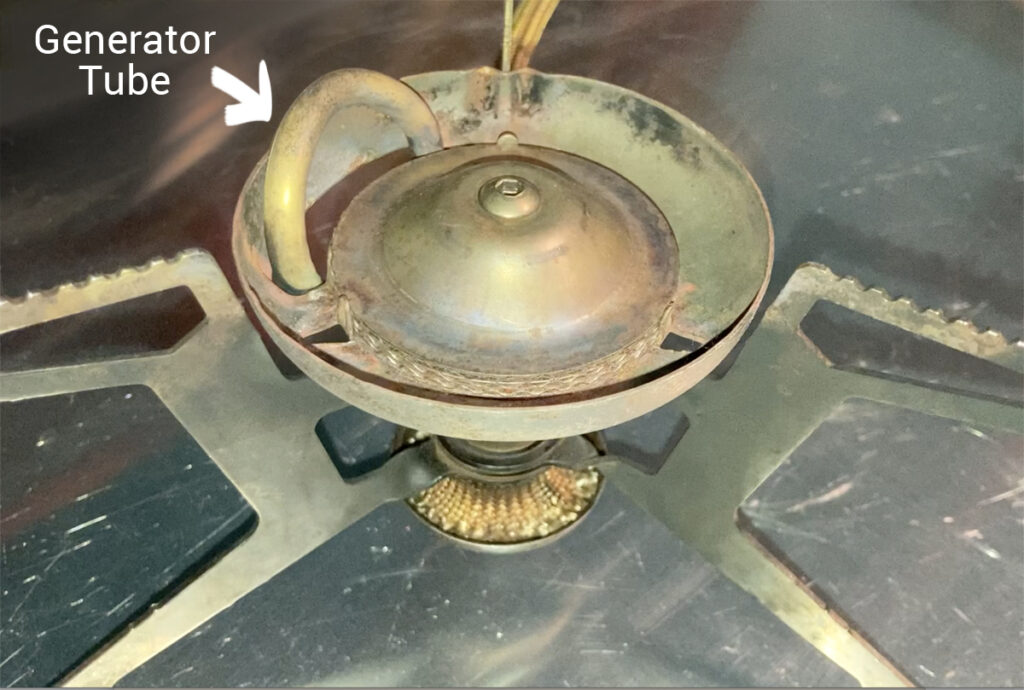
First, the position of the fuel bottle matters. For best results, it neess to lay on its side, especially when the fuel is low, and the fuel control value needs to be pointing up. When the fuel control value is pointing up, the fuel tube is able to reach the fuel at the bottom of the fuel bottle. See diagram below.

Second, the primer flame needs to heat the generator tube which is situated on one side of the stove. Make sure the wind isn’t causing the flame to drift away from the generator tube. Try to position the stove to concentrate the flame on the generator tube so that it gets hot quickly and fully.
For the full instructions for operating a Whisperlite stove, see the manual.
Cold Weather Troubleshooting
Although the manual pump on the liquid fuel stove allows the stove to maintain a consistent high-efficiency flame once operating, the stove can be affected by cold weather. There are two problems.
First, moisture can collect in the fuel jet preventing the liquid fuel from filling the primer cup. To remove this blockage, warm the stove or manually clear the jet pathway with the needle tool.
Second, the pump itself can seize up. If you force the pump plunger, it may give way and appear broken. That is, the pump plunger will loosely move back and forth with no resistance because the pump cup (a seal at the bottom of the plunger) is too stiff or needs lubrication. Warming the pump, such as putting it under your arm or just patiently pumping it for a while, will usually restore the seal’s traction and start to build the necessary pressure to make the fuel flow. Rather than forcing the pump plunger, warm the pump, and it will begin to function as it should.
Sometimes, the problem is not cold temperature but a dry pump cup that needs lubrication. The problem is rare, but it does occur. Maintaining the stove annually and lubricating the pump cup will reduce this problem.
Additional troubleshooting tip
You connect the fuel bottle and stove and pump up the fuel pressure. You then gently release the fuel control value and instead of fuel filling up the priming cup, you hear what sounds like a bicycle tire air leak. The cause is the problem is the fuel tube has fallen off inside the fuel bottle. You must take the pump off and retrieve the fuel tube (not easy). The fuel tube is replaceable, so it is not permanently attached. If you have the Expedition Maintenance Kit with you it contains a replacement fuel tube. It sometimes happens that it comes loose while being packed in your pack. For this reason, it is best to check it to make sure it is firmly inserted before attaching the pump to the bottle.
Stove Comparisons, fuel cost, weights, etc.
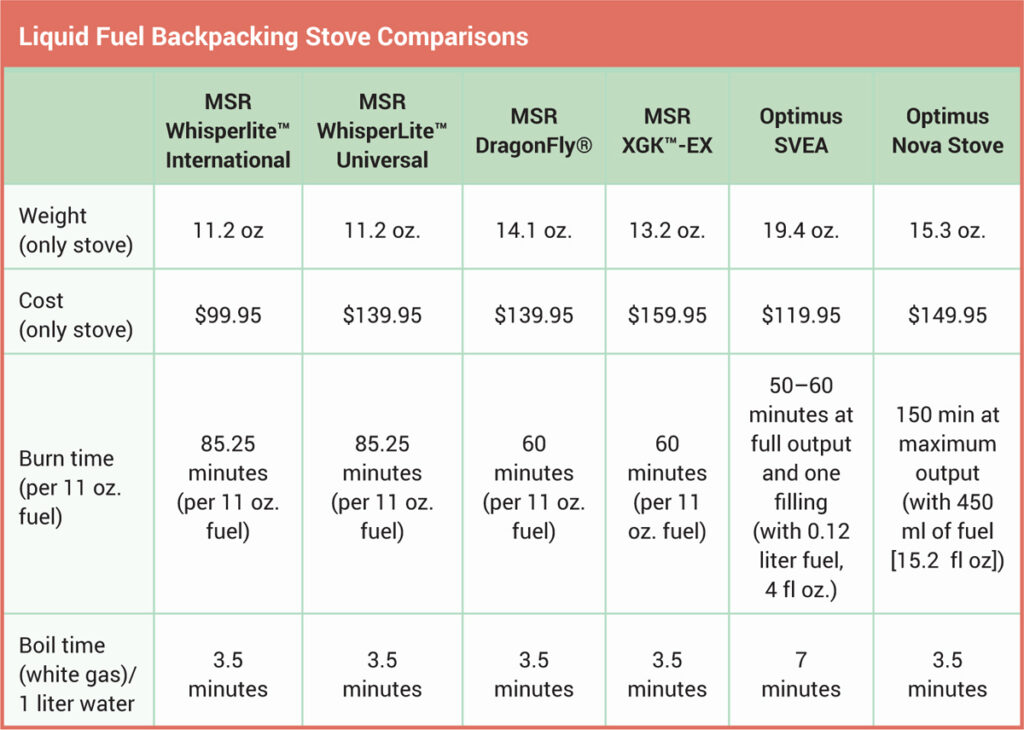
One reason hikers would want to use the same stove year-round is the expense of a second stove. Even though a liquid fuel stove system is more expensive than a canister stove at first, in the long haul it is less expensive because you will save money on fuel costs and reuseable fuel bottles. A liquid fuel stove can last a lifetime.
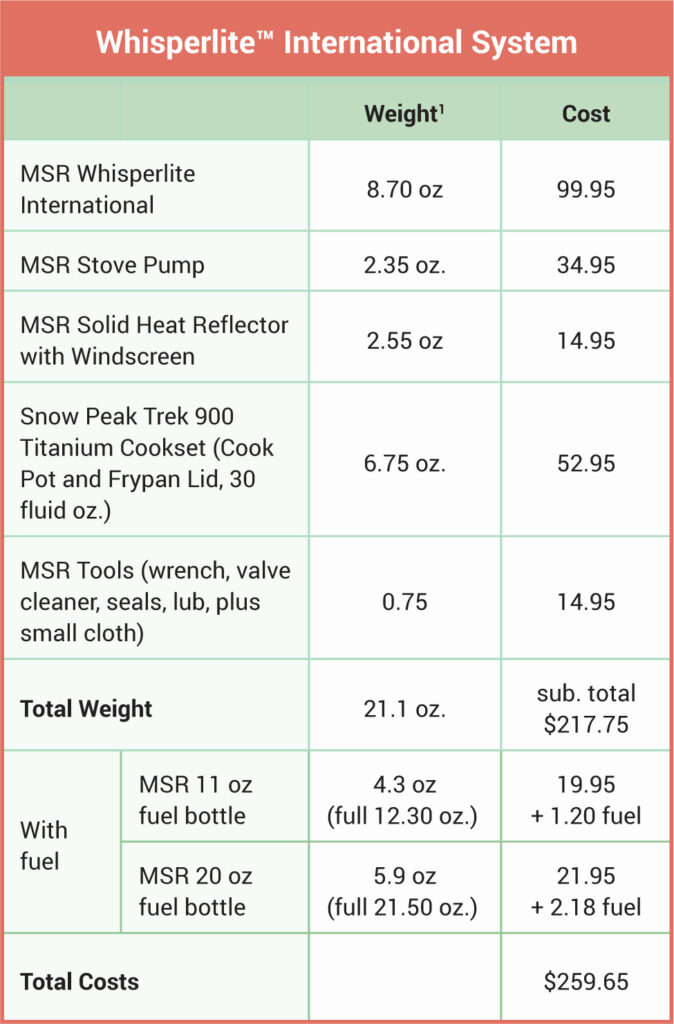
In the above table, I’ve added up everything in my stove system, including a cookpot with lid and two fuel bottles, but not a lighter. If you already have a suitable cookpot, you can exclude that expense ($52.95).
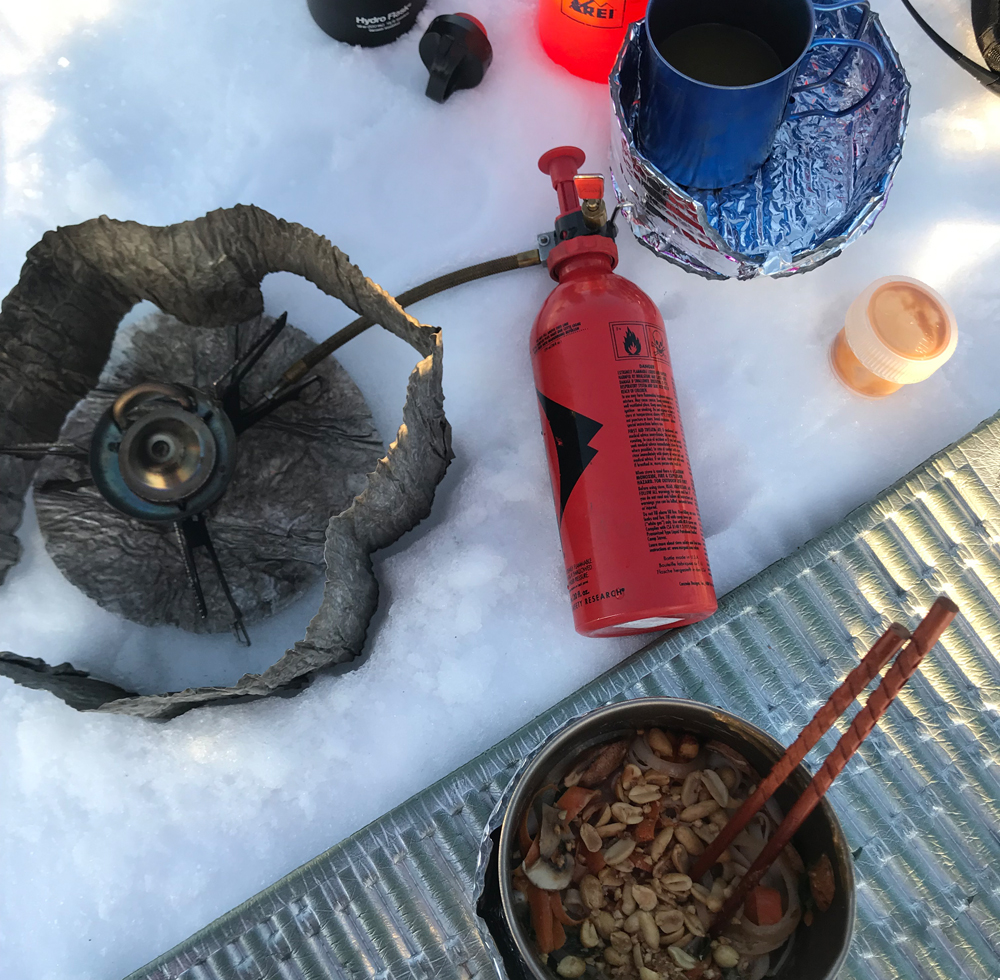
Notice that I have chosen the Snow Peak 900 Titanium Cookset. Other cookpots will work with a liquid fuel stove. I prefer the Snow Peak 900 because it holds around a liter of water, which is useful for melting snow. The lid fits tight enough to hold in heat and the lid also works as a frypan. The frypan is small but ideal for street taco size tortillas. It is also better for scooping snow than a standard flat lid. For these reasons, I think the Snow Reak 900 is an ideal winter backpacking cookpot.
Let me know your thoughts. If you have tips for how you keep your canister warm in winter or success or failure stories in cold conditions, let us hear your experiences. Please leave comments below.
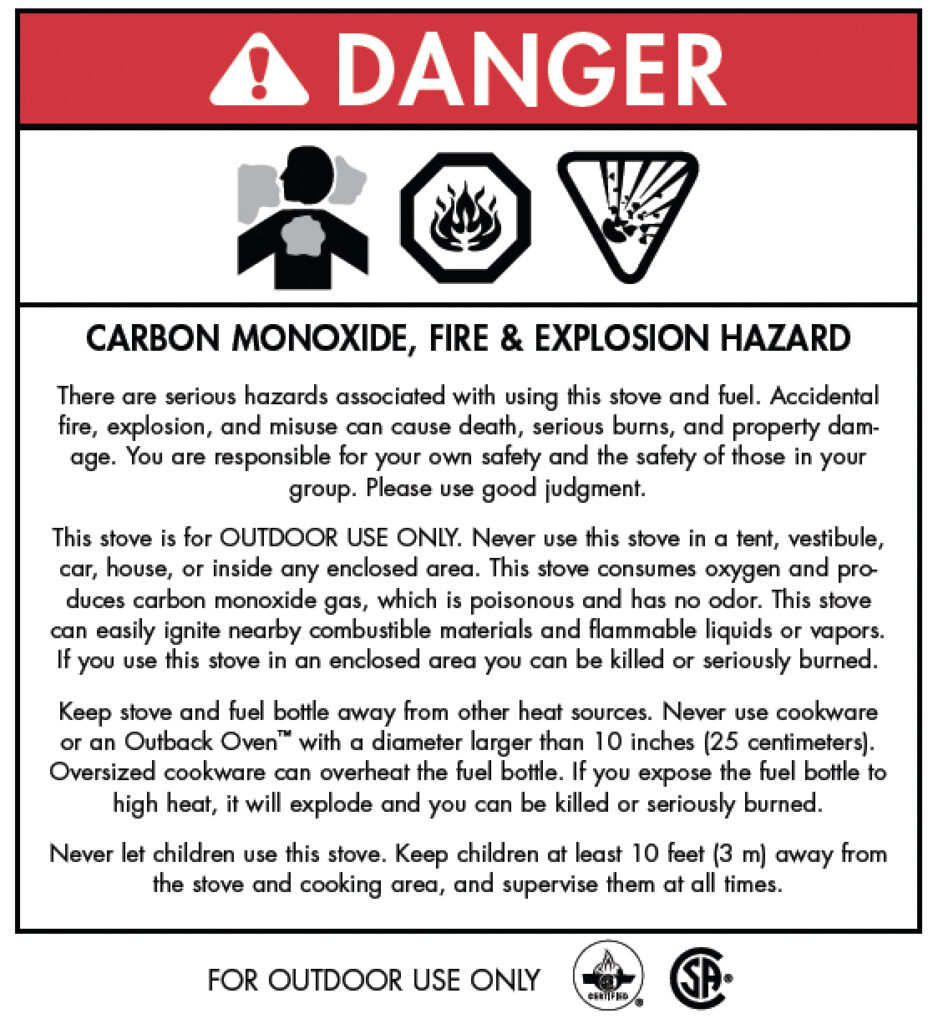
Stove safety
In theory, the most desirable convenience of canister systems is the ability to ignite the stove in a tent vestibule without having to contend with a large primer flame. That said, for safety reasons, I would not use a stove in a tent vestibule. If you take that risk, please take care that fumes are not entering your tent and the vestibule is open or well ventilated.
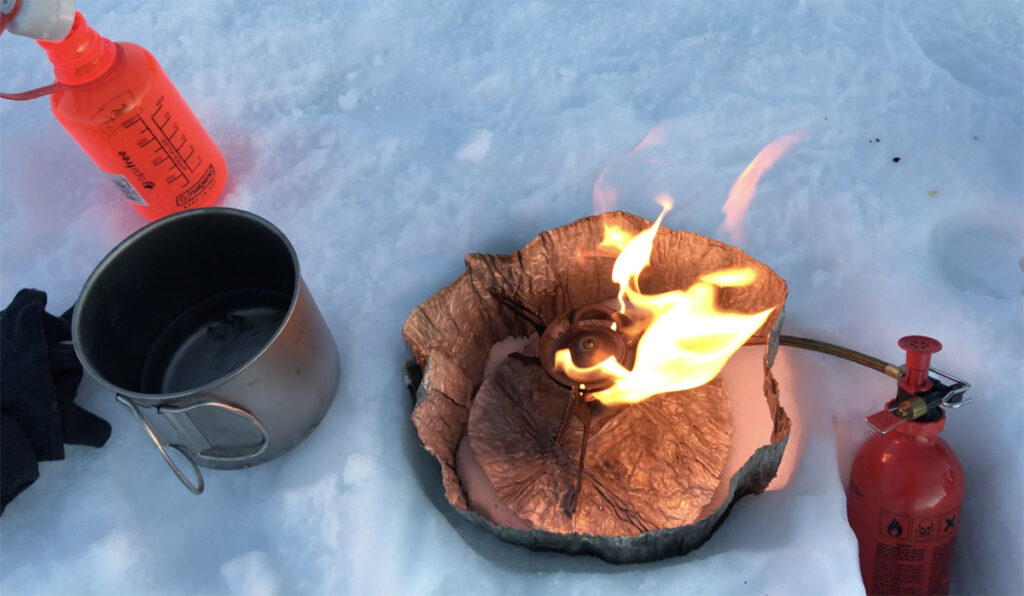
On a liquid fuel stove, the fuel pump causes fuel to flow into a primer bowl, which you manually light. This fuel creates a large flame that heats the fuel coil. The hot coil vaporizes the liquid fuel passing through the coil and creates the blue cooking flame. The initial primer flame can be large, so I never ignite my stove in my tent or near anything that could melt or catch on fire. I always operate the stove out in the open.
I usually dig a large cooking pit in the snow or, on very windy days, a small hole in the snow outside the door of my tent. It is in these sometimes harsh conditions that I understand why some hikers take the risk of using a canister stove system inside a tent vestibule. Because of the risk of carbon monoxide poisoning, I’m resigned to keeping my stove outside my tent. I carry some backup food that doesn’t require cooking when I encounter conditions too severe for my stove. Usually, even in cold and high winds, I can keep my body protected in my tent while operating the stove outside the tent door.
Carbon Monoxide (CO) Poisoning
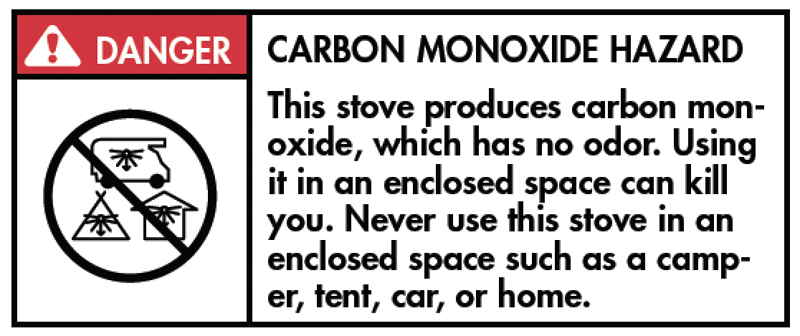
Be very careful about carbon monoxide poisoning. When the weather is cold and windy you’ll be tempted to use your stove in an enclosed tent vestibule. The CDC advises against using any fuel-burning device in a tent. If you use a ventilate for your stove do not seal it up! Using a stove in a tent vestibule is also dangerous. The deadly fumes are odorless and have killed hikers and climbers. This is a real danger and if you search the topic there are many tragic stories and statistics. Some symptoms of carbon monoxide poisoning are similar to the less dangerous altitude sickness. More here.
BE CAREFUL ABOUT CARBON DIOXIDE (CO2) LEVELS TOO
Even aside from using a stove in a tent, care should be taken to prevent Carbon dioxide (CO2) levels from reparation in an enclosed tent from rising too high and creating an oxygen-deficient atmosphere. Let your tent breathe at night. Leave the door open or partially open when you can, and be mindful about clearing away snow buildup that can block ventilation. I almost always sleep with my tent door and top vent open even with a double-walled tent that breaths well.
So why did I switch from the Svea to the Whisperlite?
The MSR Whisperlite (11.2 oz.) is lighter than the Svea (19.4 oz.). It might be argued that the Svea includes a small built-in fuel tank, but even with a fuel bottle, the Whisperlite is lighter.
The MSR Whisperlite is the most common liquid fuel stove used in the Cascade Mountains (my unscientific observation). For teams, it is good to have compatible stoves.
The Whisperlite is also a little easier to use in cold weather. The Svea needs to be warmed with one’s hands to cause the primer fuel to flow out, or warmed with a flame (small fire) or the primer bowl can be filled manually. On cold mornings I don’t want to be warming a stove any more than I have to, so I would likely end up priming it manually which is not convenient. The Whisperlite uses a manual pump to create fuel pressure. I also prefer a larger Titanium pot for melting snow, rather than the small aluminum pot that comes with the Svea. All that said, I kind of miss the Svea. It was my first stove and I have great memories using it.
Let me know your thoughts or questions. Please leave comments below.
2 replies on “Why Use a Liquid Fuel Stove?”
This really is an excellent and instructive review.
Great insight into the mechanisms used.
I only used the same Optimus 8R for 54 years. And used it a lot in the cold Canadian Winter. Spoiled now with the Dragonfly. The simmering capabilities are spectacular. Also easy to assemble and run with mitts on.
It would be cool to see a Optimus 8R in use. MSR and Jetboil seem to have cornered the market in the PNW.