When packing a winter backpack, safety is an important consideration. In winter, how you pack matters more than any other time of the year. For example, when you reach the crest of a ridge and encounter a severe wind chill, your rain jacket and gloves need to be at the top of your pack or easily accessible. This post reviews safety considerations and general packing methods.
Top Safety Tips to Know
- Put liquids on the exterior of your backpack: Water and fuel need to be stored on the exterior of your backpack, typically in the side pockets. Otherwise, you risk leaking fluids onto your sleeping bag and camp gear which will put you at risk of hypothermia. Keeping your gear dry is a priority. Do not use a pack bladder in winter! There are water bottle holders that go on shoulder straps and hip belts so that you can easily access a water bottle or flask while hiking. Water has to be managed differently in winter.
- Secure your gear: All items attached to the exterior of your backpack need to be secured to the pack and not merely resting in a pocket. Do not put items such as water bottles in side pockets without clipping them to the pack. Falling in deep snow is common and gear will fall out of your pack pockets and disappear into the snow. You will not hear it fall out and you may not see it in the snow. Losing unsecured gear such as micro-spikes, crampons, cell phones, and water bottles, is common when hikers are glissading. The most secure way to carry a cell phone is to use a case with a lanyard.
- Put everything else inside your pack. You will likely need to put your solid pad on the exterior of your backpack and sometimes your snowshoes. However, besides liquids, everything else should go inside your backpack or as much as is possible. That includes your snow shovel and avalanche probe, tent poles, etc. If you are hit by an avalanche you do not want your rescue gear to be lost or ripped off your backpack. If you are descending a steep slope and it is unsafe to continue with a heavy backpack on your back, you may need to release the pack and allow it to slide down. To prevent gear loss in such a situation, the gear needs to be secured inside the pack. Also, if you are navigating difficult terrain, having the gear inside your pack reduces the chances of it getting caught on tree limbs or rocks.
- Wind and rain protection: Gear, such as your rain jacket, waterproof gloves, and mittens need to be easily accessible when you need protection from moisture and wind chill. The sleeping bag and camp clothing needs to be packed in a way that is waterproof, such as in a plastic bag, dry sack, or pack liner.
- Pack weight: The heavier and larger your backpack is, the more difficult it is to balance on steep slopes and river crossings. Keeping pack weight to a minimum and positioned low in the pack, as well as keeping the overall pack size small will help you balance and feel more secure and confident in hazardous terrain.
The Gear Hierarchy
This photo shows an example of gear placement in a backpack, from top to bottom. In this image, the strategy is to keep the heavy weight low in the backpack and items that may be needed during the hike at the top of the pack or more easily accessible. The hard items such as tent poles and cooking pots are positioned away from the center where they could create discomfort.
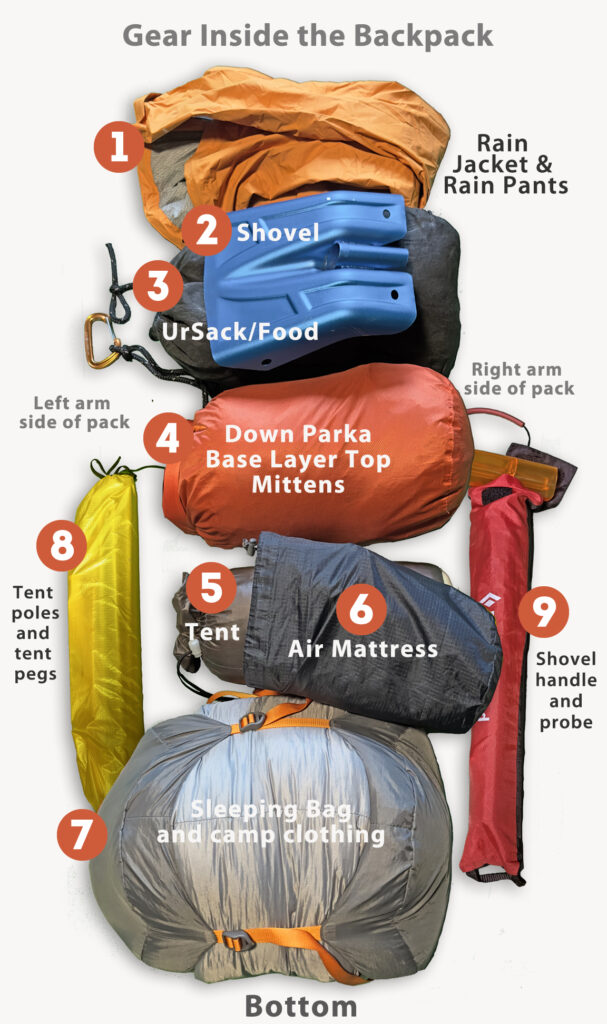
- On top, my rain parka and rain pants (rain and wind protection). These are at the very top where they can be easily accessed. If there is no rain or wind in the forecast, the rain pants can go deeper in the pack because they are likely to only be needed around camp. (If there is snow or cold high winds, I switch my lighter rain pants to a heavier full-zip version and place it at the top of pack with my rain jacket. The full-zip rain pants can be easily put on while snowshoeing.)
- Snow shovel is placed at the top so this recue item can be reached quickly. The snow shovel is a useful tool around camop, but it is also an essential safety item used in avalanche rescue. It should be easily accessible on the inside of the backpack.
- Bear-proof food bag or canister. On short trips this can includes food, stove, and cooking gear.
- Down parka, thermal base layer top, and mittens.
- Tent
- Air mattress
- At the bottom is a compression sack that contains the sleeping bag and most of the camp clothing (thermal bottom base layer, down pants, down booties, dedicated wool socks). These items are all compressed together into one stuff sack. (This particular stuff sack is not waterproof so I will put a plastic trash bag around it to secure the gear from moisture.)
- Tent poles and tent pegs.
- Shovel handle and probe are together on the right arm side of the pack (inside the pack). Both the shovel handle and probe are in the probe sack so these rescue items can be removed quickly with one motion. They are always on the right arm side of the pack so there is no searching for them and their location can be conveyed to other hikers quickly.
Balance
Keeping pack weight to a minimum and positioned low in the pack, as well as keeping the overall pack size small will help you balance and feel more secure and confident in hazardous terrain.
Gear on the exterior and in hip belt pockets
Ideally, there should be as few items on the exterior as possible.

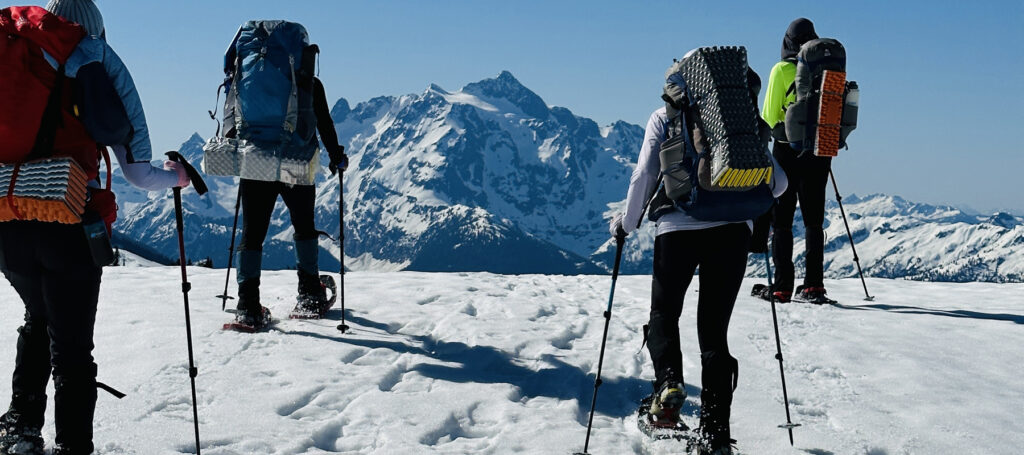
- Snowshoes
- Flask (hot water or tea)
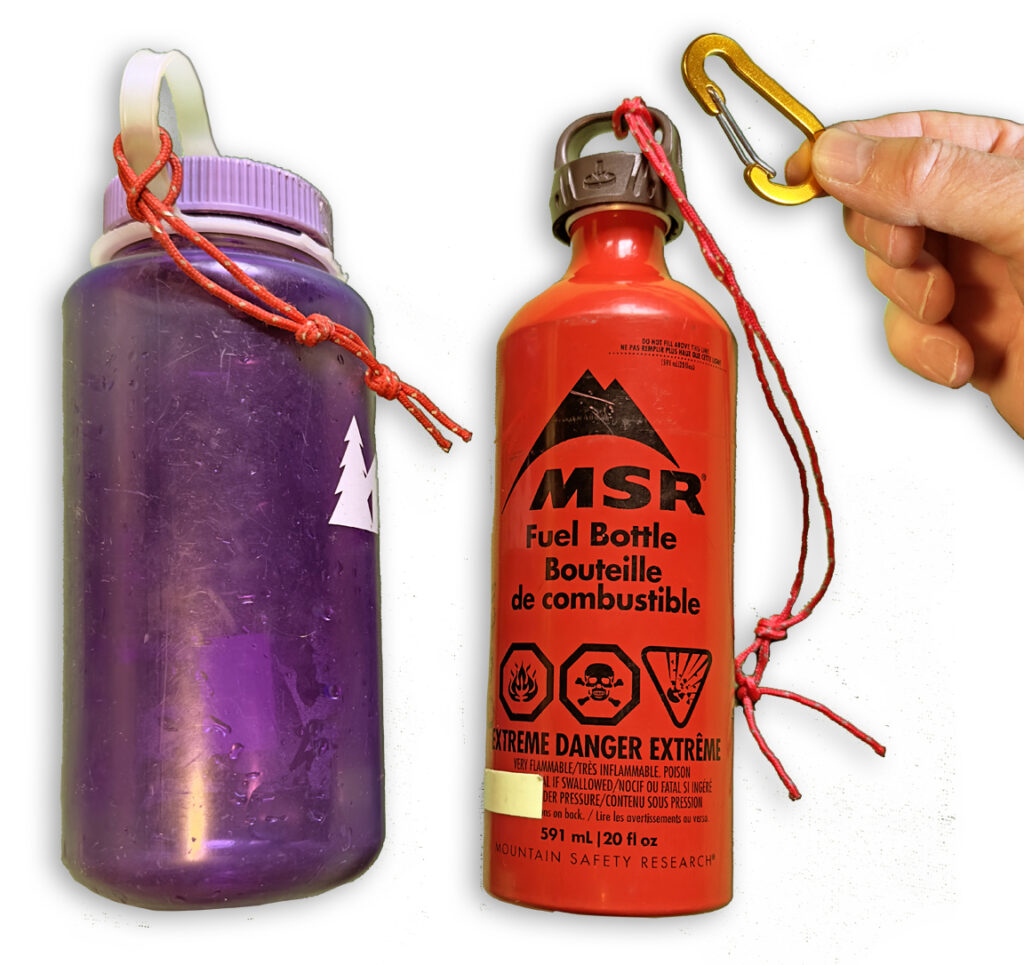
- Fuel bottle for liquid fuel stove and Nagene bottle (the Nalgene is usually empty and used for a hot water bottle at camp)
- Snacks in hip belt pocket
- Holster holding water bottle on hip belt for easy access while hiking
- Solid pad (top, bottom, sides—doesn’t matter)
- Hip belt pocket items: Head lamp, extra batteries, sun screen, lighter, chewable aspirin (for cardiac difficulties for anyone in the group)

Pack lids
Pack lids can be useful, but if you need to reduce weight, I recommend eliminating it. Not having a pack lid will give you quicker access to your gear while you are on the trail.
Occassionally, I have more gear or food than fits in my pack or small items I prefer to be easier to reach. When that happens, I either use the outside large pocket on the pack or attach a ultra-light daypack to the exterior of my pack.
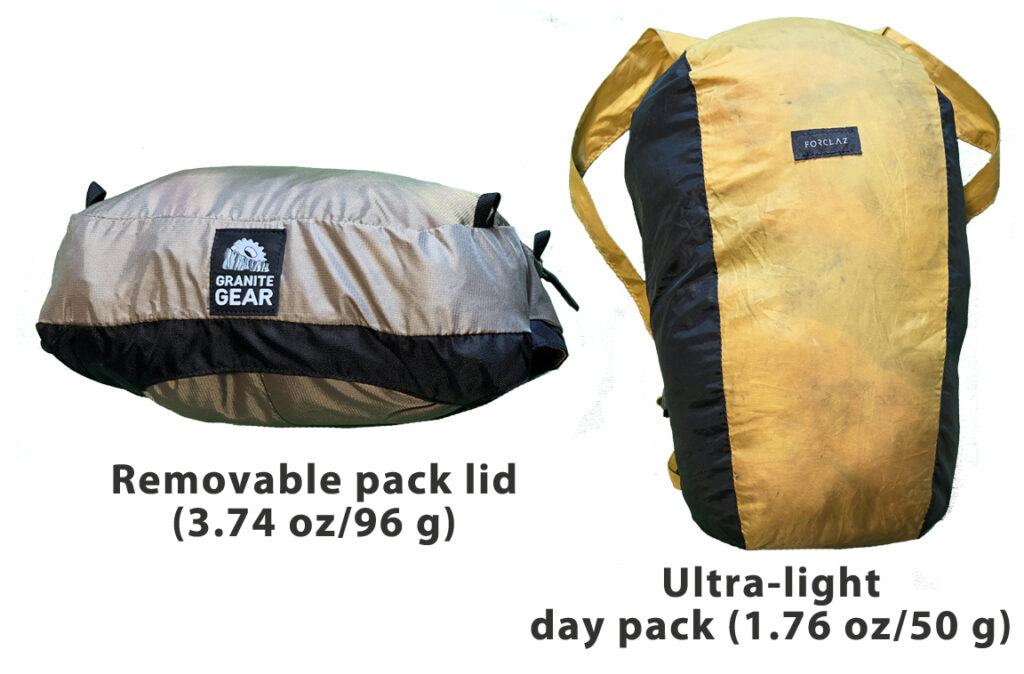
Ultra-light day packs tend to weigh less than pack lids and are more versitile.
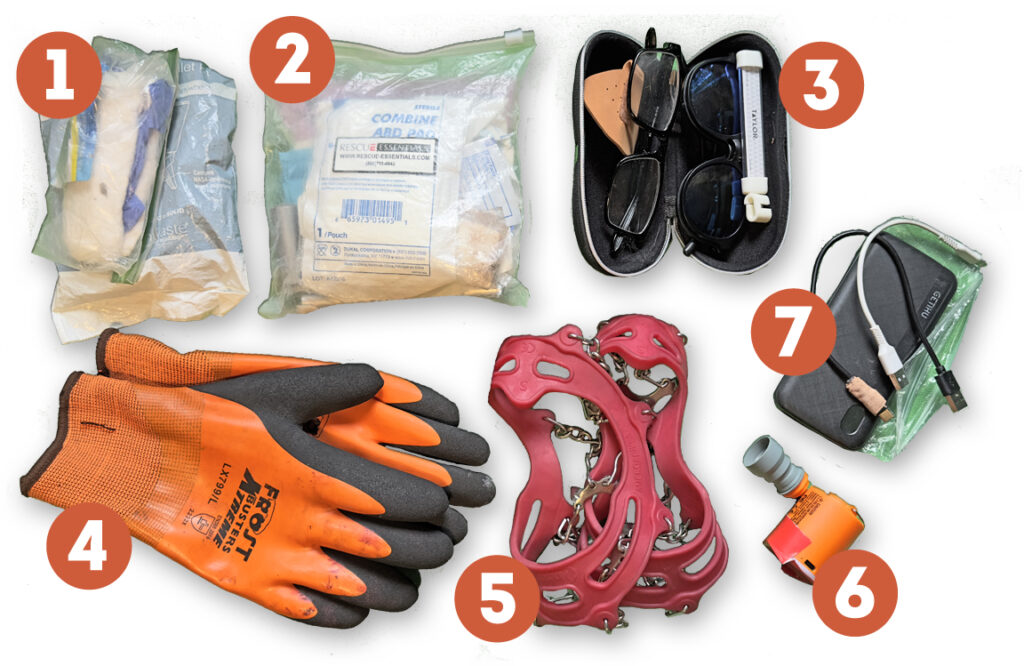
When I use an ultra-light pack, I sometimes put it inside the pack at the top. Ultimately, it is best to keep everything inside the pack. However, I sometimes place a few items inside the large mesh pocket on the outside of my pack. These items may include: 1) toilet paper and wag bag, 2) first aid kit, 3) extra eye glasses, UV nose shield, and thermometer in a case, 4) waterproof gloves, 5) micro-spikes, 6) the air mattress pump (tends to get turn on accidentally when stored inside the pack), and 7) phone charger and USB cables.
Moisture and wind management
Moisture and wind management are important winter backpacking skills. This includes managing sweat while hiking, tent condensation, and keeping snow melt off your clothing and gear. Wind is challenging not only for the reason of wind chill but also because gear can blow away, especially doing camp set up and take down. Managing these challenges begins with how you pack your gear.
Rain
Even in winter, rain cannot always be avoided. At low elevations temperatures are usually warmer and precipitation can come down in the form of rain rather than snow. This creates a hypothermia risk if you get wet hiking up from a warm low elevation to a colder and windier higher elevation. It is essential to stay as dry as possible and even more essential to have dry gear once you arrive at camp.
Never rely solely on the waterproofing of a backpack or a rain cover. Many backpacks are not water proof or are only water resistant. Water resistance usually fails after an hour in persistent moisture. Rain covers are helpful but do not offer a complete seal to the backpack and can get pulled off your pack by getting caught on a tree limb without your being aware.
Protect critical gear. Use a pack liner or trash bag to line the inside of the backpack if rain is likely. Then put individual items, such as your sleeping bag, down parka, first aid kit, etc., in an additional waterproof stuff sacks or plastic bags. No matter what the forecast, always pack your sleeping bag, camp clothing, and down parka in waterproof bags.
Stuff sacks vs no stuff sacks
Some hikers prefer to put everything in their packs without using stuff sacks. There are two goals behind this strategy. First, the gear will more easily fill all the space inside the backpack and second, the weight of the stuff sacks is eliminated.
This no-stuff-sack strategy has some merits for ultra-light warm weather backpacking, but in the winter I prefer to use stuff sacks even if they provide no waterproofing. I use 6 stuff sacks:
- Sleeping bag and camp clothes compression sack (always placed inside multi-purpose plastic trash bag)
- Air mattress sack (because it adds some protection against punctures)
- Tent sack (fly in first)
- Tent poles and pegs sack
- Avalanche probe sack (includes shovel handle)
- Puffy jacket, thermal base layer top, and mittens sack (always a waterproof stuff sack).
Of these six, the stuff sacks for the tent and air mattress are least important and could easily be eliminated.
The plastic bag that goes over my sleeping gear compression sack is also used to hold my boots when I bring them inside the tent. This helps to keep any snow and moisture stuck on the boots from spoiling my other gear inside the tent. Some people use one large plastic liner bag for all the items in their backpack. In situation when low-elevation rain is possible, I use this method but also double the waterproofing with a plastic bag and dry sack for the sleeping bag, down parka, tent, and air mattress.
All total, these stuff sacks together add 7 ounces of weight. That’s significant, but it allows me to better organize and protect my gear.
One stuff sack doubles as a pillow. I fill my stuff sack for my air mattress with the other stuff sacks and un-used clothing and it becomes my pillow at night. This also helps me keep track of all the other stuff sacks.
I put the tent pole sack inside the tent sack to keep them together. Waterproofing is not necessary for tent poles or avi probe and shovel.
Wind
In addition to moisture, be aware of the risk of loosing gear to unexpected gusts of wind. When you are camping on an exposed ridge, which is often our destination goal, an item blowing off the ridge may not be recoverable. The wind is a challenge when setting up and packing up. When you take your tent out of your pack don’t let it or other gear get blown away. Stuff sacks will keep the gear in heavier units that are less likely to blow away. Small wire carabiners can be used to clip stuff sacks and other gear to your clothing during setup in high winds.
Pack rain covers
It can rain on a clear day. The snow high in the trees can melt and drip down in large amounts causing a heavy rain in the forest that soaks you and your gear. If termperatures are above freezing and there is still snow in the trees, bring a back cover.
It is hard to fit a 60-liter rain cover over a full 60-liter pack, especially with snowshoes and a solid pad attached to the outside. You will need a 70–80 liter pack cover to fit over a fully equipped 60-liter pack. Bright colors, such as orange, are preferable in fall and winter because of hunters and whiteouts.
How to attach snowshoes and solid pads to a backpack that is covered with a rain cover: The easiest solution is a larger-sized rain cover that fits over everything. However, if that’s not available there are ways to attach the snowshoes and solid pad to a pack that has a rain cover. There is a handle between the shoulder straps on most backpacks. You can attach a utility strap to this handle and run it to the top of the pack to hold the snowshoes. You can place another strap around the middle of the pack and attach another strap to it. All total, this method uses two small straps to hold the snowshoes together and 3 longer straps to secure the snowshoes and solid pad. The snowshoe cleats and traction bottoms are less likely to cause damage to your pack if the are facing each other.
Compressing gear
Typically, there are about seven pieces of gear that can be compressed with the sleeping bag in a compression sack.
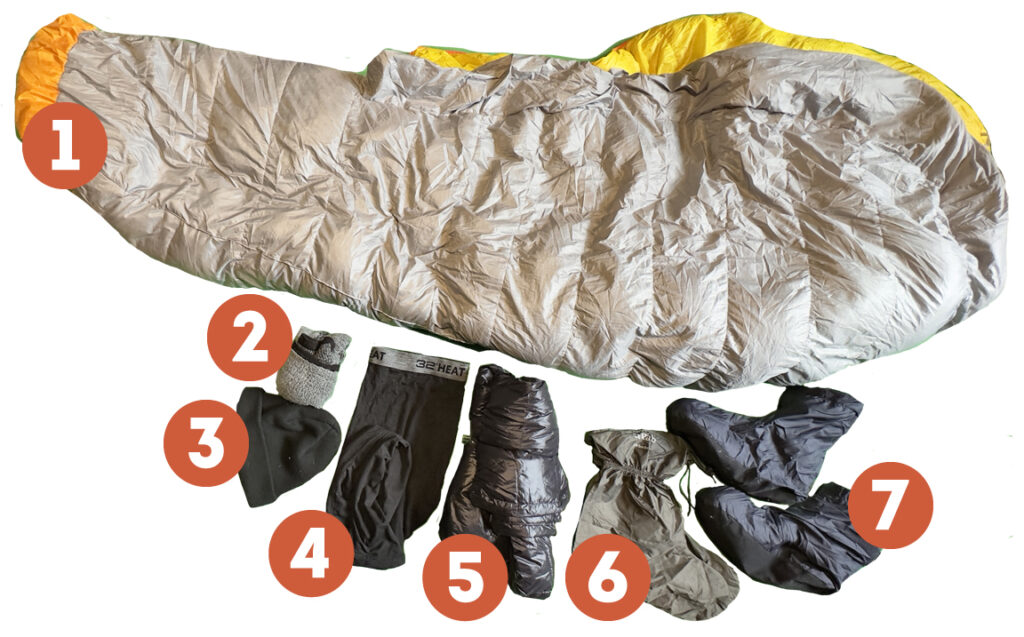
Notice the sleeping bag is inside out. Turn the bag inside out because the inside lining releases air faster than the water-resistant exterior. This practice will also help prevent accidentally leaving gear inside your sleeping bag when you pack in the morning.
Never store your sleeping bag compressed at home. Always hang it in a closet or store it in a large laundry bag. Some companies provide a large storage bag for the sleeping bag.
My own strategy is to compress all my camp clothing with the sleeping bag except my rain pants, thermal base layer top, and puffy down parka. These items are sometimes needed while hiking or when I first arrive at camp so they are packed separately where I can reach them more quickly (higher in the pack).
Securing gear that is on the outside of the pack
You can use a 2mm utility cord or small wire carabiners to clip water bottles and other items that are on the exterior of your pack. Some backpacks, such as the Granite Gear Crown 3, have straps on the exterior that can secure water bottles.
How to wear a backpack
Be aware that when you lift your full pack to put it on, it is best to use the handle located between the top of the shoulder straps. Use the handle to lift the pack to a resting position on your thigh and then slip your arms into the shoulder straps. Lifting a heavy pack by the shoulder strap can weaken and break the shoulder strap. Once the pack is on your back, lean forward and shift the pack up to take the weight off the shoulders, then tighten the hip belt. Almost all the pack’s weight should be on your hips when you are hiking. Use the shoulder straps to hold the pack close to your body not to support the weight of the backpack.
Additional packing tips
- Lay out your gear and use a gear checklist to ensure you are packing what you need.
- When you layout your gear, inspect pack straps, snowshoe straps, and other items for tears and defects.
- Avoid over packing and bringing more weight than you can comfortably carry to the planned destination. If in doubt, take your full pack and do a test hike and see how well you do at your normal pace. For hikers in the Seattle area I recommend Mount Si. An 8 mile hike with 3000 feet of elevation gain should take you between 2 and 4 hours round trip. Longer than that and you need more conditioning to be comfortable with our group.
- Avoid overloading your pack with water. Water is heavy and you only need to pack enough to reach camp. After that you can melt snow.
- Make sure you are bringing enough fuel to melt snow, cook all your meals and make hot water bottles for camp and at night. A hot water bottle in winter is both a luxury and a first aid essential. Always pack a Nalgene bottle even if it is empty.
- If you have gear or technique questions for specific events, reach out to the winter backpacking group. Post your questions on the Meetup comment section or direct message an organizer. We have a great group and people in the group want to help.
How you pack your backpack is your choice and your responsibility
Sometimes packing and gear mistakes can be noticed when people arrive for an event, such as not bringing a full-size solid pad, trekking poles with no snow baskets, the wrong type of snowshoes, or having too much unsecured gear on the exterior of their backpack. But mistakes can go unnoticed. Everyone is free to make their own gear choices, use their own methods of packing, and learn from their mistakes. My hope is that everyone arrives prepared.
Event organizers do not inspect people’s backpacks for readiness when they arrive for an event. It is assumed that everyone knows what they need to know. Those new to the winter backpacking Meetup are encouraged to read the “Know Before You Go” basics on the winter backpacking website and the information on this website.
It is also assumed that everyone has been reading the special gear and trip notes in the Meetup event comments. Every trip has gear requirements based on how cold, windy, or wet conditions are in the forecast as well as the current conditions of the snow pack. Read the event notes because you don’t want to carry the needless weight of inapproriate gear or leave behind something essential. If the snowpack is firm, for example, carrying heavy snowshoes may not be necessary. You may need micro-spikes or crampons instead.
If you arrive with a pack that is not balanced and your gear—snow shovel, pots and pans, jacket, and gloves—are hanging off the outside of your pack, no one is there to send you home. In this group, no one signs up to take responsibility for your comfort or safety. You are responsible for yourself. It is up to you to pack what you need and learn and improve gradually, if necessary. Some mistakes are more consequential than others. On one trip a person showed up with a tent that couldn’t fit in their backpack and did decide to go home. On another trip, a person was using a pack bladder that not only leaked on their gear but the other backpacks in the car. Don’t be that person. Arrive prepared.
You may also find useful Tips for Selecting a Winter Backpack
Have any questions or comments?
In the comment section below, let us know your thoughts. Your comments and questions are welcomed.
2 replies on “Safety Tips for Packing a Winter Backpack”
Love this! Logically packing goes a long ways in ease of use, comfort, accessibility and no lost items. I had not considered carrying my shovel and probe together but will be doing so from now on. Truly appreciate the thought, effort and wisdom compiled in this post. Thanks!
Thanks Daniel. I’m thinking having the handle in the probe sack also reduces the risk of the handle tearing other gear. And, if everyone is packing it on the right arm side, we all know where to look and can get to this rescue gear quicker when necessary.