Layering in the Pacific Northwest:
Knowing how to layer clothing will determine whether you are comfortable or uncomfortable in winter conditions. But be aware that the information here is for winter conditions of the Pacific Northwest, which are comparatively mild—meaning conditions between 0–45º F on average in elevations between 1000–7000 ft and winds that are mostly 0–25 mph and rarely up to gale force. You will likely need more insulation in colder regions, which is why in many places people are traveling on skis pulling heavier gear on a pulk, rather than backpacking in snowshoes. In Pacific Northwest, it is not difficult to backpack in winter with a 25–35 lb backpack. The mountainous terrain here would make pulling a pulk nearly impossible. Nevertheless, some of the basic techniques described in this short introduction to layering may be useful in other destinations.
Winter layers need to serve four purposes
- Preventing overheating and sweating
- Preserving body heat
- Protection from moisture (sweat, snowmelt, condensation, and rain)
- Blocking wind
To achieve these goals, fast-wicking, insulated, and waterproof types of clothing are used in various layered combinations.
Two categories of layering
If you are a beginner, it helps to think of layering in two categories: 1) layering for hiking and 2) layering for camp. When hiking, the main objective is to stay warm without overheating and sweating too much. The moisture from sweat wicks the warmth away from your skin causing you to lose body heat. Once you reach camp and stop hiking, you are no longer generating as much heat and you need to insulate the body to prevent heat loss. The main objective is always to prevent loss of body heat. You want to avoid putting too many layers on while hiking and, likewise, it is best to avoid wearing your sweaty hiking clothes around camp.
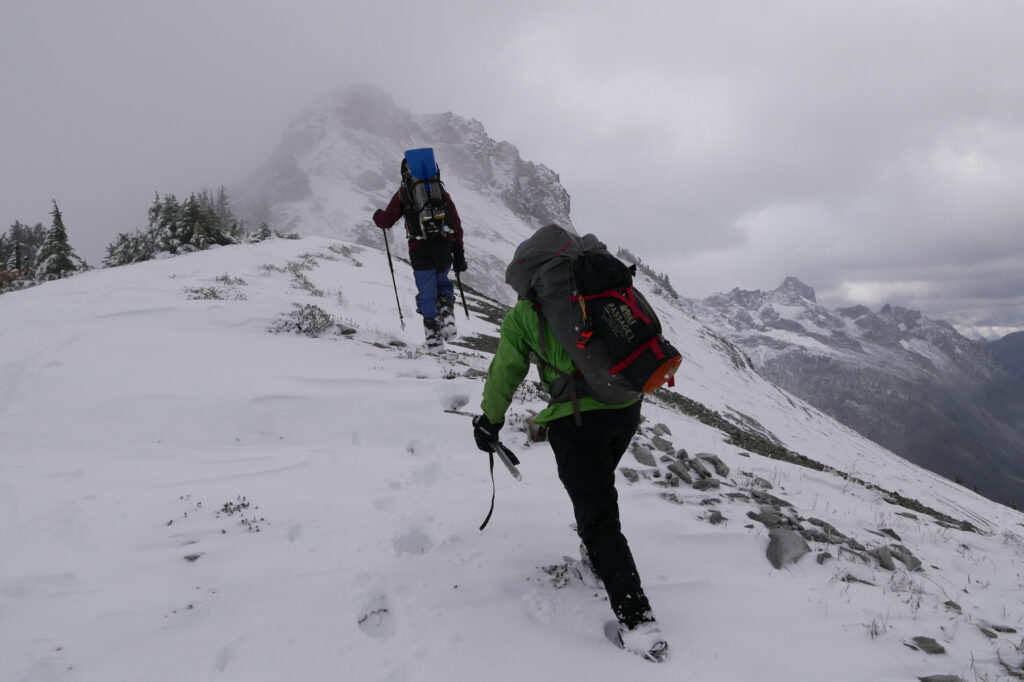
Layering while hiking
People have different requirements. Generally speaking, what works for me is one or two synthetic top layers, consisting of a nylon t-shirt, and a UV pullover with a hoodie. If the weather is going below 25º F, I will wear a thin nylon base layer or thermals under my regular summer hiking pants (standard convertible pants). Many hikers prefer “soft-shell” pants used by climbers, but I find them to be too warm. I prefer a combination of regular hiking pants, a thin base layer, and rain pants if necessary like this:
- Regular hiking pants (temperatures above 25º F, on ascents with 25–35 lbs pack)
- Regular hiking pants with a thin thermal base layer (temperatures below 25º F, on ascents with 25–35 lbs pack)
- Regular hiking pants with a thin thermal base layer (temperatures around 40º F, flat terrain, no pack, casual speed)
- Regular hiking pants with rain pants (high winds or snowing)
If the weather is in the 5–10º F range, I may wear a nylon-wool blend pullover or a fleece pullover, and possibly a rain jacket if it is snowing or wet. If I am hiking uphill, typically gaining 3000–4500ft in elevation, I may only need one layer while hiking. When coming down I will burn less energy and need more layers. Heat is generated by movement, so what I’m doing, ascending or descending, is as important as the air temperature and wind chill. Either way, I subscribe to the one-jacket strategy. If I stop for any length of time, I quickly pull out a thick puffy down jacket to preserve my core warmth. In warmer and wetter conditions, I may take a synthetic puffy jacket instead of a down one. Synthetic jackets retain loft better than down when wet, and loft is essential to warmth.
When you are starting the hike at a trailhead, you usually want some extra layers such as a fleece or wool pullover or down jacket while you are getting ready and waiting on others. You can pull off this extra pullover or down jacket when you start to hike (the cold-start method) or usually 10–20 minutes into the hike when you begin to overheat. Commonly, the group will stop shortly after starting to take off a top layer. A common miscalculation is for a hiker to wear a base layer bottom when it is unnecessary. Getting a base layer bottom off when you are hiking in deep snow with snowshoes on is difficult and time-consuming.
When there is strong wind, I wear rain pants and a rain jacket. Rain gear needs to be waterproof to hold out wind, so look for pants and jackets that have zipped vents that can allow in air if you begin to overheat and sweat. I use a balaclava and goggles to protect my face. I use a very thin lite-weight balaclava in the spring and summer for UV protection and a warmer insulated balaclava for late fall and winter. I carry multiple fleece liner gloves for hiking.
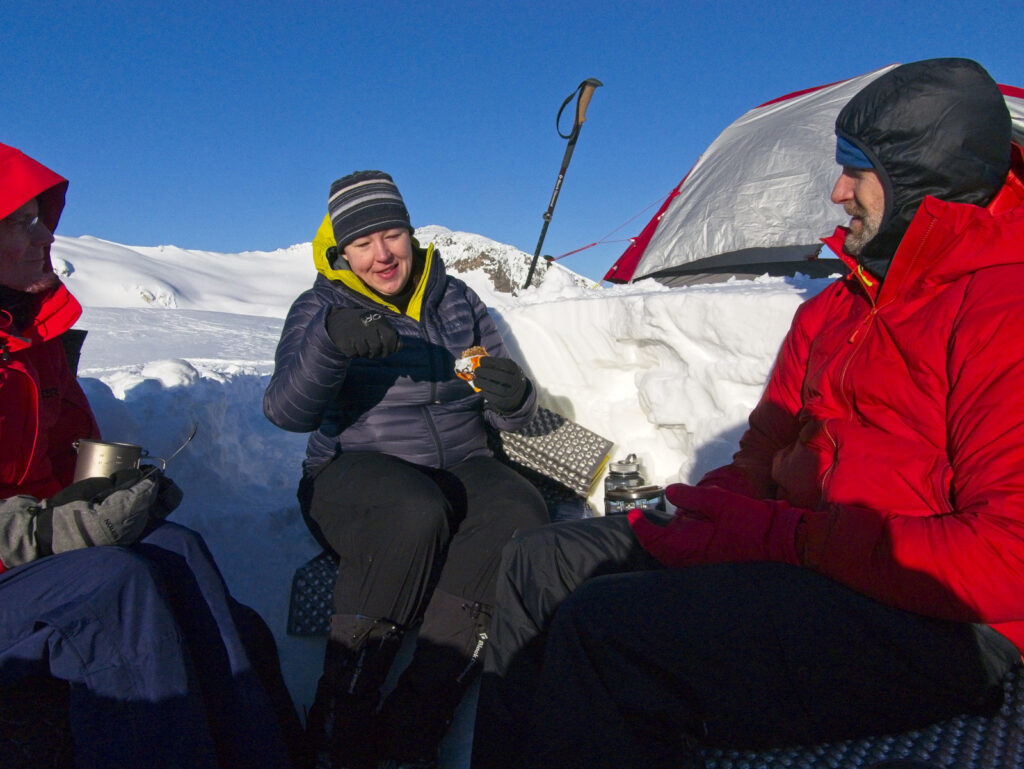
Layering at camp
Because your hiking clothing becomes sweaty while hiking, the recommended practice is to switch into a fresh base layer at camp. This base layer is for hanging around camp and sleeping at night. If it is cold and windy, the sooner you get into this fresh base layer the better. You then add down pants or rain pants for activities around camp, such as cooking and socializing. You also wear a puffy down jacket with a hoodie. If it is windy or snowing you may need to wear rain pants and a rain jacket over your down-insulated clothing to keep out moisture from melting snow.
The ability to keep your body protected from moisture, such as melting snow and the windchill is essential, which is why rain pants and a rain jacket are required. Ultra-lite windbreakers are not robust enough. You need moisture protection. If moisture and wind are threats while hiking, it helps to have full-zip rain pants that can be put on easily without having to remove snowshoes. Otherwise, lighter partial zip rain pants will do the job.
I carry a pair of cold-weather waterproof gloves for handling snow, and a double-layer mitten system for windy conditions and keeping my hands warm while hanging out around camp in temperatures in the 5–15º F range. You want to have gear that gives you peace of mind, the knowledge that if a perfect storm of unfavorable conditions strike, you are going to be okay, if not comfortable.
Being comfortable in harsh beautiful conditions is the most sublime wilderness experience you can have.
I tend to avoid mid-weight layers. When I’m not burning energy, I have one well-insulated jacket that I put on. It is good for the harshest conditions I’m likely to encounter. But I’m not a climber, so I’m not looking for a bullet-proof 3 lb 30D expedition jacket, just something really warm with a good weight-to-warmth ratio (my parka is 20D, 800 fill, 1 lb 4 oz total). I do want to be comfortable, but the expedition-level gear isn’t really necessary for backpacking trips in the Cascades below 8,000 feet. That said, it is important to watch the forecast and know the limits of your gear. The coldest recorded temperature in Washington State was around –40º F, a freak event to be sure, but my gear will not keep me comfortable if the cold plunges that low.
Winter layering gear list
Use these lists to help remind yourself of essential gear when packing.
Hiking clothes
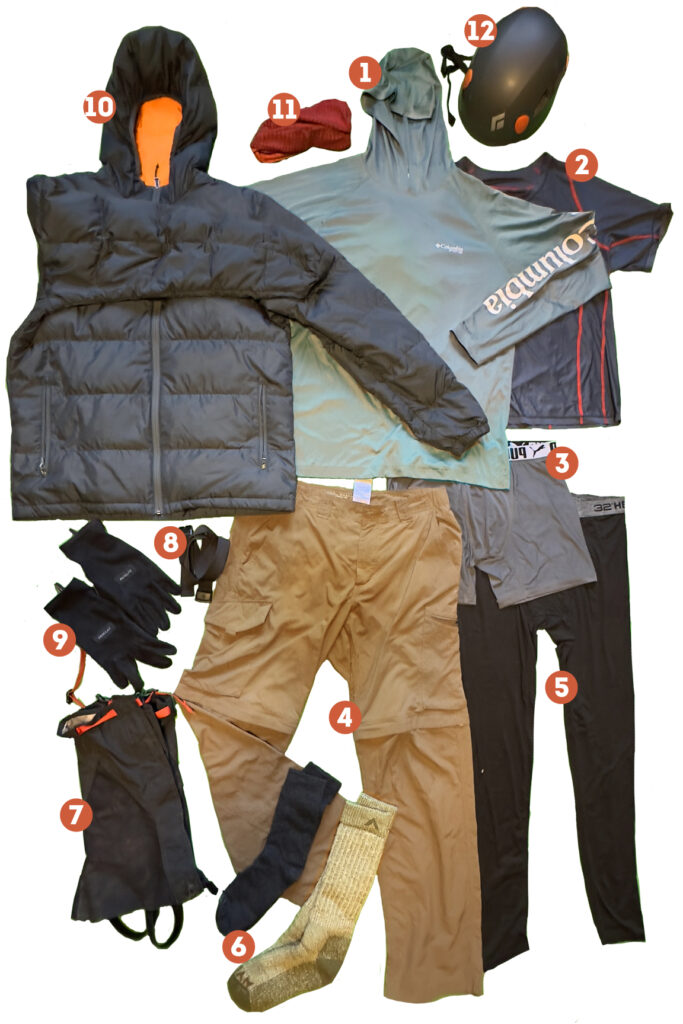
Typical hiking layers: 1) UV pullover shirt with hoodie (especially March–July), 2) Light nylon t-shirt, 3) synthetic underwear, 4) Convertible hiking pants, 5) light nylon thermal layer for temps in the 10–25º F range, 6) Liner socks (wool) plus thick boot socks (wool blend), 7) Gaiters (knee-high), 8) Belt, 9) Fleece liner gloves (100 g/m2), 10) light down jacket that is worn at the trailhead and usually removed shortly after the start of the hike, 11) Buff, and 12) Helmet (recommended when snowshoeing on steep slopes and anytime an ice ax is required)
Easily accessible layers in the backpack (packed in a dry sack):
- Down parka with hoodie (keep near top of the pack)
- Synthetic parka (alternative for warmer rainy trips)
- Fleece or wool pullover
- Rain pants
- Rain pants (full zip type—when high winds are expected) If you are using rain pants while hiking for rain protection, put rain pants on over your gaiters to keep water from flowing inside the gaiters and into your boots.
- Rain parka with hoodie (Robust and reliable, not merely a windbreaker. Keep near the top of the pack.)
- Insulated balaclava (mainly November–February)
- Goggles (mainly November–February)
- Gloves (waterproof)
- Inner mittens
- Outer mittens (for harsh conditions combined with inner mittens)
- Lite UV balaclava (mainly March–July)
- Glacier glasses (mainly March–July)
- UV nose shield (clips to eyeglasses)
- Cap (provides eye and UV protection) Most caps are cotton. You can find lite nylon caps by searching for running caps.
Less accessible layers in the backpack (packed in a dry sack):
Packed for all trips:
- Thin thermal base layer pants (nylon or Capilene base layer)
- Thermal base layer top (long sleeve)
- Liner socks (wool)
- Thick boot socks (wool blend)
- Beanie (wool)
Packed for some trips:
- Mid-weight thermal base layer pants (mainly January–March, if 0–15ºF weather)
- Down insulated pants (optional, mainly January–March, if 0–15ºF weather)
- Down insulated booties (optional, mainly January–March, if 0–15ºF weather)
- Down insulated pants (optional, mainly January–March, if 0–15ºF weather)
- Vapor barrier socks (for around camp, especially March–July)
Gear weight
Generally speaking, much of the gear available for climbers, snowboarders, and skiers is made with materials heavier than what is required for winter backpacking. For backpacking, it is important to focus on the warmth-to-weight ratio.
Nine winter layering essentials to know
- Don’t wear too many layers when you are hiking (you’ll overheat and get sweaty).
- Put on layers quickly when you stop to rest or set up camp (don’t lose body heat).
- Always sleep in a dedicated base layer.
- Take off layers when you are too hot to avoid sweat.
- Avoid getting wet from snow (wear gaiters and waterproof gloves).
- Wear fast-wicking fabrics. Avoid cotton because it doesn’t have good wicking properties causing it to increase the risk of hypothermia.
- Take wind protection seriously and be able to cover all flesh.
- Take UV protection seriously and be able to cover all flesh (especially March–July on snowfields).
- Protect your gear from moisture. Gear can easily get wet in unexpected ways (see Preventing Wet Clothing below)
Preventing wet clothing
Packing clothing in dry sacks or plastic bags is not enough. There are three main ways your gear can get wet:
- In your backpack: Gear in your pack can get wet from snow on trees and limbs brushing against your pack, from setting the pack on the snow, from the sun melting snow in the treetops and dripping down on your pack while hiking in the forest on a clear day, and from snow converting to rain in lower elevations. Gear can also get wet from leaking pack bladders or water bottles. A leaking pack bladder is a much more serious problem in the winter than in the summer, so pack bladders are not recommended. It is best to store water bottles in the outside pockets of your pack clipped with mini-wire carabiners to help ensure they don’t fall out. Most of these threats can be neutralized by storing clothes and sleeping bags in dry sacks or plastic bags. (I usually pack camp clothes together with my sleeping bag in one compression sack.)
- Body heat melting snow: This is especially likely in temperatures between 25º and 35º F (a common winter temperature range in the Cascade mountains). Setting up camp, digging a cooking pit, or building a snow wall are situations that can lead to wet clothing and especially gloves. Waterproof gloves are best for these activities. Vapor barrier socks are a good way to protect socks and down booties from moisture around camp.
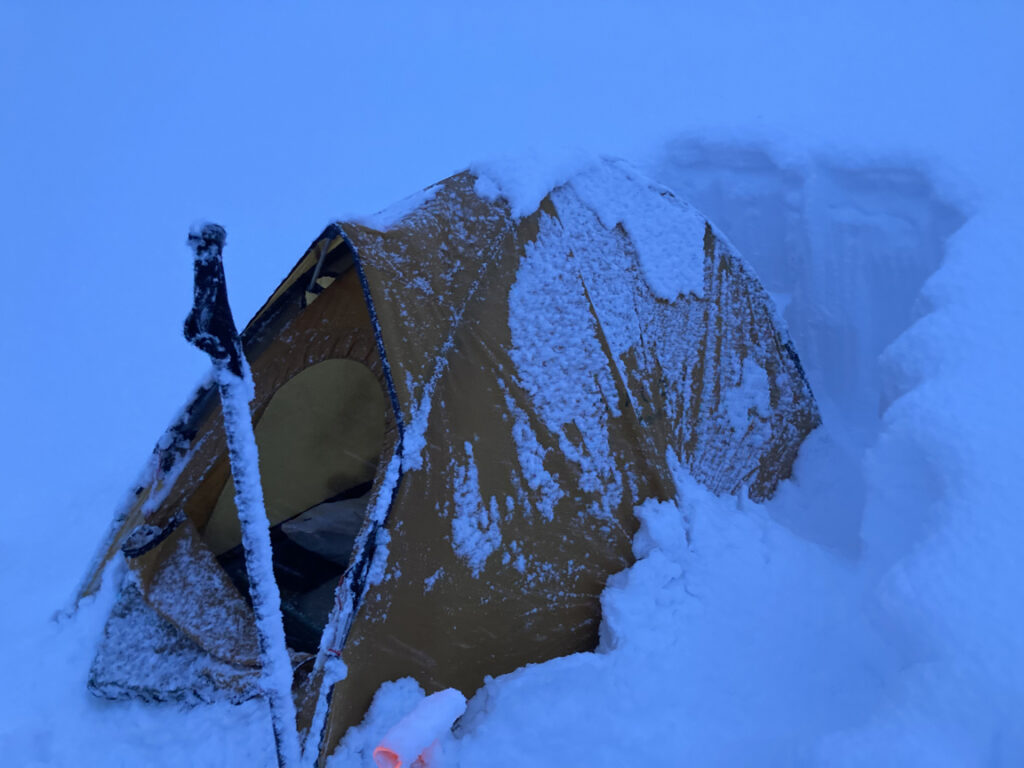
- Tent condensation: Pack clothing in your sleeping bag or in a tent sack that you can use as a pillow. Avoid leaving clothing outside your sleeping bag along the edges of the tent where condensation can run down the tent walls. Be aware that if it is 25º F outside, it can easily be 35º F inside your 4-season tent. This means condensation will not turn to frost inside the tent, but rather will become water collecting around the edges of the tent floor and on the surface of your sleeping bag. Sometimes it is best to leave the tent door open to keep the tent cool. I never include potential tent warmth in my calculations when selecting which temperature-rated sleeping bag to take.
The “don’t lose your heat” rule
Heat, once lost, is hard to regain.
Apart from a warm meal and a hot water bottle, your gear doesn’t provide heat. Base layers, sleeping bags, and jackets exist to preserve your body heat.
An important rule of winter backpacking is don’t lose your heat. You lose heat while hiking by pausing for too long without adding layers, by standing or sitting on snow around camp without using a closed-cell mattress, by sweating too much and getting wet, by sleeping in sweaty clothing, etc. To retain your body heat, you have to know what gear to bring and how to use it and have the discipline to implement warmth-saving practices before you become uncomfortable. Small mistakes and gear failures can rapidly escalate into serious problems. By practicing techniques often you can help form habits that will help you get through difficulties when you are exhausted and not thinking as clearly as usual.
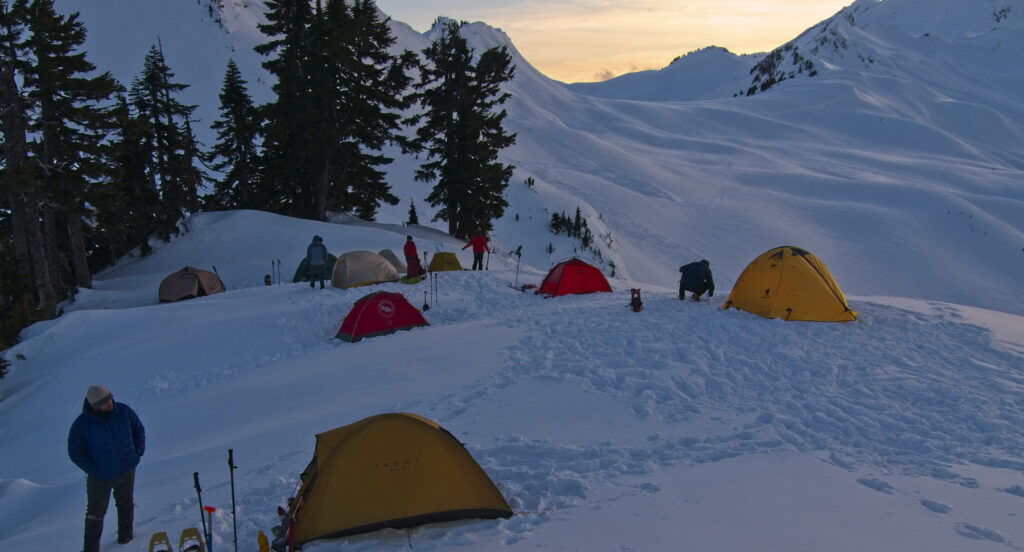
Setting up camp in harsh conditions
Successful layering is as much technique as it is layers.
There are two times when hikers most often mess up their layering—when they start to hike and when they stop to set up camp. First, if they start off with too many layers, they overheat and get clothing wet with sweat. The more a hiker sweats, the more that sweat wicks away warmth, leaving the hiker cold. Second, when they reach camp, they fail to change out of sweaty layers quickly enough.
Hikers often reach camp at the end of a long hike. The day is becoming dark, the wind may be picking up speed, and the temperatures are dropping. Typically, a hiker will be tired and some will want to set up a tent and fully stake it out before changing clothing and adding on layers. This can be a serious mistake. Tents have 4, 10, or more anchors and the tent setup process can take longer than expected. The hiker may have trouble anchoring stakes in the snow or find themselves chasing after a piece of gear that got blown away or some other problem. They may be spending too much time trying to level the area for the tent or post-holing because they have their snowshoes off. Quickly they start to lose heat. The cold wind is blowing against sweaty clothing wicking warmth off their skin. Already exhausted, they begin to shiver, their judgment becomes less clear, their fingers are painfully cold, and their coordination begins to falter. In this condition, they are beginning to experience hypothermia. They need to get out of the cold quickly and warm up, but they are already too cold to be setting up a stove to melt snow. In this situation, hikers tend to have trouble making good decisions.
The best solution is to avoid getting into this situation by following these steps:
1. Pack your gear for a quick setup
Your insulated coat should be at the top of your pack with your rain jacket. Take out one or both and put them on immediately to minimize heat loss. Your tent should not be hard to remove from your pack. If your tent has a fly, pack the fly in the stuff sack first, so the first thing you pull out is the tent. Keep your other gear secure in your pack so nothing gets blown away. Avoid a situation where you have to unload your pack to get to essential outer layers and your tent. Also, make sure you already have your tent configured with extended utility cords for your main anchors so that you are not struggling in the cold trying to attach dead-man tent pegs. For more, see How to Stake a Tent in the Snow Without Tying Knots.
It is also not necessary to spend a lot of time packing down or leveling the snow to create a perfect spot for your tent. If that’s necessary, it can be done after you have on your camp layers.
2. Anchor the tent with your pack
Put on a jacket and take your tent and poles out of your pack. Most 4-season tents are free-standing. A few tents are designed to pitch from the inside, meaning you can get inside and then install the poles on the inside. Either way, put the poles in place, toss your pack inside to anchor the tent, and climb in so you are out of the wind. This whole process can be done while standing in one spot next to your pack. In mild winds, the pack’s weight is enough to anchor the tent while you get in. If you are on deep firm snow with an ice ax, anchor one corner with the ice ax.
A typical tent has 4 staked corners and 4–6 tension cords. Skip this setup for now. When you climb into your tent, your body weight and pack are enough to anchor the tent. The tent may be flapping in the wind, but the important thing is that you are out of the cold wind.
Obviously, this is harder if you are using a 3-season tent, because they only offer limited wind protection with a fly, and often the fly must be protected by a snow wall. Nevertheless, the principle remains the same. Changing into dry layers takes priority over perfecting the tent setup.
3. Put your layers on before finishing the tent setup
Once inside your tent, roll out your solid pad and take off your jacket and hiking clothes and start layering. You can pack all your camp clothes in a compression sack with your sleeping bag. Pull out your camp clothes and change into a dry base layer. Put sweaty hiking clothes in the tent sack. I usually hang sweaty socks from a 2mm utility cord inside the tent. Put rain pants or down pants on over the base layer, and a puffy down parka, rain jacket if windy, beanie, and flesh socks and gloves.
The activity of changing clothes inside a tent will raise the temperature in the tent by 10–15º degrees. If it is 25ºF outside with a 15 mph wind, the chill is 13º, but inside the tent, it will be closer to 35º. Decide how much layering and wind protection you need before going back out. If it is cold and windy, an insulated balaclava and goggles are preferable to thin UV balaclava and glacier glasses.
4. Take care of your feet and hands
When you remove your boots to change cloth, take care to not get snow inside the tent. Snowmelt can get gear wet. Brush off snow and pull back the boot tongue to prevent the boot from freezing in an odd uncomfortable shape.
Because you will be going back outside and will likely use your snow shovel, you will need to put your boots back on. If you have thick snow booties, those will need to wait. You can either put your hiking socks back on or protect your fresh night socks with vapor-barrier socks or plastic bags. Vapor-barrier socks or plastic bags (bread bags will work) will enable you to put on your sweaty boots without spoiling your fresh camp socks. Before you put on fresh socks, first use the dry upper portion of your hiking socks to wipe your feet dry from sweat, and then put on the fresh socks.
Bring a pair of cold-weather water-resistant gloves just to use around camp to keep your hands warm and dry when handling snow. If you know you might be in really cold weather, bring double-layer mittens too. Mittens are much warmer than full-finger gloves.
5. Complete the tent setup
With a dry base layer, down parka, rain pants, and wind protection on, you are now ready to go back out and fully secure the tent with deadman stakes or whatever is needed. Even if you are in harsh conditions, you are now warm and comfortable and able to think clearly.
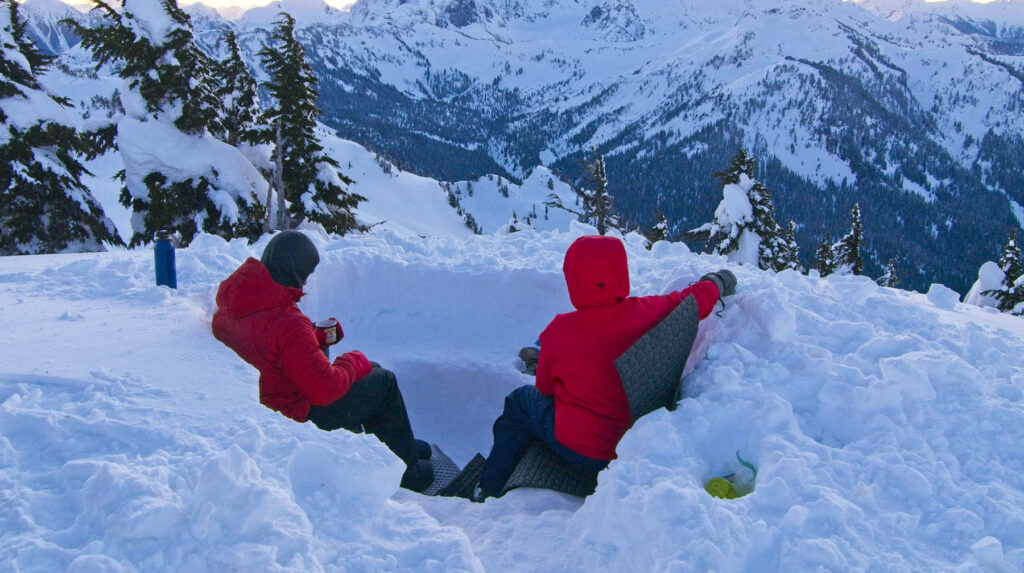
6. Create a wind-protected cooking pit
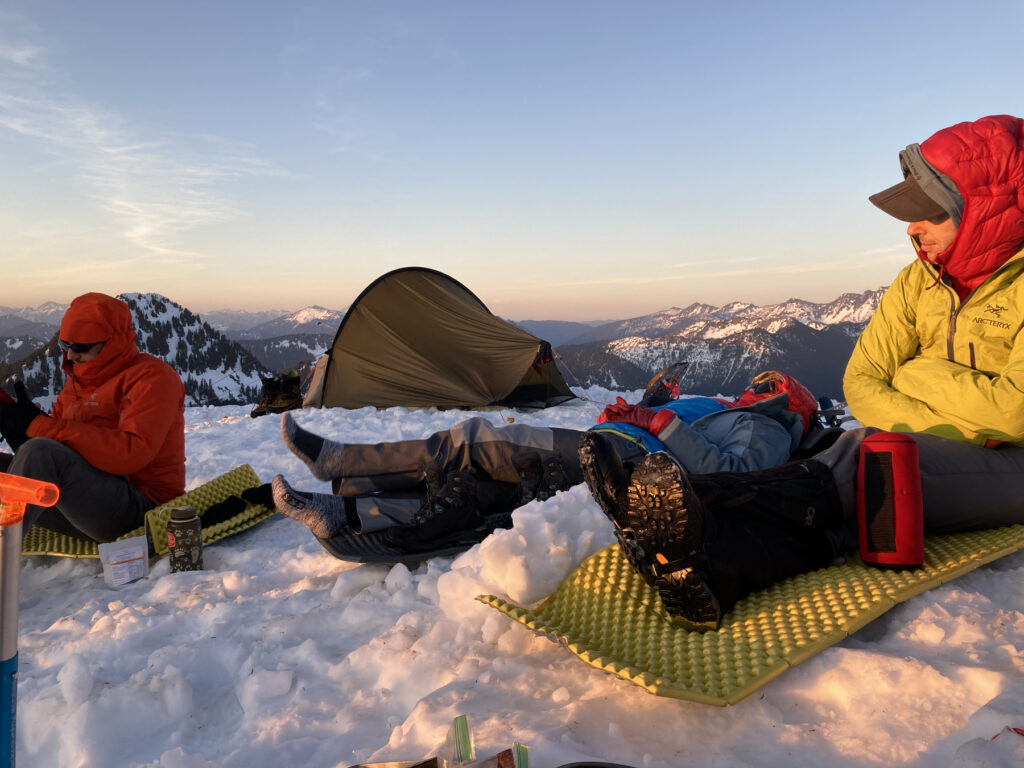
Once the tent setup is completed, depending on the time of the year and snow conditions, I may dig a cooking pit with a small wall to break the wind. In windy conditions, the ideal cooking pit has two levels, a mid-level to sit on and a bottom area for one’s feet. Both the seat and foot area need to be wide enough for your closed-cell mattress pad. The pad should fit into the cooking pit so that it is safe from being carried away by the wind and prevents your body from having direct contact with the snow, extending from under your feet to up behind your back. If possible the seat should be deep enough that your core is protected from the wind. Now you’re ready to melt snow, make a hot water bottle to go in your parka or sleeping bag, prepare a meal, and restock your water supply by melting snow.
DO NOT be hestitant about using your closed-cell mattress outside your tent. You can sit on it, fold it and stand on it. These pads are durable. Maximizing your use of the pad around camp is essential to preserving warmth and keeping your feet from becoming cold. Just be careful to not allow it to blow away off the mountain ridge!
Sometimes you may want to create a group cooking pit or invite others to extend your pit and join you.
Conditions are not always suitable for creating a cooking pit. When that happens I just try to create a wind-protected spot for my stove outside the door of my tent.
7. Sleep in a dedicated base layer
Your base layer should include everything necessary to cover all flesh: socks, thermal pants, long-sleeve thermal top, balaclava (usually UL type or buff), beanie, and liner gloves. I do not usually wear a balaclava or gloves while sleeping, but I keep them handy in case I need to get out of my sleeping bag or I am sleeping with the tent door open.
Keep in mind that your sleeping bag rating assumes you are wearing a base layer.
A base layer will help protect your sleeping bag from sweat, grime, and body odors. I usually keep my rain jacket and rain pants in my sleeping bag so I can get to them quickly if necessary. If you are in weather so cold (below 20ºF for me) that you need a base layer while hiking, carry a separate base layer for around camp and while sleeping. Always have a base layer that is completely dry and sweat-free for sleeping and lite activities around camp. If I wear a base layer on my legs, it is usually a thin nylon one, but for sleeping, I prefer a warmer mid-weight capeline baselayer.
Frostbite and Hypothermia Prevention
A key part of layering is being able to stay dry and being able to cover up as completely as possible.
You can experience frostbite on exposed flesh in 30 minutes in 0º F weather with 15–20 mph winds and 5º F with 30mph winds. Such conditions are rare in the Cascades under 6000 ft, especially on the west side of the range. In the cascades, hypothermia is a much greater concern, especially when temperatures are close to freezing or slightly above because snow will melt on your clothing and get your body wet. Similarly, crossing over from low-elevation rain to high-elevation snowfall increases the risk of hypothermia if you get wet. Because it is easier to stay dry on colder weather days, lower temperatures (0–25º F) days are more ideal than warmer 25–35º F days.
Know how to recognize the signs of hypothermia
When hypothermia happens, someone needs to help out. When hikers are tired, actively watch for symptoms of mild hypothermia among team members, such as complaints of pain in fingers and feet, uncontrollable shivering, loss of balance and coordination, social withdrawal, and being irritable and grumpy. Symptoms of moderate to severe hypothermia include an absence of shivering, dilated pupils, mental confusion, slurred speech, and loss of consciousness.
If you are ever shivering you are doing something wrong, such as not layering properly, wearing a jacket with insufficient insulation, or standing around in clothing that is sweaty. As a safety rule, if you are experiencing shivering, it is wise to speak up. Just say, “I’m shivering a bit.” Then state what you’re going to do to mitigate the problem. You may not need help, but it is good for people around you to know what’s happening so you don’t silently slip into hypothermia.
Food is fuel for warmth
Hikers who are suffering from fatigue and mild hypothermia lose their appetite and motivation to cook and eat. Eating nutritious food and drinking warm beverages provides your body with the fuel to stay warm. Soups are a good starter meal to rehydrate and get nutrients into your body. A sweet trail bar can be a good way to kick-start a hiker’s energy and recover their appetite.
Always have the capability to create a hot water bottle
Bring a Nalgene bottle so you can make a hot water bottle. At camp and in your sleeping bag, you can place the hot water bottle between your thighs where it can warm your main arteries and help you recover warmth quickly. Hot-water bottles can be attached to a gear strap and worn like a necklace to position the bottle inside your parka close to your heart. It can also be used to warm frozen boots.
Expect to gain experience gradually
People have different requirements. The only way to learn your own layering needs is by experience and that takes time. It helps to begin with short day hikes and snowshoe trips. For safety pack more than you may require and try to start by hiking with someone who has experience.
I never hike alone in winter and I don’t recommend solo winter hiking to anyone. It’s okay to snow camp alone, but traveling on snow alone is dangerous because you can fall through the snow into a tree well, deep hole, or stream, and your tracks can be blown away by the wind or covered over by new snowfall.
When you are camping overnight, you have the gear you need for multiple days. When day-hiking in the winter, be sure to pack enough gear so that you can protect yourself from cold without a fire if you have to stay out overnight. You should carry a fire starter, but you should not assume a fire will be possible or safe, especially in some parts of the Cascades. It may be impossible to light a fire in winter conditions in some areas of the mountains because the snow can be too deep and wet. If you try to collect wood when the ground and trees are covered in deep snow you will likely get wet while failing to build a fire increasing your chances of hypothermia, or you may fall into a tree well and die. For those reasons, don’t rely on warmth from fires. Always pack layers that will keep you warm and dry. Fires are inefficient and unnecessary when you have the right gear, which is why we have never built fires on any of our backpacking trips at any time of the year. Correct layering is the key to being warm, dry, and comfortable while winter backpacking.
I will try to get some more illustrative photos for this post and update it later.
What’s your experience? Have questions or insights, please leave your comments below.