Updated September 2025.
If you want to really enjoy winter backpacking, one of the first skills you need to master is your water management. This is both about staying hydrated and staying warm. It may seem like a minor thing to have your water freeze, especially in a plastic bottle, but if you allow this to happen, it is one of those small things that can spiral into big problems. You don’t want this to happen.
Do not use pack bladders
Perhaps the most important thing to know about winter water management is that you cannot risk letting your gear get wet or letting your water freeze in containers. Pack pladders are dangerous in winter conditions because they can leak on your vital insulated gear and put you at risk of hypothermia. The pack bladder mouth value easily freezes making it impossible to extract water placing you are risk of dehydration. And, if the bladder freezes at night or in your pack, it becomes useless. You simple are carrying heavy useless ice.
If not a pack bladder, what should you use? Let’s start with the basic gear necessary for managing your water.
Gear for Water Management
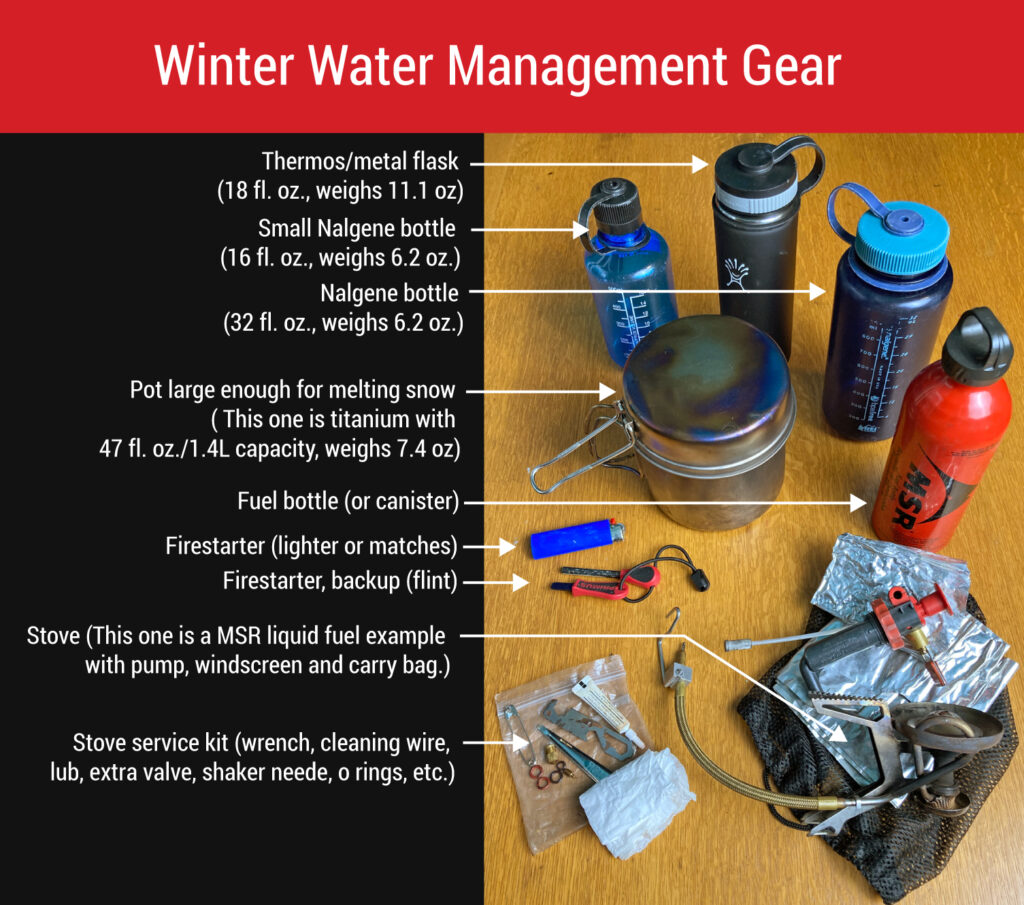
Recommended winter gear for water management consist of three components, storage bottles, a stove system, and a cooking pot for melting snow:
1. Water storage:
- Nalgene bottle (32 fl. oz., weighs 6.2 oz.)
- Small Nalgene bottle (16 fl. oz., weighs 6.2 oz.)
- Thermos/metal flask (18 fl. oz., weighs 11.1 oz)
2. Stove system:
- Stove (liquid fuel recommended for below 20º F)
- Firestarter (flint and/or lighter and matches)
- Fuel (a full canister or an 11 fluid oz. fuel bottle. 11 fluid ounces is usually sufficient for a weekend, but I often take 20 oz. in anticipation of someone else needing help with water.)
- Stove repair kit (if you use a liquid fuel stove)
3. Cooking pot:
- Pot large enough for melting snow (I use the Snow Peak Trek 1400 Titanium Cookset, 7.4 oz). This should include a lid that completely seals to hold in the heat. Cooking efficiency is important because of limited fuel. It is harder to heat water in cold temperatures and high elevations. This lid is also ideal for scooping snow and works as a skillet.
This method is for the Pacific Northwest
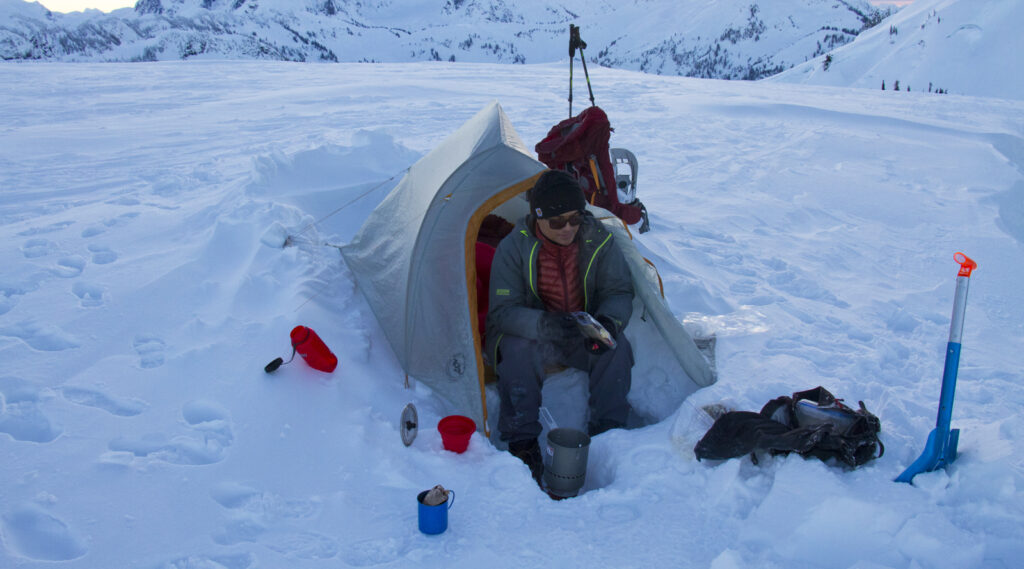
Note that the methods I’m explaining in this post are for trips in the Cascade Mountains of Washington State. This is important because you may be hiking somewhere that has colder temperatures that require different methods. Here in Washington, I’m usually hiking between 2000–8000ft and camping between 3500–7500ft. What I consider “deep cold” is typically 0º F–15º F (–17ºC to –9ºC), which is when the methods described here matter. Otherwise, expect temps to be on average between 15º–45º F (–9ºC to 7ºC) in PNW winters. These are thermometer temps, not wind chill.
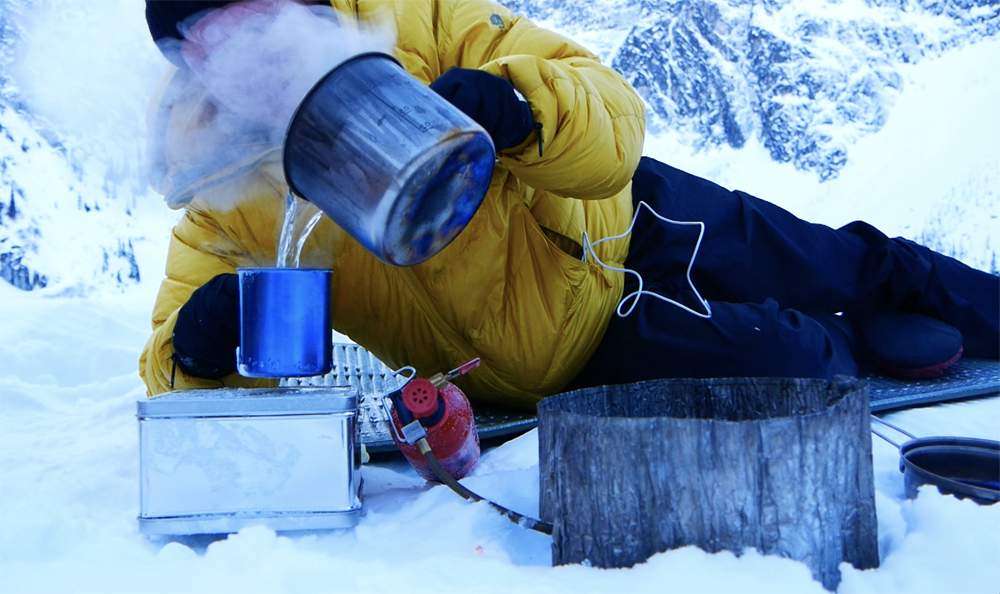
In the photo above, I’m melting snow on a solidly frozen alpine lake at about 5500ft. The nighttime low was 6º F (–14 C).
How to Pack Water
Winter gear is heavy. In very cold weather, my total pack weight is between 26–30lbs. That’s with a 4-season tent, bear-resistant food container, avalanche gear, food, water, and other essential gear. To keep my pack weight down, I carry only enough water required to reach wherever I will be camping, which for an all-day hike is around 32 oz. (1 Liter), or sometimes one and a half liters—which admittedly is often a little less than I would probably prefer.
When I start hiking, I typically have two Nalgene bottles and a metal flask.
- FULL: Small Nalgene bottle (Optional, 16 fl. oz., weighs 6.2 oz.) Just enough water to drink before it freezes.
- FULL: Thermos/metal flask (18 fl. oz., weighs 11.1 oz) I’ll drink 16oz of this and leave 2 oz as a starter fluid for melting snow.
- EMPTY: Nalgene bottle (32 fl. oz., weighs 6.2 oz.) This is for a hot water bottle. For some trips, it is for drinking water too, if it can be consumed before freezing.
Notice that the larger Nalgene is empty. This bottle is mainly for use at camp as a hot water bottle. In theory, I could just use the smaller bottle for that purpose, but the larger bottle lasts longer during the night. In a 0º F rated sleeping bag (lower limit) the hot water bottle loses warmth about halfway through the night or 4–5 hours before becoming lukewarm. In an expedition bag (–20º F) it usually stays warm most of the night.
Most of the people who hike with me carry more than one liter of water and on most trips, it is not cold enough for their water to freeze solid. But in the colder conditions (15º F or lower), the more you carry the harder it is to keep it from freezing.
With only one liter of water, I am thirsty by the time I reach camp at the end of the day. (Bear in mind that there are fewer daylight hours in the winter so camp setup comes sooner unless we are hiking in the moonlight or dark.) I usually reserve a small amount (a few ounces or about 1/3 of a cup) of this water to use as starter fluid when melting snow. That is, I don’t want to just put snow in a pot and put the pot over a gas burner. This can damage the pot. I’ll start by heating a small amount of water and then add in the snow.
Use the Water in the Small Bottle First
I start the day with a small 16 fl. oz. bottle on my pack hip belt where I can access it easily while hiking. It can be attached to a belt with a carabiner or a bottle holster. I’ll drink the water in this small Nalgene first. If I don’t drink it all before lunch it may freeze. The goal is to consume it before it has a chance to freeze. The smaller bottle doesn’t pull down too hard on my pack hip-belt the way a larger bottle would. Also, if I attach it toward the back of my hip it doesn’t bounce off my leg while hiking.
Never allow water to freeze in a water bottle
If you fill a Nalgene with water and it starts to fully freeze up before you can use it, just pour it out to maintain the use of the bottle. If the water freezes fully it is unlikely you will be able to unfreeze it. The bottle just becomes a useless weight and you no longer have a bottle to use as a hot water bottle or for water storage.
It is possible to unfreeze a frozen Nalgene bottle but the process consumes valuable fuel. To unmelt the Nalgene, boil water in a pot and place the bottle in the water without touching the bottle of the pot.
Be aware that a bottle full of water will freeze top-down, sealing the opening first. You can mitigate this problem by flipping the bottle upside down, but make sure the lid is tight.
Use the water in the flask second
Once my small water bottle is empty, I rely on the flask or double-wall vacuum insulated thermos (stainless steel). This will keep me hydrated the rest of the way to camp. I’ve never had ice form inside a flask in the PNW. I use a Hydro Flask Wide-Mouth Water Bottle – 18 fl. oz., a design that has been replaced with a 20 oz version. Take whatever size you require. A flask will allow you to maintain liquid all day in very cold weather, provided the liquid was hot or boiling when you filled it.
In weather above 25º F, I usually don’t bring the flask because I don’t need it and it weighs more (10.7 ounces) than a 32 ounce Nalgene bottle (6.2 oz) or single-wall titanium bottle (2.05 oz.).
Above 25º F the two water bottles are moving as I hike and usually will not fully freeze. I will not always fill the larger bottle completely because I only want to carry what I need. I always plan to melt snow when temperatures are below freezing. The warmer the weather, the more water I carry.
I only carry a water filter when temperatures are consistently above freezing. Water freezing inside a filtration cartridge will damage it. I have never needed water purification tablets in the Pacific Northwest.
In deep cold or weather below 20º F, I bring the metal flask filled with hot tea. This hot tea will cool down by the end of the day but remain fluid until I reach a camping spot. A small amount of that tea will be used as starter water when melting snow and may end up in my diner, but that’s okay.
When I reach the camp, I melt snow to refill the flask, as well as making water for cooking a meal. For winter trips, any meal with a broth, such as soup, Pho, or Ramen, will help you rehydrate. Dinners with broths are also easier to rewarm if necessary. Later, I’ll melt more snow to fill my empty 16 or 32 oz bottles with hot water. This hot water bottle can go inside my down parka to keep me warm around camp or in my sleeping bag when I’m ready to sleep.
Winter nights are long, so I usually plan to get up and hike around the camp in the moonlight or to enjoy the stars. During this time I may heat more water, but it is rarely the case that I need another hot water bottle at night. By the time a hot-water bottle becomes lukewarm, the sleeping bag is warm for the rest of the night.
In the morning I’ll start the day with boiling water for the flask and the small bottle. Same routine each day to resupply the water. Around camp, I’m also filling my mug with tea from melted snow and my cooking pot. Although I try to get by with carrying only 1–1.5 liters while hiking, I’m always consuming additional water at camp from melted snow. This way there is never frozen water and always enough to keep hydrated.
Are Plastic Bottles a Hazard?
When I used a Nalgene, I mainly carried the large empty Nalgene bottle to fill at camp for use as a hot water bottle rather than a drinking bottle. The degree to which Nalgene bottles are a hazard is not a question I can answer. Because of possible chemical leaching and the growing concern over micro-plastics, I mostly avoid drinking water from the Nalgene bottles if the water was boiling when it was added to the bottle. I don’t know how the plastic reacts to the heat and I don’t want to consume chemicals that might be released by that process. Instead, I drink from the flask.
The problem with using Nalgene bottles as hot water bottles was that I had to poor out the water after use and use more fuel to melt snow to replace the water. This is inefficient and waste fuel. In 2025, to solve this problem I switched out all my plastic bottles for metal alternatives for both winter and summer. Another hiker in the group did this first and tested them for leakage. Seeing that metal bottle were available that didn’t leak, I did the same.
SAFETY FIRST: Be aware that single-wall titanium bottles are very hot when you add boiling water to them. They also radiate heat faster than Nalgene bottles. To solve these problems, most titanium bottles come with a cloth sleeve. You can also use a sock.
It is unclear to me if this is safer because metal bottles are often coated with chemicals that make them unsuitable for dishwaters. So I am uncertain if there is an entirely safe alternative, but I have come to prefer metal bottles anyway.

Winter Bottles
- Small Nalgene Bottle
- Capacity: 16 fl. oz. / 473 ml
- Weight: 3.75 oz. / 106 grams
2. Large Nalgene Bottle
- Capacity: 32 fl. oz. / 1 Liter
- Weight: 6.20 oz. / 182 grams
3. Small Aluminum bottle
- Capacity: 16.9 fl. oz. / 0.5 Liter
- Weight: 2.6 oz. / 73 grams
4. Titanium Large Single-wall Bottle
- Capacity: 25.3 fl. oz. / 750 ml
- Weight: 5.15 oz. / 144 gram
5. Titanium Medium Single-wall Bottle
- Capacity: 20.2 fl. oz. / 600 ml
- Weight: 4.25 oz. /131 grams

Summer bottles
In the summer months when I don’t need a hot-water bottle, I would switch to ultra-light plastic bottles. I’m not using aluminum bottles.
6. Small Ultra-light Aluminum bottle
- Capacity: 16 fl. oz. / 473 ml
- Weight: 1.1 oz. / 30 grams
7. Large Ultra-light Aluminum bottle
- Capacity: 25.3 fl. oz. / 750 ml)
- Weight: 2.05 oz. / 58 grams
8. Large Ultra-light water bottle (Plastic Smart Water brand)
- Capacity: 33.8 fl. oz. / 1 Liter
- Weight: 1.5 oz. / 42 gram
9. Medium Ultra-light water bottle (Plastic Smart Water brand)
- Capacity: 20 fl. oz/591 ml
- Weight: 1.5 oz./42 gram
Why use Nalgene or titanium bottles?
Why not use an ultra-light water bottle that weighs less? In winter it is critical that the bottle doesn’t break or leak or melt. Wet gear, especially a wet sleeping bag, is dangerous. Nalgene bottles are simply very durable and reliable water storage containers.
Why carry a half-liter bottle?
Why not just take one or two large bottles? Without a pack bladder for easy access to water, you can attach a small bottle to your hip belt. The large bottles are too heavy for this method. For this method, the bottle needs to be attached close to the pack so that it is on the side and not bouncing around on the front of your thigh while hiking. The small bottle is quicker to fill and works well inside a parka or as a hand warmer too.
Why not use two flasks instead of an additional single-wall bottle?
There are lots of ways to manage water. You could, for example, just bring two large flasks. I don’t because of the extra weight and the fact that a flask doesn’t release heat like a Nalgene or single-wall titanium bottle. That is, a flask doesn’t work well as a hot water bottle. The single-wall bottle + Flask combination provides complete wanter management without adding unnecessary weight.
The Importance of Your Stove
Stoves are essential for maintaining the water supply. Carry the water you need, but avoid trying to carry all the water you will need for a full trip because it is too heavy and too hard to keep from freezing.
No campfires: High up on the snow in alpine zones campfires are usually prohibited because organic matter (wood) is too scarce to burn. The lack of organic matter is a year-round issue. Building fires is just unnecessary trouble. It is better to practice LNT and use a stove.
No water filters: Water sources such as streams and ponds are often frozen or unreachable in winter, so there is no reason to carry a water filter. Freezing weather can damage expensive water filters. I use a water filter in summer and the shoulder seasons when I am snow camping, but only when temperatures are above freezing.
Bring both cook and no-cook food: If you’re an ultralight backpacker that cold soaks food—someone use to camping without a stove or hot food—I recommend making an exception for cold weather. Cold-soaking isn’t going to work well in freezing temperatures. Always bring a reliable stove for melting snow, creating hot water bottles, and warming meals. This method is the easiest way to stay warm and comfortable in cold conditions. That said, backup no-cook meals are also recommended because situations can arise that prevent setting up a stove.
Don’t lose your heat! Avoid staying out in the cold and wind unprotected while cooking. Always put on layers and wind protection first when you arrive at your camp and then start cooking. It is hard to regain body heat once you lose it. The main secret to winter comfort is to conserve your heat. If you do lose it and your stove fails, you will not have a hot water bottle and you’ll be in your sleeping bag shivering for a long time. Don’t make that mistake!
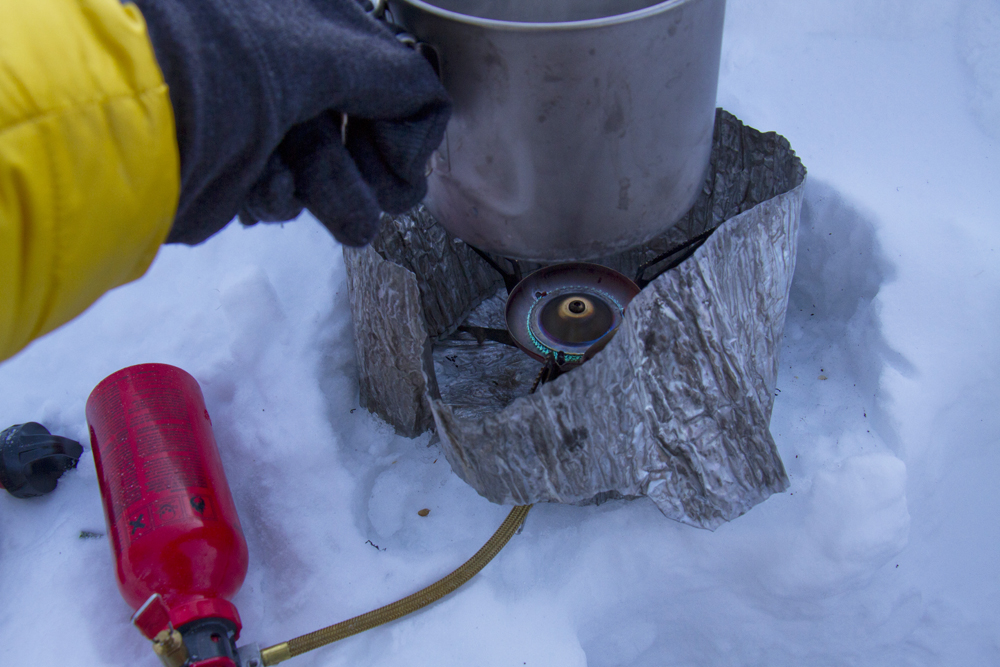
Canister fuel and liquid fuel stoves: Both canister fuel and liquid fuel stoves will work in the mild winter weather conditions found here in the Cascade Mountains, but a liquid fuel stove usually performs better in colder and windy conditions. (For more about the limitations of canister stoves see: Will a canister stove work for winter backpacking?) I use MSR Whisperlite International and Universal stoves. The Universal is able to use both canisters and liquid-fuel.
If you use a liquid fuel stove it is important to understand how the design works in order to position the pump correctly and make sure the coil is heated by the primer flame. Do not light a liquid fuel stove in or near a tent because the primer flame is often tall and will instantly melt the tent.
The windscreen is an important part of the liquid fuel system as it protects the flame ensuring efficient heat. BE AWARE that windscreens are not safe on canister stoves. A canister stove with its own built-in windscreen is recommended, such as the MSR Reactor Stove System.
We have had ten hikers in a group and as many as three canister stoves fail. Sometimes hikers are trying to rotate and warm two canisters and that fails too. In my opinion, the best group situation is multiple liquid-fuel stoves.
Four winter backpacking stove tips
Stoves are so essential to your water supply, so kep in mind these tips:
Tip 1: Have multiple fire starters. A flint is the most reliable all-weather fire starter and all you need to ignite a stove. If you decide to use a flint, practice at home first. It is not as easy as it sounds to stike a flint next to a primer cup on a liquid fuel stove. Regardless of what type of firestarter you prefer, it is wise to carry multiple starters—flint and small lighters—because any one of them can fail in cold snowy conditions. Do not set your lighter on the snow because this can cause the flint to get wet and fail. Lighters should be stored in a pocket that is warmed by your body. Matches are the least reliable method. The clear lighters allow you to see the fuel level in your lighter, but are made of cheaper materials and tend to fail more compared to the better Bic lighters.
Tip 2: Everyone should bring their own stove and some extra fuel in case someone’s stove fails, as often happens. Stoves are important to safety and comfort and failures are not uncommon. No group should rely on just one stove.
Tip 3. Bring enough fuel. 11 fluid ounces of fuel is often sufficient for a two-day or weekend trip, as is one fuel canister, but 20 ounces of fuel provides extra in case someone else in the group has stove problems.
Tip 4: Always bring a stove repair kit. This applies to MSR liquid fuel stoves because these stoves can be repaired and serviced in the field. Canister stoves cannot. A stove that fails is a serious problem. At the very least, bring the wrench, cleaning needle, and an extra jet value. You want to be able to unclog or replace the fuel jet if necessary. Be aware that gently shaking a Whisperlite stove allows the self-clearing needle in it to clear the fuel passage.
A tutorial video for servicing MSR stoves is available here: https://youtu.be/O1WSGFBq-FI. Get the service kit that is specific to your stove and practice servicing your stove at home. It is not as easy as it looks in the MSR videos. The first time you use the jet and cable tool to pull out the fuel line cable on an old stove can be painful and difficult. When you can calmly service a liquid fuel stove on a cold dark winter night in the wind on a mountain top, you are a Jedi winter backpacker.
Leave comments and questions below.
