All trips into the wilderness come with dangers and risks as well as rewards. Mitigating risks involves gathering information, careful planning, bringing gear suitable for any conditions, and avoiding mistakes.
The Pacific Northwest—Unique Challenges
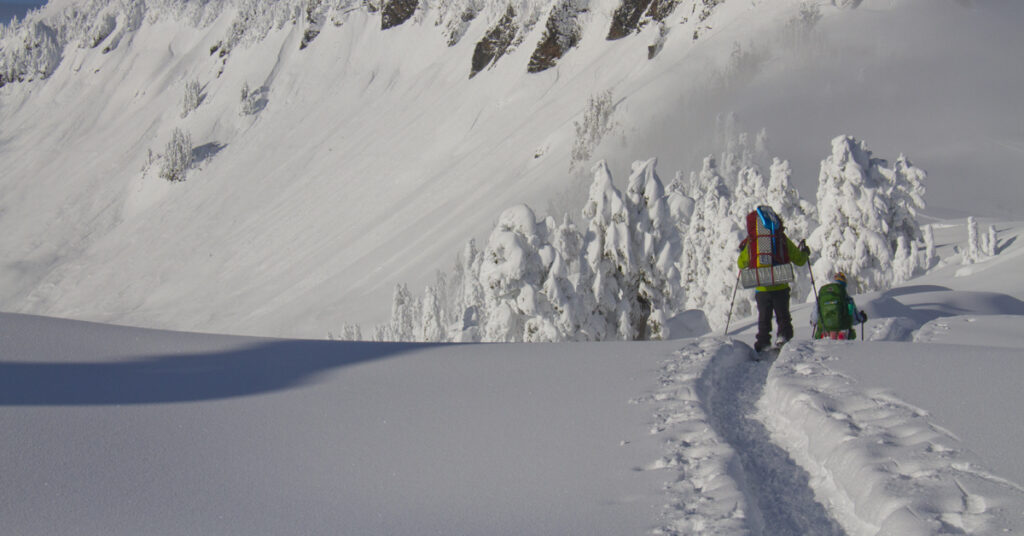
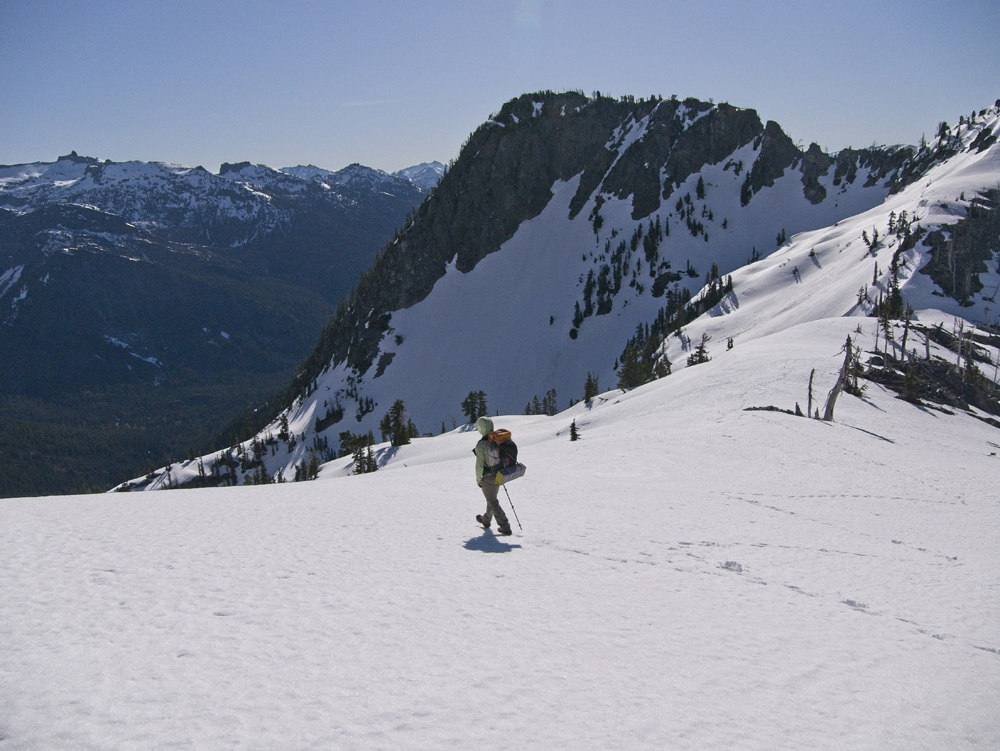
Much of the Cascade Mountains in the Pacific Northwest is located in the marine west coast climate zone. Marine or maritime climate zones (Köppen classification) have a relatively mild and narrow temperature range. The peaks of the Cascade Mountains force up weather fronts originating in the Pacific Ocean causing a significant amount of rain and snow. In the winter, the west side of the mountains experience high precipitation combined with warm maritime temperatures resulting in wet and heavy snow, high avalanche danger, and cloudy skies. On the west side of the Cascade Crest, temperatures are rarely below 0 °F (−18 °C) or above 80 °F (27 °C). Despite the mild winter weather, the relatively warm temperatures, heavy wet snow, and winter winds, create a unique set of challenges with regard to hyperthermia and avalanche risks. Having the appropriate gear and skills are essential to both comfort and safety.
Trip planning starts with these considerations:
- Reviewing the avalanche forecast. Is it safe to be in the backcountry?
- Reviewing the weather forecast. Will snowfall levels be manageable or too heavy to reach the destination or exit the parking spot at the end of the hike?
- Finding accessible trailheads. Can the trailhead be reached? Are the roads open or can they be hiked?
- Winter trail evaluation and route finding. This involves looking for routes with manageable risks. Where does the route cross dangerous avalanche slopes and how can these be avoided? What are the snow conditions at the elevations along the route? What distances are involved and how will snow levels affect travel speeds? Is the destination worth the effort and will there be views?
- Winter gear adjustments. Based on snowpack, weather forecast, and time of year, what gear will be needed, such as avalanche gear, wind and UV protection, insulation, or traction?
1. Reading the Avalanche Forecast
Check the Northwest Avalanche Center (NWAC) avalanche forecast here: https://www.nwac.us/
Note the danger level and type of avalanche risks. Click the zone and note the danger level, problem type, aspect/elevation, likelihood, and size. Read the “Forecast Discussion” and look at the photo and videos provided. This is an excellent way to learn about avalanche signs to watch for while hiking.
Unlike Skiers, who ski the steep open slopes, we will be looking for snowshoe routes that avoid avalanche terrain as much as possible.
You can begin learning about how to read avalanche reports by watching these tutorial videos:
If you are new to snow conditions and avalanche dangers, attend the classes offers by NWAC, especially those designed for snowshoers. You may also find their tutorial helpful.
Avalanche Gear
Even when the forecast says the risk is low, it is always best to carry three essential pieces of avalanche gear: A transceiver, a probe, and a shovel. Check the transceiver batteries and functionality before heading out. Turn on the transceiver at the trailhead and leave it on at all times. Wear your transceiver under your outer clothing so it cannot be knocked out of you. Hopefully, you will never need the transceiver or probe, but the rescue shovel will be useful when you need to build a snow wall for wind protection, level a tent spot, dig a cooking pit, or clear a passage through a snow bank, such as to reach a lower log bridge.
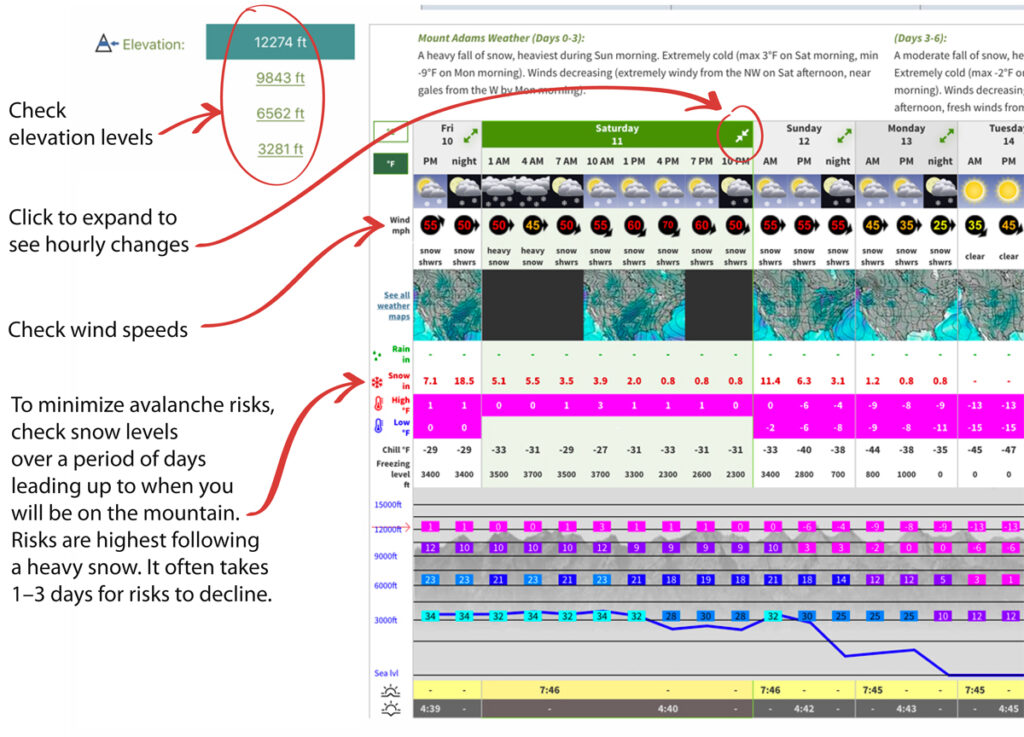
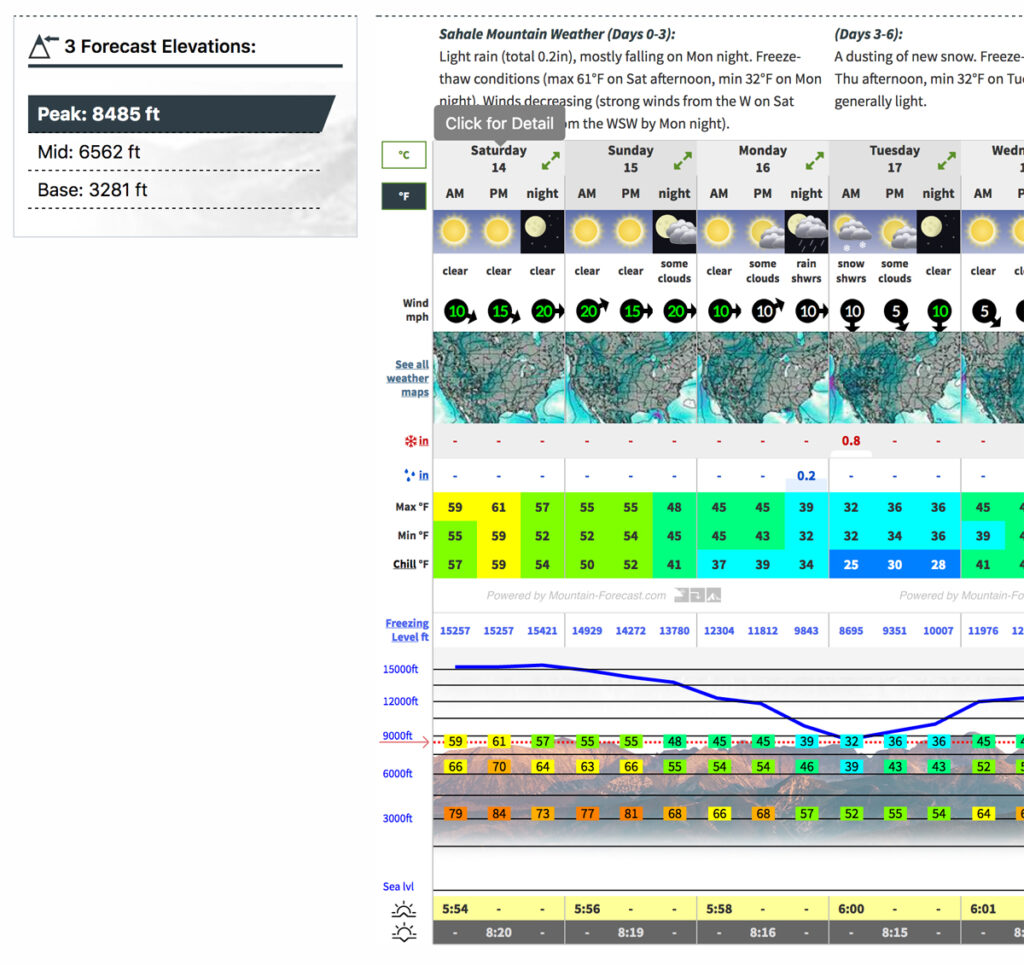
2. Reading the Winter Weather Forecast
Always check weather temperatures and wind speeds, not just cloud cover.
An easy way to check the mountain weather conditions is the Mountain Forecast website: https://www.mountain-forecast.com/
I recommend bookmarking specific mountains.
Pay attention to each elevation you will be in. Sometimes there will be rain at low elevations and snow and wind at higher elevations. Conditions around freezing are common in the Pacific Northwest and make staying dry difficult. Ideal winter travel tends to be in colder conditions 15–25ºF, which is cold enough to stay dry, but not so cold as to require expedition-level gear.
You can also use the National Weather Service website to pinpoint specific locations on the Washington Map for weather information. Here’s an example using Lookout Mountain: https://forecast.weather.gov/MapClick.php?lon=-121.37214660644531&lat=48.54917907910345#.Ywp4bB17nKk
Interpreting the Mountain Weather Forecast
Why Rain Gear is Always Mandatory
There are three reasons to always carry rain gear:
- You can get wet on clear days: Even on clear days, you must be prepared for moisture. The sun can melt snow on the top of the trees causing what is equivalent to a heavy rain shower in the forest.
- You need wind protection. Rain gear provides an essential hardshell for wind protection. It is important to consider not just snowfall, but wind conditions. More about planning for wind here: https://winterbackpacking.com/preparing-for-winter-wind/
- You need the warmth. Rain gear provides an additional layer of warmth when needed.
3. Finding Accessible Trailheads
In the winter months, trailheads are often closed and/or covered in snow. This means the accessible trailheads tend to be near major roads or ski resorts.
The first major consideration is the snowpack. If the snow is deep and not yet compacted, snowshoe travel is difficult and can even be impossible. However, if snowshoe travel is possible, the question is whether a trailhead can be reached by either a plowed road or a snow-covered forest road that is short enough to add to the trail hike.
If the is more than 8 inches of fresh snow for several days in a row, hiking more than a few miles in the snow even with snowshoes may be too exhausting.
Elevation changes affect the level of snow on the road and trails. Some routes, for example, might have 4 miles of a closed forest road with little snow followed by 4 miles of snow deep enough to require snowshoes. In some cases, the trailhead can be reached even if the forest road is closed.
Trailhead Resources
Resources for determining access to trailheads are listed below.
Washington State Department of Transportation (wsdot)
For mountain pass road closures, use the Washington State Department of Transportation (wsdot) website for updates and information: https://www.wsdot.com/traffic/passes/
National Forests in Washington State
Resources for checking road and trail conditions and closures:
Gifford Pinchot National Forest
Additional Resources
- Washington Department of Transportation
- Washington Department of Forestry Fire page
- Washington Office of Emergency Services
- Game Management Units (GMUs) Maps
- State Highway Maps (PDFs)
Ranger Station Contact Information
- Forest Headquarters
- Mt. Baker Ranger District Offices (360-854-2553)
- Glacier Public Service Center (360-599-9572, hours Mon–Sun, 8 am–4:30 pm) Mt. Baker-Snoqualmie National Forest and North Cascades National Park
- Heather Meadows Visitor Center
- Darrington Ranger District Offices
- Verlot Public Service Center (360-691-7791, 8–4 pm, closed Sat, Sun)
- Skykomish Ranger District Office (360-677-2414, 8/9 am–12 pm, 12:45–4:30 pm, M-F)
- Snoqualmie Ranger District Offices
- Enumclaw Office
- Silver Creek Visitor Center
- Cowlitz Valley Ranger District
- Mt. Adams Ranger District (509-395 3402, 8–4:30 pm, closed Sat, Sun) Gifford Pinchot National Forest
- Mount St Helens National Volcanic Monument
National Parks in Washington State
Mount Rainier
- For road updates, visit @MountRainierNPS on Twitter.
- Road Status list (NPS website)
- Road status map and text-only link
- Twitter account for road alerts
- Winter Recreation Webpage
- Winter Camping Information (PDF)
- Contact information (Plan Your Visit page on Rainier Website). Longmire Museum (360-569-6575) Open year-round. Best number for reaching a person.
North Cascades National Park
North Cascades Road Closure and Winter Recreation webpage
For the North Cascades Visitor Center, Park and Forest Information Center (Sedro-Woolley), Wilderness Information Center (Marblemount), Golden West Visitor Center (Stehekin), Methow Valley Ranger Station (Winthrop), and the Skagit Information Center, click here.
Olympic National Park
- Olympic National Park Winter Road Closures and Recreation page
- Current conditions
- Hurricane Ridge Weather Station
- Waterhole “Snotel” Site
- Hurricane Ridge Webcam
- Lake Crescent Webcam
- Quinault Climate Reference Network Station
Non-motorized Snow Parks in State Parks in Washington State
There are about 40 Sno-Parks designated for non-motorized use.
Non-Motorized Sno-Parks by region
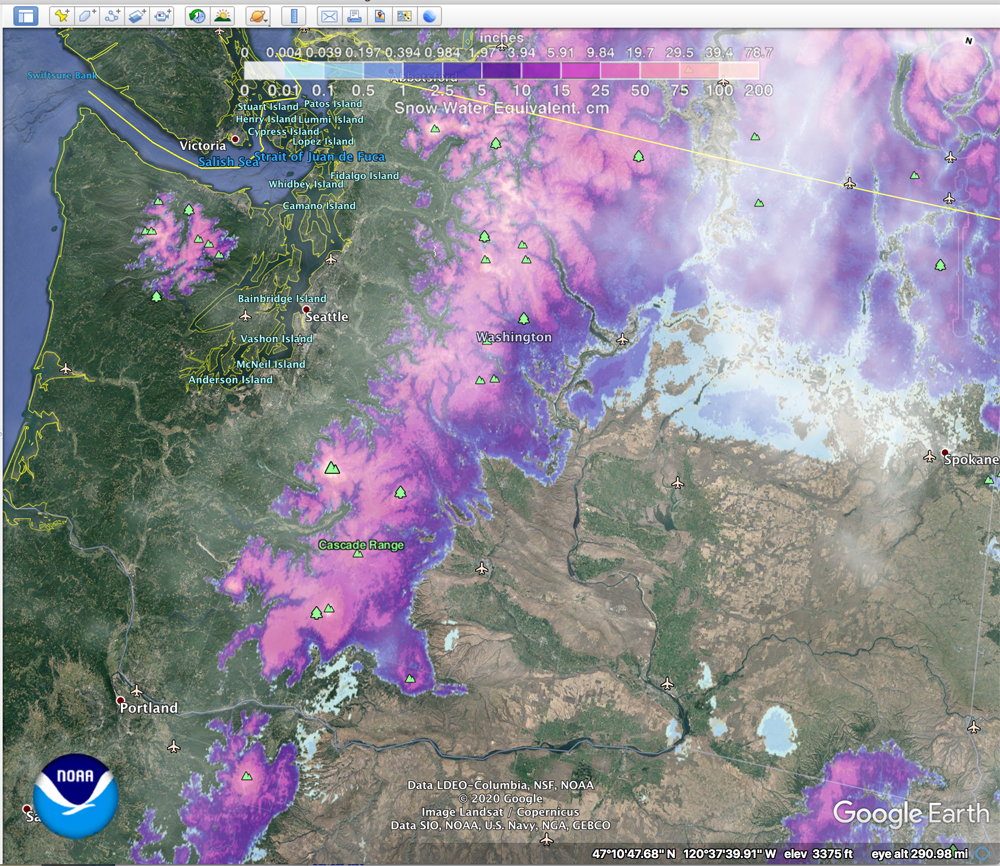
How to View NOAA Snow data on Google Earth
You can load the latest NOAA Snow Data into Google Earth to get an idea of where recent snowfalls are heaviest and what roads are affected.
National Snow Analyses 3D Interface
The data comes in a Keyhole Markup Language (KML) feed and is a compressed (KMZ) file.
Download the latest National Snow Analyses here: https://www.nohrsc.noaa.gov/earth/. Mac users can then drag and drop onto the Google Earth icon to launch. For more instructions, visit Connecting Google Earth and Maps to NDFD Web Services (https://graphical.weather.gov/xml/mdl/XML/Design/Google_example.php).
Gear for your car
- Windshield ice scraper
- Tire cable chains
- 30″ bow saw
- Tow strap
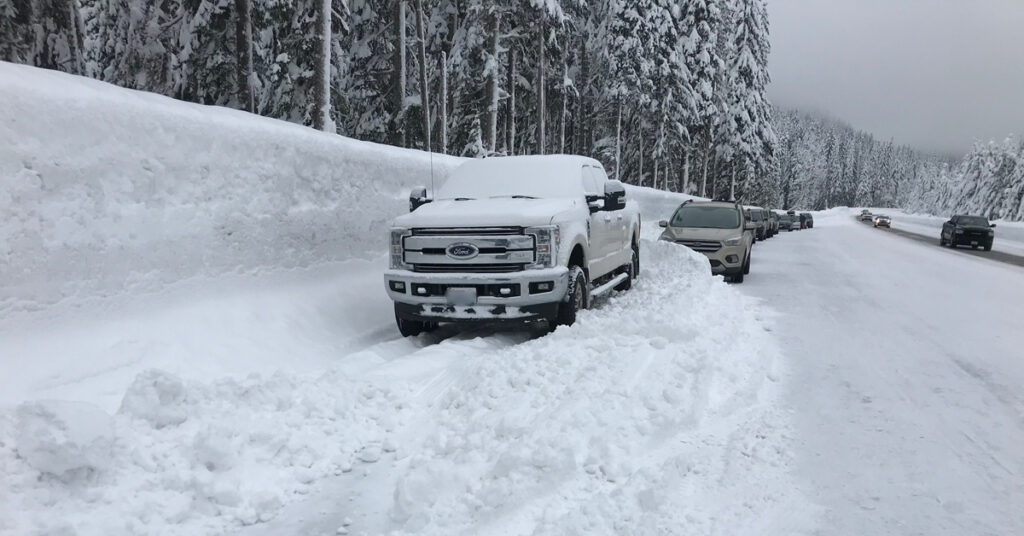
Always bring cable chains for your tires. I usually bring pliers and gloves to help with the cable installation because the cables can get gammed. Cable chains are often required by law for the mountain passes and roads to Mount Baker and Mount Rainier. Many mountain roads are steep and have no guardrails.
Snow becomes compacted into hard slick ice as each car goes over it, making it impossible to steer the vehicle without cable chains on the tires. The car will simply move and slide as directed by gravity, without regard for acceleration or brakes or how you turn the steering wheel. The ice is so slick that if you get out of the car you will not be able to stand up. The fact that cars in front of you have not lost control is not an indicator that your car will not suddenly start sliding.
Another useful tool is a 30″ bow saw. These saws are incredibly fast and effective for cutting trees. Sometimes the snow will cause trees to fall over the road, blocking your route home after a hike. Because this is the Pacific Northwest, some trees may be too large to clear. But many forest roads go through areas where old-growth is rare and the trees are smaller.
Winter Driving Safety Tips
- Carry tire chains in both winter and spring.
- Keep extra distance between vehicles.
- Stay back when following plows.
- Never stop or park in a traffic lane (you may be hit by sliding car).
- Practice installing chains before you need them.
- Avoid setting the emergency brake when parking because it may freeze.
- Be extra cautious crossing bridge surfaces because of icy surfaces.
- Make sure snow is not blocking the exhaust when parking overnight or in snowfall.
4. Winter Trail Evaluation and Route Finding
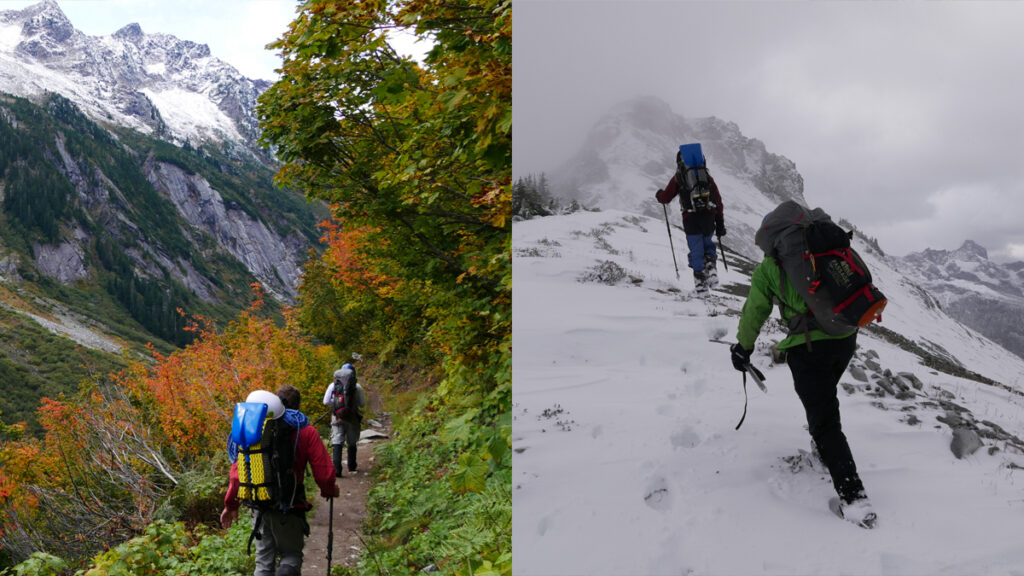
In the shoulder seasons, the snow is high up and trails can often be approached by using the forest roads. Day hikers are often fooled by the clear conditions at the trailhead only to find themselves in deep snow, slippery ice, and windy conditions as they move a few thousand feet higher up the trail. Not being prepared with rain gear, gaiters, microspikes, and trekking poles with baskets, can place you at risk.
Once the forest roads close or get covered in snow, the forest road can only be hiked if the distances are short enough. Bear in mind that some forest roads have scenic views, but most are lined with trees. In most cases, you want to avoid hiking long forest roads. Many people choose forest roads for snowshoe hikes hoping to avoid avalanche dangers, but this does not always eliminate avalanche dangers. With careful planning, scenic wilderness destinations can be found beyond the forest roads.
As a general practice, it is best to hike to planned winter destinations in summer and the shoulder months. When the trails are covered in snow, it is good to already be familiar with the route, the terrain, and general directions. Be mindful that orientation is more difficult in winter and the trail can be hidden many feet below the snow. It is not always possible to see the sunrise, sunset, or north star. Things will look different and your safest winter route may involve avoiding the established trail.
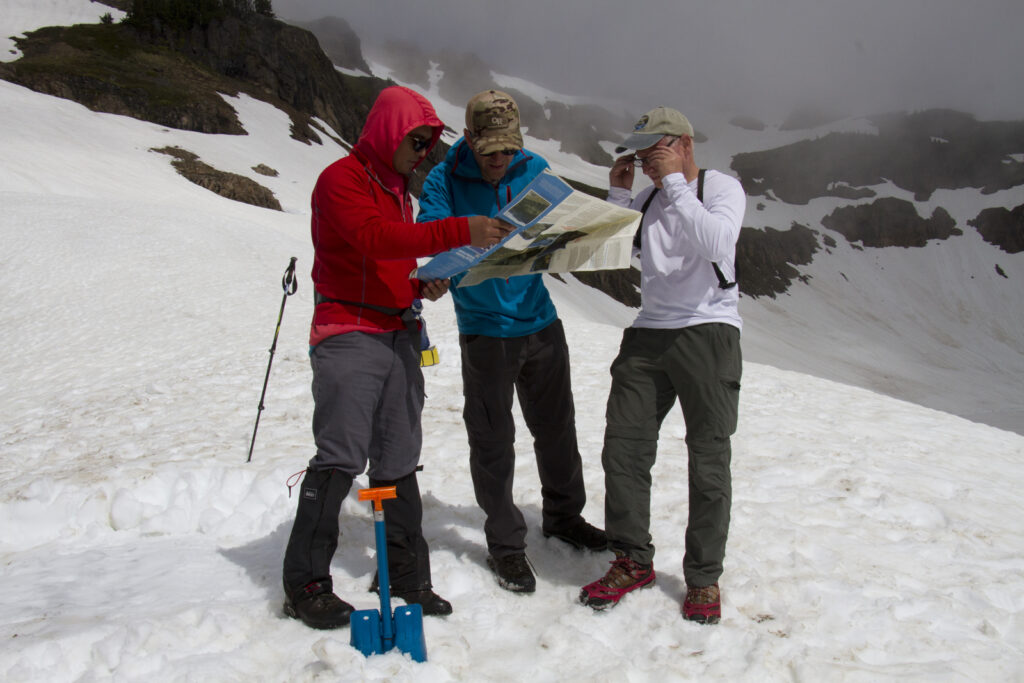
Here are a few additional steps to follow when checking out a route on a map for winter trips.
- Check the avalanche forecast.
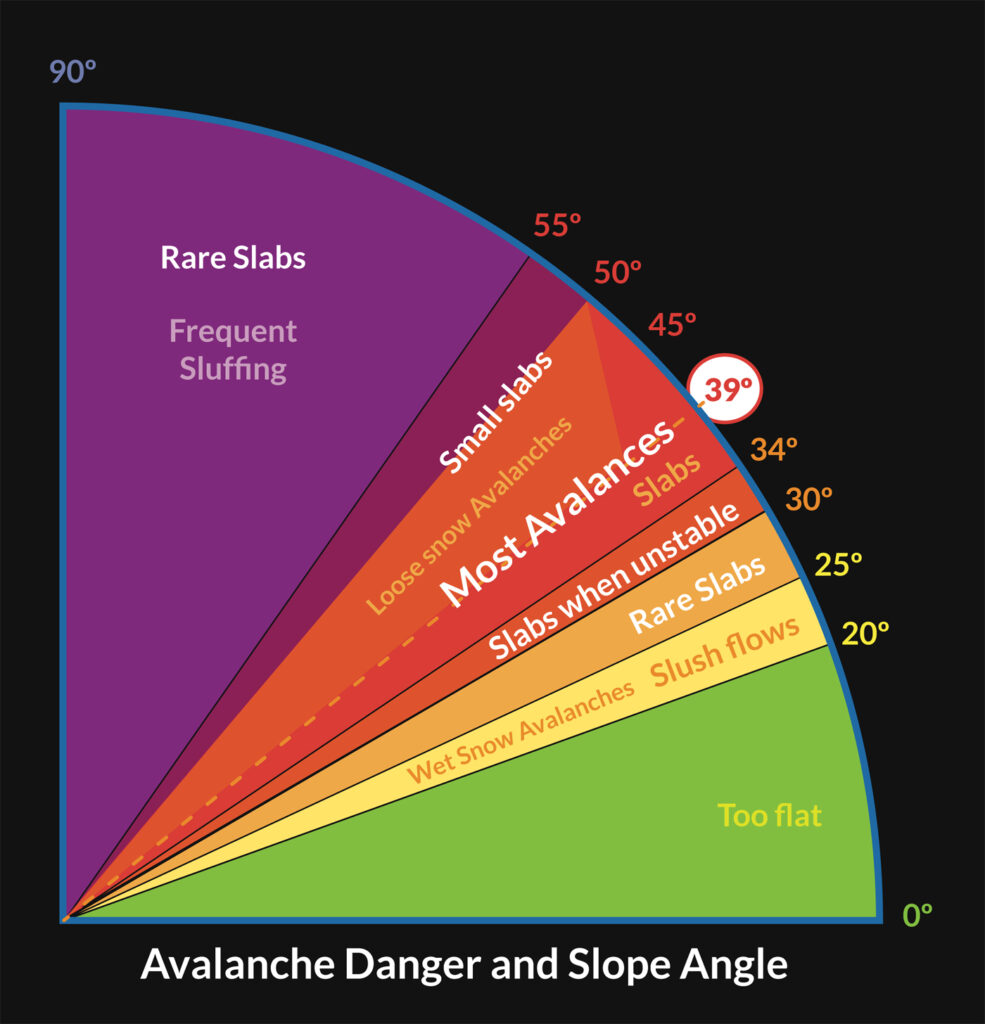
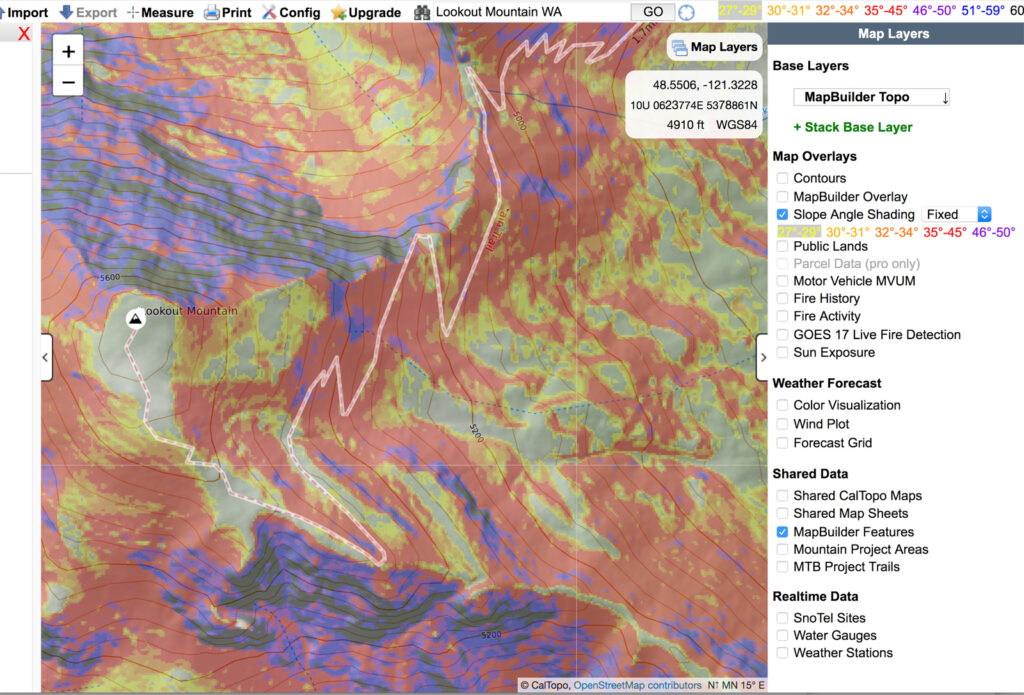
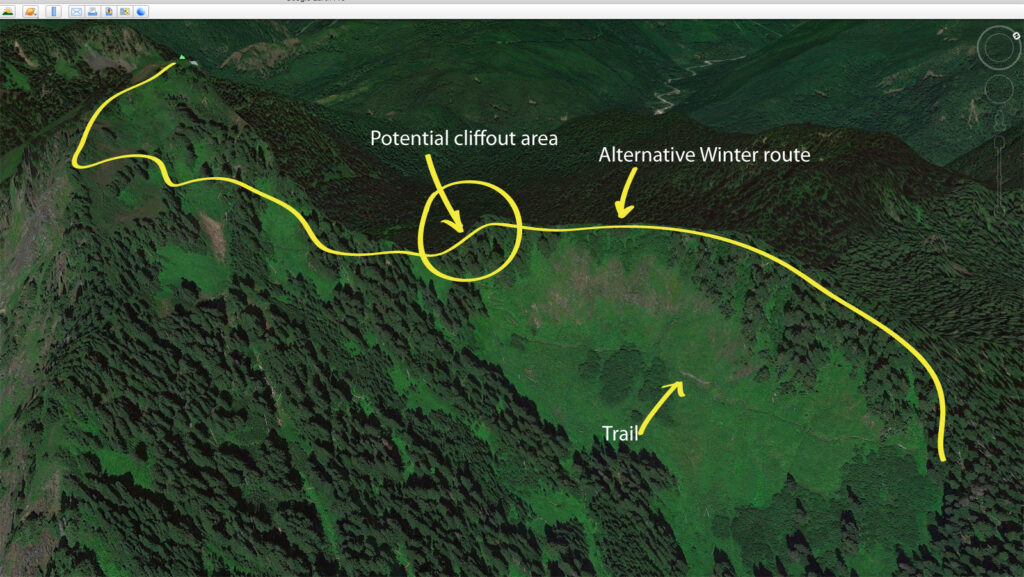
- Check slope angles on a topographical map, such as Caltopo. (Here’s a tutorial for using Caltopo: https://www.youtube.com/watch?v=2188-p_uFMY). Check where the trail is in the higher risks slopes (30–55º slopes) and use satellite imagery to evaluate tree cover and how anchored the snow may be. Look for alternative routes or ways to navigate around these danger areas.
- Check slope aspect. The aspect is the direction of the slope and relates directly to such issues as sun and wind exposure. The avalanche forecast will indicate how each aspect is affected by each avalanche issue.
- Check the sunlight position on the trail. On the trail, you can view the sun’s position, a GPS or compass to determine which aspect you’re on. But prior to the start of the hike, you can use Google Earth to see sunlight on 3D images of the landscape. This means you can plan your route with sunlight effects in mind prior to being there. You can evaluate the amount of sun on slopes at the time you plan to cross those slopes. On the trail, you can also identify whether your planned campsite will receive early morning sunlight.
Creating a Winter Route
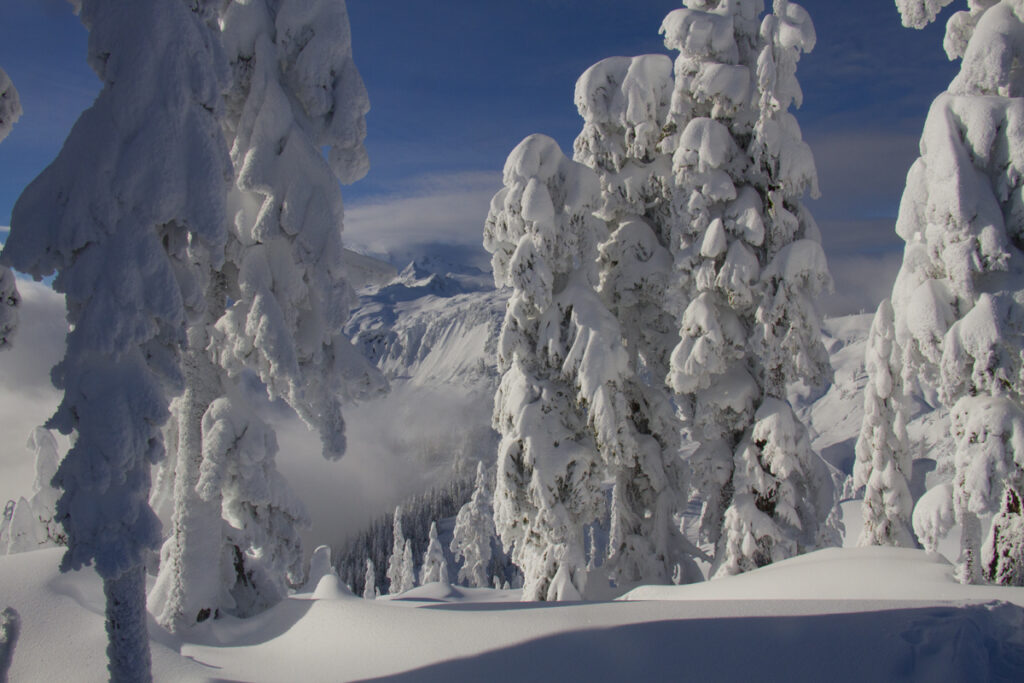
The winter offers opportunities not found any other time of the year. Wet and marshy areas can become wide-open areas when covered in deep snow. Popular trail viewpoints that are crowded in the shoulder and summer seasons are sometimes completely empty when covered by winter snow. Areas too rocky to camp on can be smoothed over with snow. Lakes can freeze over solid enough to camp on. All of these reasons can justify winter route changes.
The most common reason to avoid established trail routes is exposed or loadbearing slopes with increased avalanche dangers, such as cornices and visible crowns. In such instances, it is better to find a route that is anchored by trees or on a windward slope with consolidated snow.
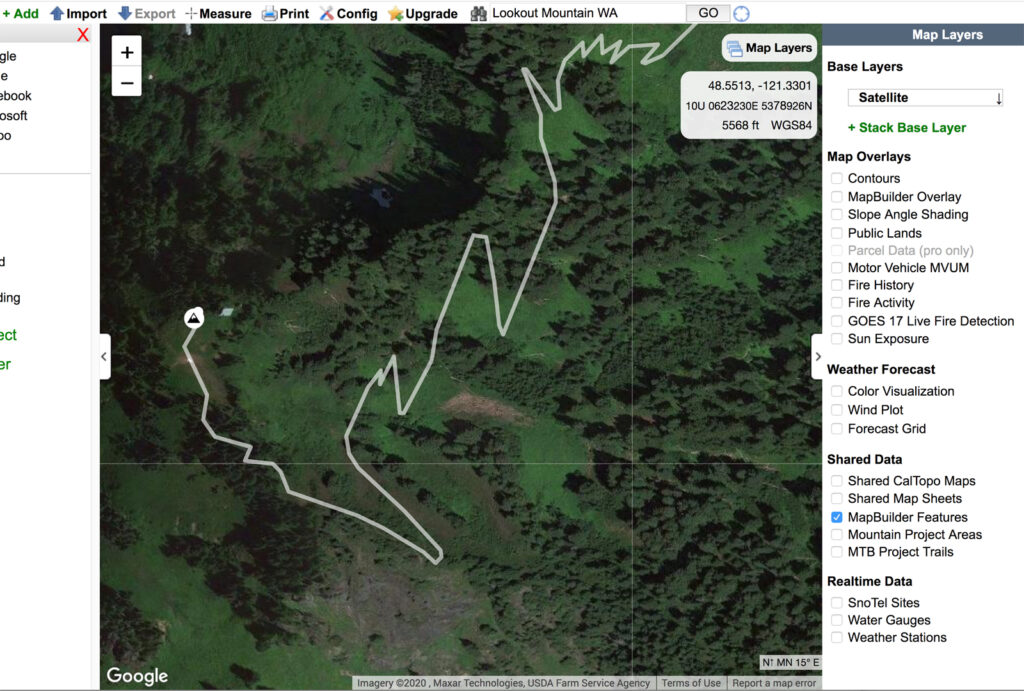
An Example
These next three map screen images illustrate an example of winter route planning (see captions for explanations).
5. Winter Kit Adjustments (Month-by-Month)
Here are some basic notes for each month of the year to help you gauge what to expect and what gear to add to your usual winter kit. While you will want to adjust your gear list based on weather, snow conditions, terrain, and trip duration, your basic kit needs to include gear suitable for unexpected cold, wind, and visibility conditions.
September–early October
An occasional early season snowfall can provide snow camping opportunities in September and October. Expect temperatures above freezing at lower elevations.
October–November
These months are often the most challenging because the weather is wet and cloudy and not quite cold enough to stay dry. It is essential to always stay dry in winter to avoid hypothermia risks. For this reason, few trips occur in November, unless the weather is colder and drier than usual. In these conditions, it is often better to use gear that works in wet conditions—synthetic insulation rather than down, wool baselayers rather than nylon.

December and January
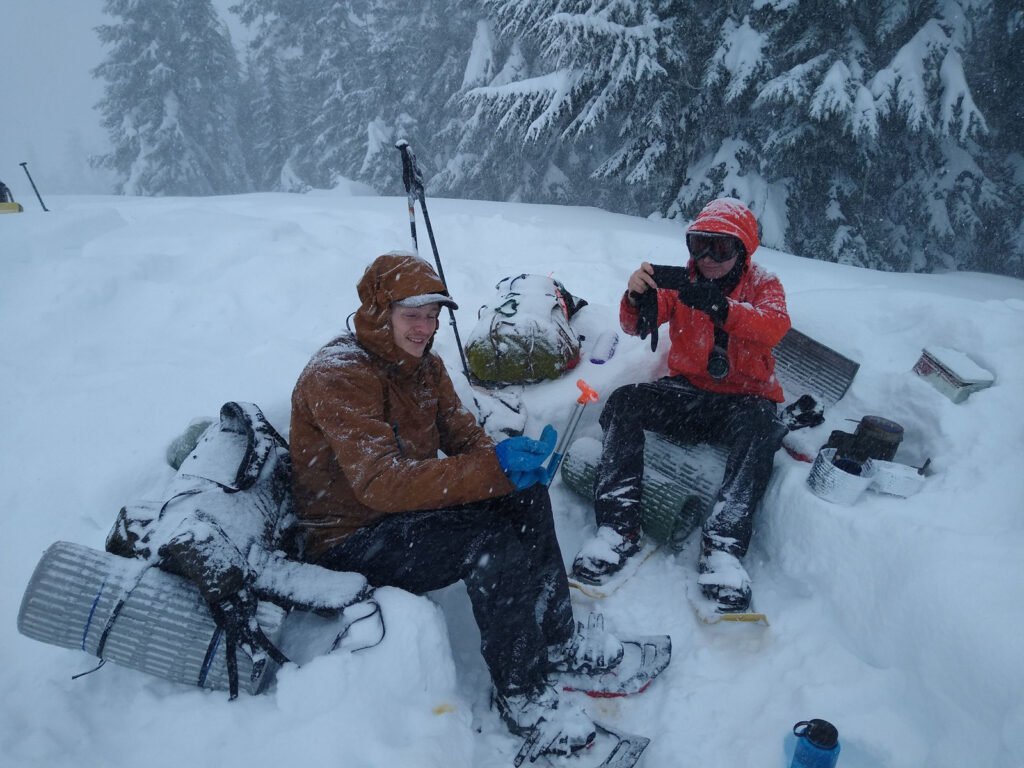
These months tend to be cloudy and daylight hours are fewer. Distances usually have to be short because the snow is deep and travel time is slower. Trip planning is difficult, but some of the most amazing heavy-snow trips occur during these months. There are many cloudy days in the winter and the few that have sunshine are not going to always fall perfectly on the weekends. If you are flexible about when you can go, I can sometimes reschedule for a bluebird weekday, which is better than canceling. Short snowy trips in December are good opportunities for people new to snow camping to test gear and learn techniques. Most routes require snowshoes, trekking poles with snow baskets, and avy-gear (shovel, probe, and beacon).
February to March
Opportunities for longer trips on compacted snow increase. Snowshoes may be needed so these need to be strapped to pack.
April–June
There is still abundant snow at high elevations. The days are longer, the weather clearer and the snow consolidated making longer and more frequent trips possible. Microspikes and/or crampons can usually replace snowshoes. Ice ax and helmet advisable for crossing windswept and ice ridges and hard slops.
July–September
The snow melts out and snow camping is only possible on the higher elevation destinations. July and August are characterized by heat, crowds, bugs, and smoke from forest fires. Both mosquitoes and tiny biting black flies (buffalo gnats) will swarm you allowing no relief outside your tent. If you want a communal cooking area consider bringing a double-size mosquito net tent. If you are familiar with winter camping you will be wondering why anyone hikes and camps in Summer.
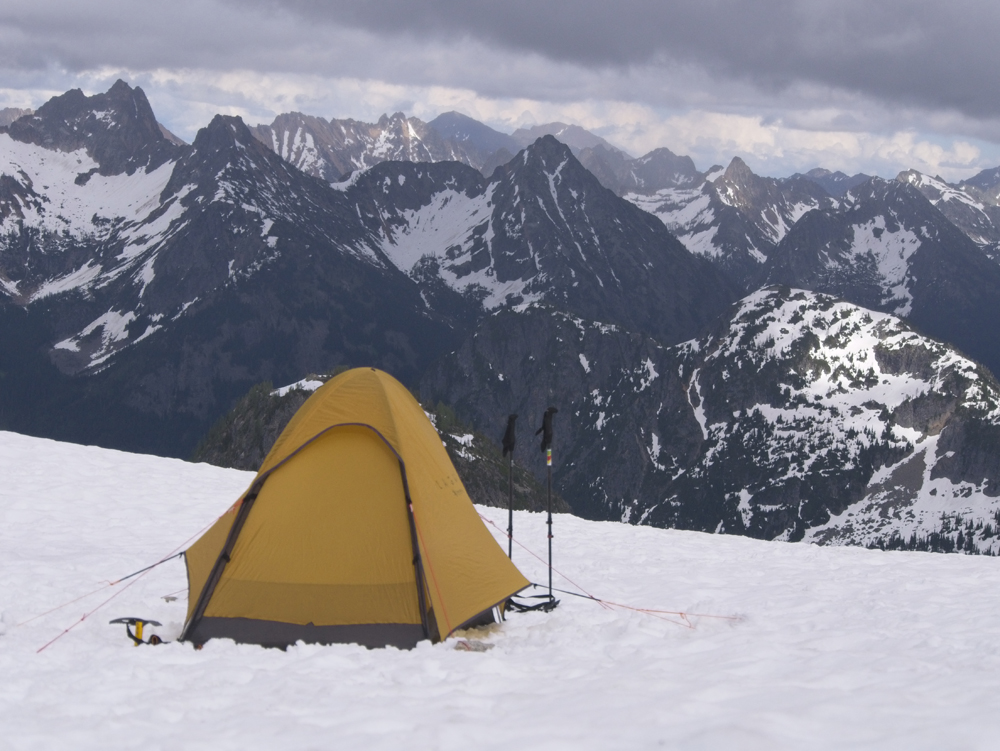
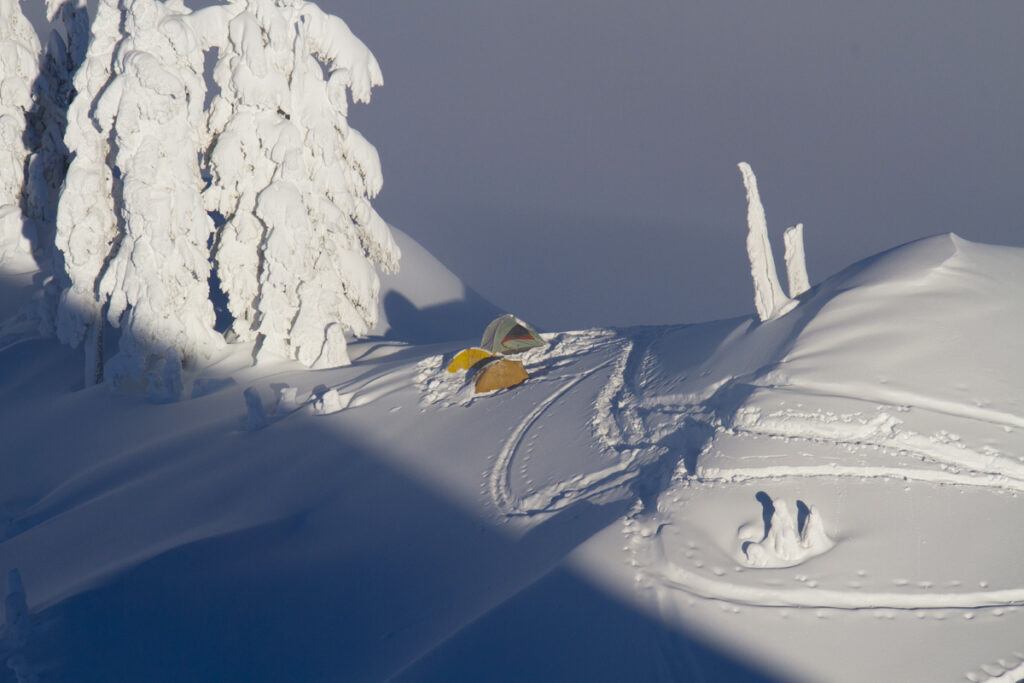
Bear in mind that even in the hottest months there are usually nights where temperatures drop to 25–35º or colder. A 30ºF sleeping bag is usually enough in summer, but may not be enough comfort at higher elevations even in August (see example below).
Hunting Season
Deer and Elk hunting season steps up in Fall. Bright clothing is recommended. Consider using an orange rain cover on your pack. You can learn more here: Summary of Seasons and Hunt Map (Washington State).
Winter whiteouts
I have had some great trips in mostly cloudy whiteout weather, but generally speaking, I am more inclined to go if there is at least some partially clear conditions in the forecast. Unfortunately, that partially clear sky sometimes turns into sustained whiteout conditions.
For more about winter gear see:
- The Fifteen Essentials for Winter Backpacking
- What’s in My Winter Backpack
- A Winter Back Under 30 lbs
Summer hiking resources:
This is not yet a concern in winter, but if you are hiking in the summer or shoulder seasons, forest fires and smoke is now a persistent challenge for hikers—what some are calling the new “fifth season.” Here are some additional resources to help you plan accordingly.
- Pack extra food in case your route is cut off.
- Pack a N95 mask to protect against smoke particulates.
Forest fire smoke and air quality map: https://gispub.epa.gov/airnow/?tab=0&clayer=ozonepm&mlayer
Forest Service Fire Status Map: https://maps.nwcg.gov/sa/#/%3F/%3F/47.2681/-120.9249/8
Interagency all-risk incident information management system location map (includes forest fires): https://inciweb.nwcg.gov/
Forest closures map: https://usfs.maps.arcgis.com/apps/webappviewer/index.html?id=8e69381e35144962a835ee59aafba153¢er=-13465688.5634%2C6077123.2354%2C102100&level=8
Forest Service Alerts and Notices (Doesn’t include National parks)
Okanogan-Wenatchee National Forest: https://www.fs.usda.gov/alerts/okawen/alerts-notices
Mt. Baker-Snoqualmie National Forest: https://www.fs.usda.gov/alerts/mbs/alerts-notices
Gifford Pinchot National Forest: https://www.fs.usda.gov/alerts/giffordpinchot/alerts-notices
Olympic National Forest: https://www.fs.usda.gov/alerts/olympic/alerts-notices
I will be updating and improving this page. Any suggestions or corrections you have are welcome.
Please leave comments below. Be aware that I receive a lot of spam. It is important that your comment is recognizable as a backpacking/hiking kind of comment. Otherwise, I may delete it by accident.