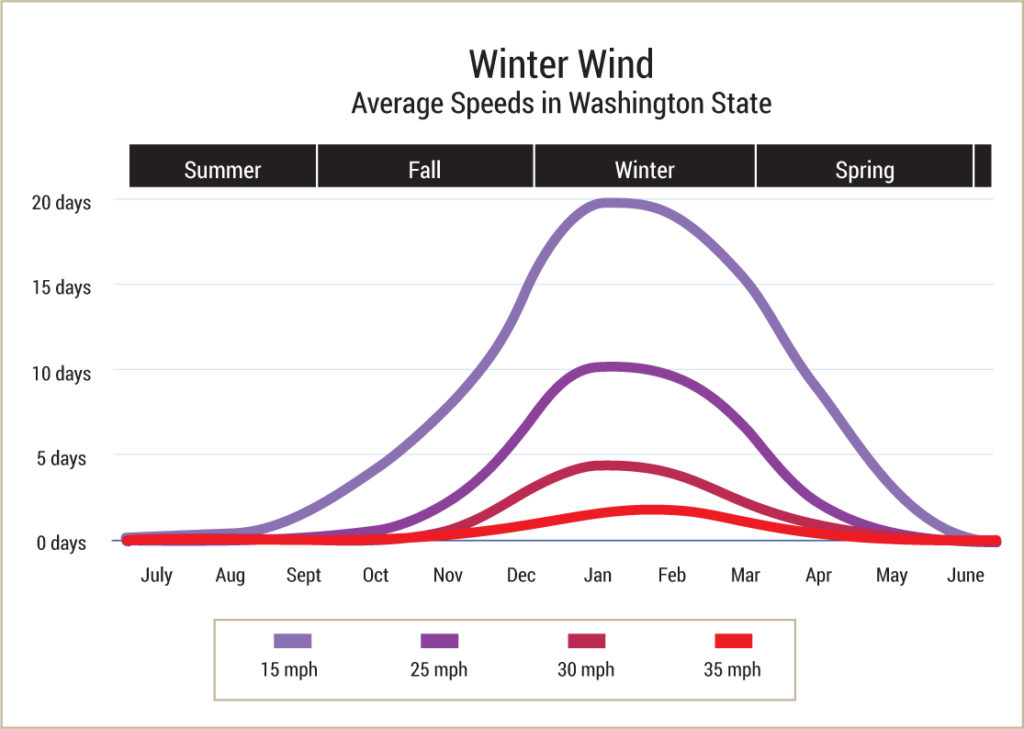
Pacific Northwest winter weather is mild with temperatures usually between 20 to 35ºF for most backpacking trips between 3,000 and 7,000 feet of elevation. However, during the winter months, wind speeds increase significantly and trip planning needs to include clothing for wind protection to prevent discomfort, hypothermia, and even frostbite.
There is a thin line of protection between being a happy winter camper and being miserable and at risk. Always plan your kit so that you are fully protected and never cold for any significant length of time.
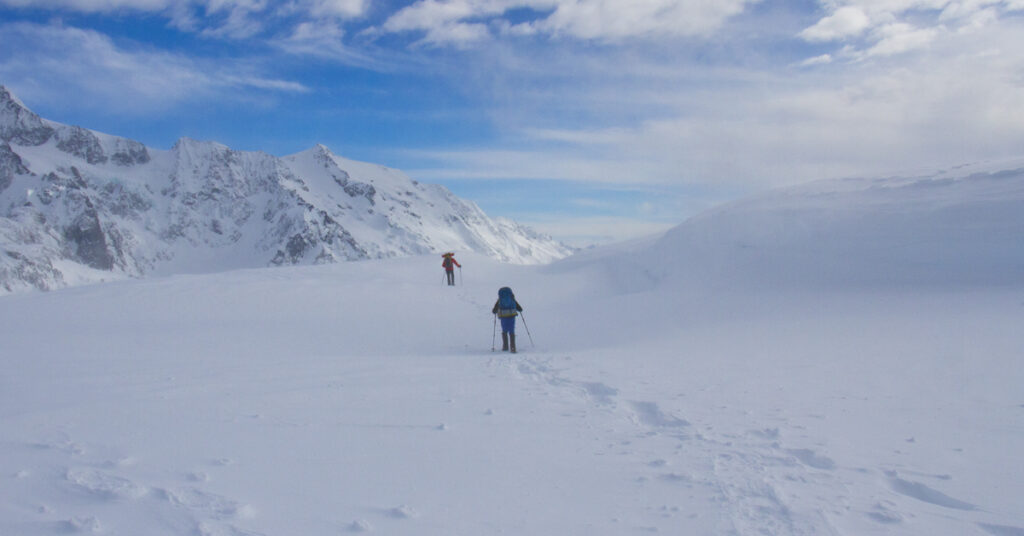
Wind Forecasts
When planning a trip, bear in mind that a forecast of 10–25mph wind can fail to represent wind speed in specific terrain conditions, such as the crest of ridges or narrow saddles and valleys, where the wind can increase significantly. The Mountain Forecast website provides wind speed data for

Judging wind speed and frostbite risk
It is often easier to get a temperature forecast than to know the wind speed you are encountering. If the wind is strong enough that you are having trouble walking and you know temperatures are below 10ºF, then you are at risk of frostbite on exposed skin. To make it easier to judge wind speeds, I have combined the Beaufort Wind Force Scale with a wind chill chart (see below). Note that the brackets for West and East Cascades are averages. Wind chills can exceed these averages.
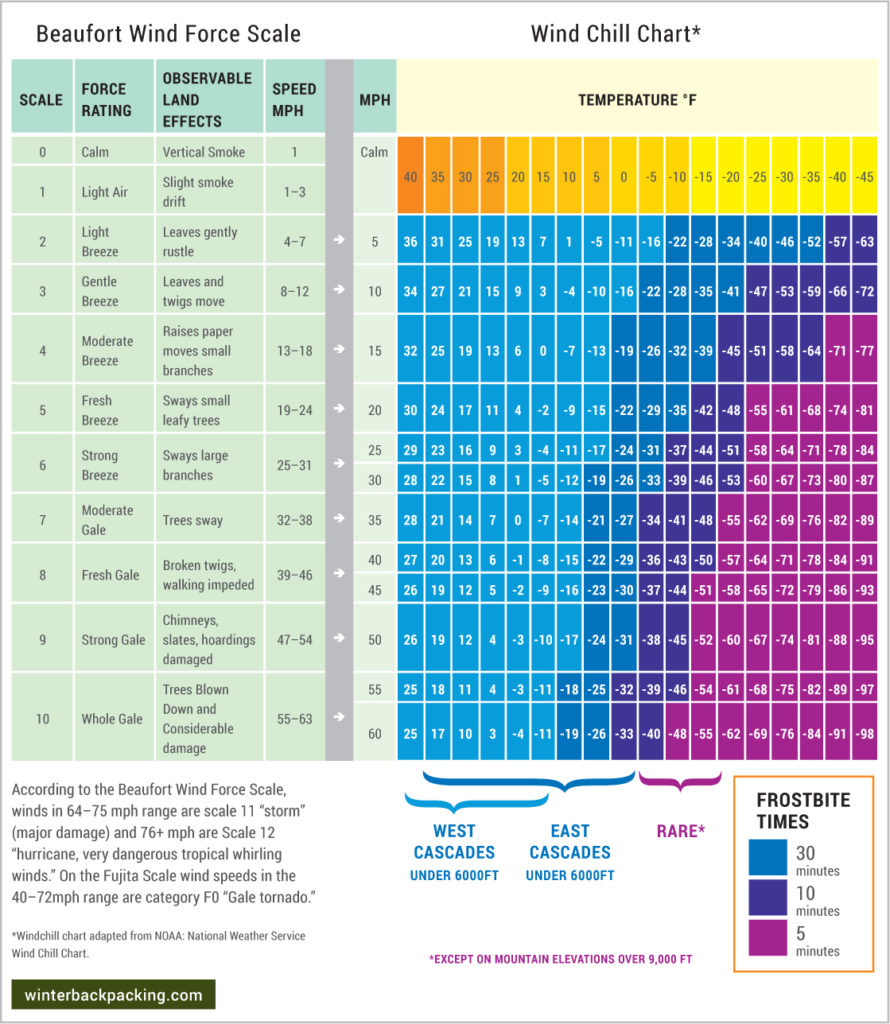
Except on the eastern slopes of the Cascade range, average temperatures and wind speeds do not pose a serious frostbite risk below 9,000ft. However, unusually low temperatures and high wind speeds can occur. The most likely risk would be in the 0–10º degree range with winds 15mph or above.
Even without the risk of frostbite, wind robs your body of warmth and comfort. It can place you at risk of hypothermia. Always be able to cover all flesh if you encounter high winds, keep moving, and if you stop add layers and avoid staying in exposed areas.
Essential wind protection gear
- Have a hard-shell jacket with a hood to protect your core and head. Layers of Capilene and wool are not enough to prevent strong winds from robbing your body warmth. Even if there is no rain in the forecast, always bring your hard-shell rain protection in case of high winds.
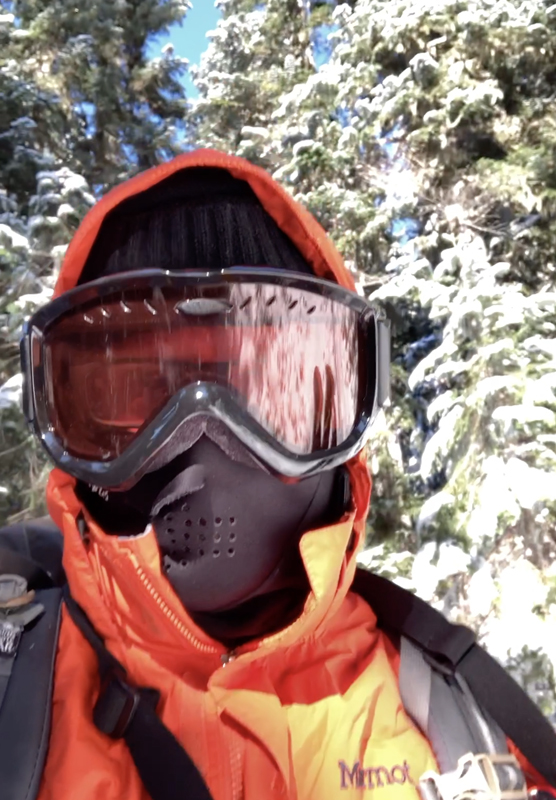
- Use a Balaclava that is designed to cover your nose and mouth while allowing ventilation under your nose to prevent your goggles and/or glasses from fogging over.
- Wear ski goggles. These are available in eyewear compatible designs.
- Wear gloves with high-rise design to cover jacket sleeve ends
- Wear gaiters to seal the ends of your pants. In severe conditions bring hard-shell pants or rain pants as well.
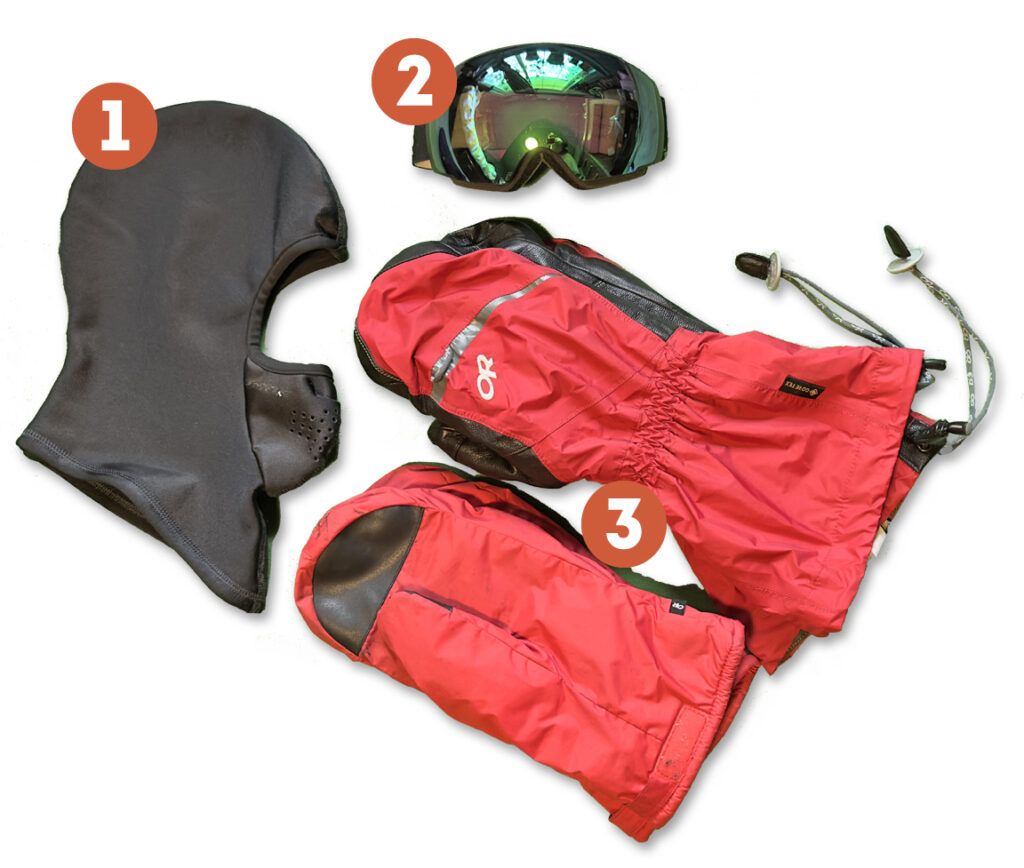
A hard-shell jacket, gaiters, and gloves are standard gear for any winter weather trip (for glove strategies see What are the best gloves for winter backpacking?). So the only additional wind protection weight is the balaclava (2.45 oz) and goggles (5.40 oz), adding a half-pound to your kit. I prefer several pairs of light-weight wool liner gloves and a mid-weight water-resistant pair, but in severe cold temperatures (below 15ºF), I’ll add heavier high-rise gloves too (7.80 oz). If you are on a volcanic peak and need to build a wall with rocks for wind protection, leather gloves are recommended because the volcanic rock has sharp surfaces. Building a snow wall in high winds is not always possible, especially in the spring will high elevation snow is compacted into ice.
Costs: balaclava ($36), goggles ($35–85), and double layer mittens (around $200). Prices can vary a lot and you may be able to find these items on sale. I bought my goggles for $35. They are designed to fit over eyeglasses. The mittens are Outdoor Research Alti II Gore-tex insulated mittens. Expensive, but I value my hands.
A buff adds warmth to the neck and can be pulled up over part of your face but the thin fabric does not provide adequate protection in high winds and low temperatures. A winter weather balaclava is necessary.
Finding shelter from the wind
If you find yourself hiking on a ridge in hind winds, you’ll need to find a natural wind barrier to set up camp and reduce the windchill or build a snow wall.

It may seem counter-intuitive, but the best and safest possible locations may be on the windward side of the ridge. The leeward side of the ridge will often be loaded with snow with increased avalanche danger. Look down the windward slope and watch for moving trees. The trees may be relatively still, indicating that the wind is accelerating on the ridge. You can then head down the windward side (hiking into the wind) to a lower elevation, which may be all that is needed to escape the stronger winds.
In the evening the winds will often subside. In my experience, winds usually die down a few hours after sunset allowing a better opportunity to come out of the tent and prepare a meal, hot tea thermos, or hot water bottle for the night. This is not always the case. Sometimes the highest winds hit late at night or just before sunrise.
Wind and tents
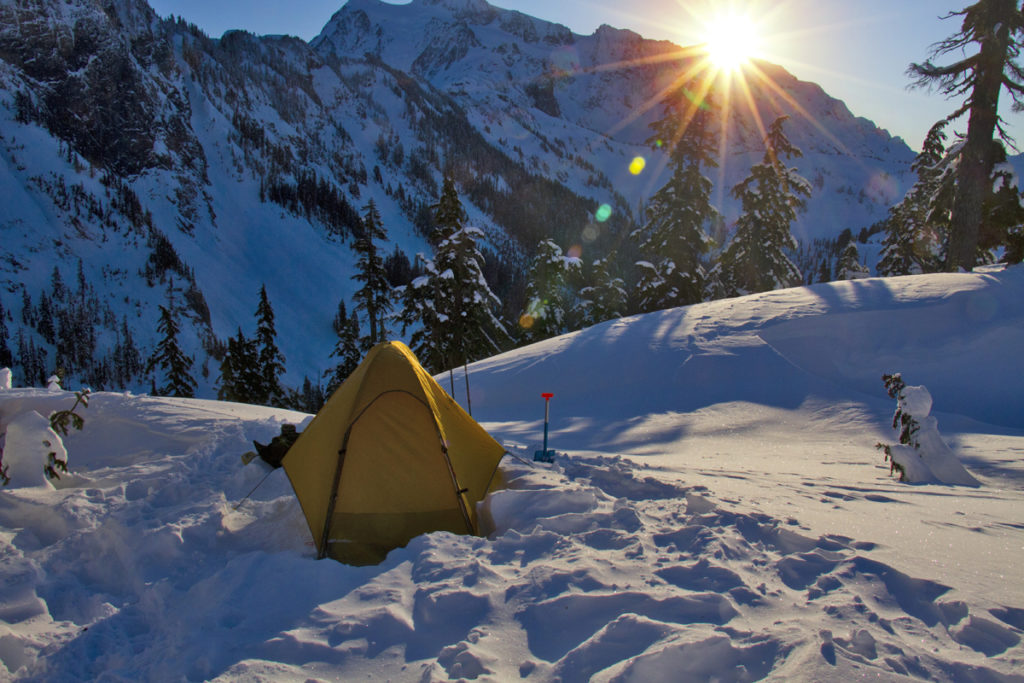
Tents add very little warmth while you sleep in winter, except when it is windy. Then a tent can add a lot because it protects you from the wind chill. A 4-season tent adds around 5–10ºF degrees in calm weather.
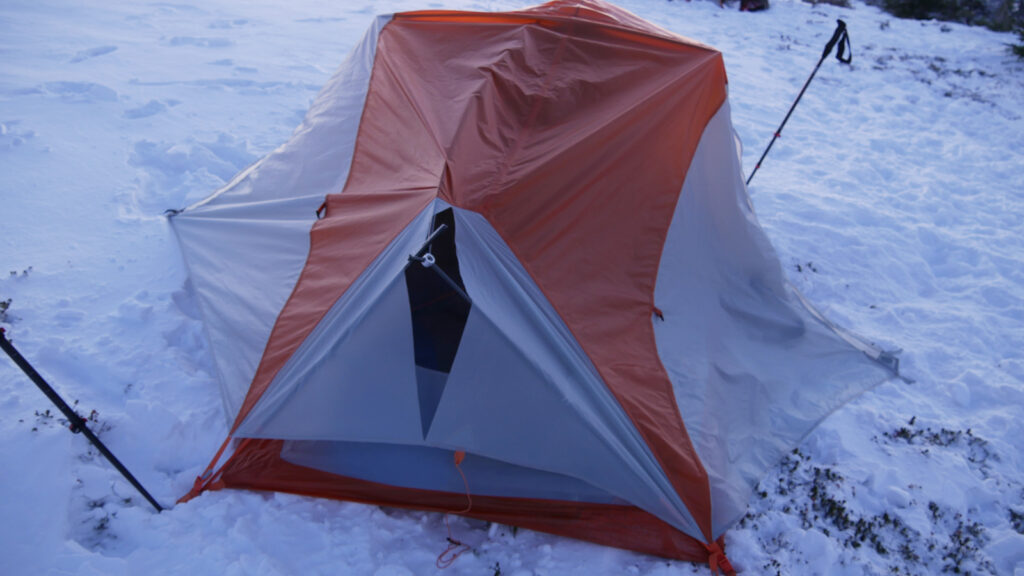
Many of the people I camp with in the winter use 3-season tents. This may not provide as much comfort as a 4-season tent, but it does work. Some 3-season tents are better than others. See my post on 3-Season vs. 4-Season Tents for more details. As newer 3-season tents are designed to be lighter, their effectiveness against wind is reduced.
If you are using a 3-season tent, high winds in very cold conditions can send both cold air and snow drift through the mosquito netting, sometimes allowing drifts to build up around your sleeping bag. This can quickly (within an hour) reduce your warmth and the wind will also more easily penetrate the sleeping bag. In high winds, fine snow blowing in the wind can be hardly perceptible, but if you leave your tent door open the snow can build up quickly. Face the opening away from the wind and put snow around the edges of your fly for added protection.
Inside your tent, even a light 5mph wind will seem like a strong wind. A 20mph wind will cause a significant amount of noise. A high wind can seem like sleeping under a passing train. Both my 3-season and 4-season tents have ridden out 15–25 mph winds, maybe 35 mph winds. I don’t know the exact speed, but I assume the speeds were in that range based on the forecast and observations. These tents could probably withstand higher winds, but the experience inside would be difficult to sleep through.
The primary reason to carry a 4-season tent is wind protection.
Setting up a tent in high winds
In high winds or gusts, two people should hold the tent at all times. If a free-standing tent is caught in a gust of wind it can be carried off the ridge for miles. Then you have no wind protection. This hazard needs to be avoided. The normal practice is to attach the tent poles and toss your pack inside to anchor the tent. Then crawl inside, change into your camp base layer, insulation, and hard shell, and then come out and finish anchoring the tent with snow pegs. Having another person hold the tent decreases the likelihood of the tent flying away in the process leading up to anchoring the tent with your pack. Once your pack has anchored your tent, help the other person do the same. Then you can crawl in and change into your warmer windproof clothing.
What to do if your tent fails
If you experience high winds, stay calm. This applies to both hiking and camping. If you are hiking in high winds cover up exposed skin. Bring and wear a balaclava, rain jacket and rain pants (full zip rain pants are easy to put on when wearing snoewshoes), and goggles. Once protected, you will be able to stay warm while hiking in all but the most extreme conditions.
At night your tent protects you from the wind chill. Be aware that you cannot always position the narrow side of the tent against the wind, because the wind may change direction in the course of the night. When high winds occur it may seem like the wind will blow the tent apart, but be aware that a 10 mph wind is loud in a tent. The wind may not be as strong as it seems when you are inside the tent. Even a 20 mph wind can seem terrifying, especially the first time you experience it in a tent.
Mountaineering tents, including the small ones using an “x” design (two bending poles that cross corner to corner in the shape of an X) are among the most wind proof. That said, I have seen quite a few 3-season tents ride out winds that were likely around 20–30 mph. Some 3-season tents use the same basic x-design as small mountaineering tents, such as the REI Co-op Passage 1 and the North Face Stormbreak 1. The only tent that I have actually seen fail is the 2-person Big Agnes Copper Spur UL (twice with two different tents). The smaller 1-person Big Agnes Copper Spur UL did fine. The larger 2-person tent puts more pressure on the poles than the smaller tent.
Having your tent fail in the loud roar of high winds is a disturbing experience. Remain calm and stay in the tent. Your body will anchor the tent and the tent will still provide some protection from the wind chill. Never leave a tent in high wind without first putting on your wind protecting gear and securing all the gear you have. The worse case scenario would be to climb out of the tent and have the tent and your wind protective gear blow off the mountain.
IMPORTANT: Do not get out of a tent in high winds if you are not wearing enough wind protection to hike in. If you find yourself in a tent that has collapsed or torn from wind, do not just call out for help from your team in the night. If you suddenly wake someone up they might not be thinking clearly and they might leave their tent unprepared only to have their own gear blown away. Or, they may be out in the cold too long with insufficient clothing helping you and get hypothermia. Be aware that it is almost impossible for anyone to clearly hear and understand anything you say when they are in a separate tent in high winds.
If you are anticipating high winds:
- Take care to fully stake out your tent.
- Organize your gear before going to sleep.
- Secure everything.
- Keep things in your pack.
- Have your headlamp handy.
- Put essential wind clothing in your sleeping bag (gloves, hard-shell pants and jacket, balaclava).
Be prepared in the event the tent burst open or you need to quickly leave the tent or work with a damaged tent in difficult conditions.
I’ve never done this, but if I thought the tent poles were about to break, I might release the tension from the front grommets (easiest to access) and try to hold the tent close to the ground (while inside). This is an untested idea and might be counter productive. Usually the wind will die down and you can later pack up and move to a lower elevation or more sheltered spot.
Know your gear limits
If the forecast includes gale force winds (scale 7–10) and deep cold, it is best to not go backpacking. With the right gear, I can remain comfortable in a wind chill down to around –15 while hiking, but if 30 mph winds are in the night time forecast, I wouldn’t go unless I can be sure of some natural wind shelter, because at night I rely on a tent and do not want to test it’s limits too far. While you can plan to be in a tent at night for protection, there is the possibility that some situation might require that you are not in your tent. A 20 mph wind at night is my usual limit and I would avoid that too if the forecast indicated that it would be sustained for many hours. The wind is often stronger than the forecast, so if the wind forecast is already 20–30 mph at night, you might be placing your tent in a situation exceeding its limits.
My coldest weather sleeping bag is an expedition bag rated –20ºF, which means it provides comfort for me down to 10º to 0ºF, and that is, therefore, my equipment comfort limit. However, at 10ºF water and food freezes so fast that my usual trip planning preference is for temperatures above 15ºF. Fortunately, the milder weather in the Pacific Northwest rarely requires trip planning involving temperatures below 15ºF. If the temperature forecast is too cold, the trip can be moved a few days or a week until warmer temperatures occur.
15–30ºF is sort of ideal. This is cold enough that snow doesn’t melt, but not so cold that hot food freezes too quickly. The lowest thermometer temperature I have recorded is 6ºF while camping on a frozen alpine lake. I don’t often carry a thermometer, so I can’t be sure that was the lowest temperature I have experienced. The expected forecast for that night was 12ºF.
Winter backpacking in colder places such as Alaska and Norway will require colder-rated gear and the need to adapt to colder temperatures than the unusually mild winter temperatures experienced here in the Pacific Northwest.
Like this post? Please comment below.
2 replies on “Preparing for Winter Winds”
Great article Michael. Great tip of packing your clothes inside sleeping bag in high wind situation.
Thanks Vishnu.