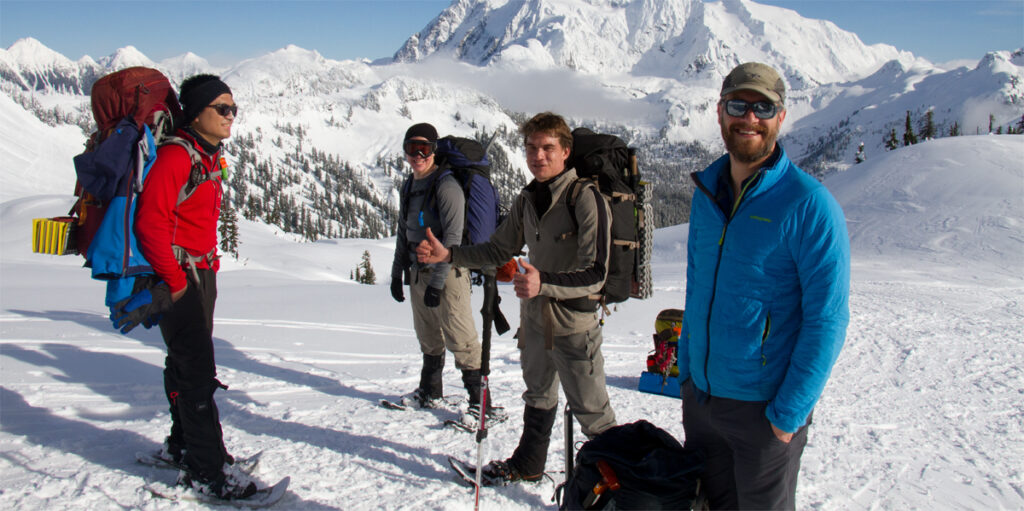
What to take winter backpacking
If you’re wondering what to take on winter backpacking trips or how I keep my winter pack weight around 26–30 lbs, use this list (below) for comparison purposes. I will try to improve this list with links and new information as well as new gear choices as gear evolves.
I have received no gear or sponsorship from any gear companies or brands. Whatever I recommend or use is based solely on my own experiences and preferences.
This checklist includes all the gear I use for 2–3 days, overnight snowshoe, and backpacking trips. Some gear choices vary depending on weather and terrain conditions, so not everything on the list is taken on all trips.
Bear in mind that many people hike in winter using different gear. Hikers have different preferences. Most hikers I know use 3-season tents and canister stoves, different packs, and different sleeping bag brands. This is fine.
Decide for yourself what gear you want to use, as there are many good brands making different kinds of gear for similar purposes. The most common gear questions I hear concern stoves, tents, and water storage, so let’s start with those.
What is the right backpacking stove for Winter Conditions?
Hikers use or try to use canister stoves on all our trips. For most trips, canister stoves perform fine, especially the ones designed for colder temperatures, such as the MSR Reactor and MSR Windburner. Temperatures are rarely in the range that causes canister stoves to fail. However, once an Isobutane canister reaches 11ºF, the fuel no longer vaporizes and the stove fails to run (butane canisters fail at 31ºF). Some steps can be taken to warm the canister and keep it running, but it becomes a challenge, and stove efficiency is low.
Unlike canister stoves, liquid fuel stoves, such as the Whisperlite International or Universal use a hand pump that allows the fuel pressure to be controlled manually. Liquid fuel stoves use white gas (or kerosene, and unleaded auto fuel) in a refillable bottle and the fuel is vaporized by an initial primer flame that starts the process. After the liquid fuel stove begins to burn, it continually heats a fuel coil to maintain vaporization regardless of ambient temperature. For a deeper dive into canister stoves in cold weather see Will a canister stove work for winter backpacking?
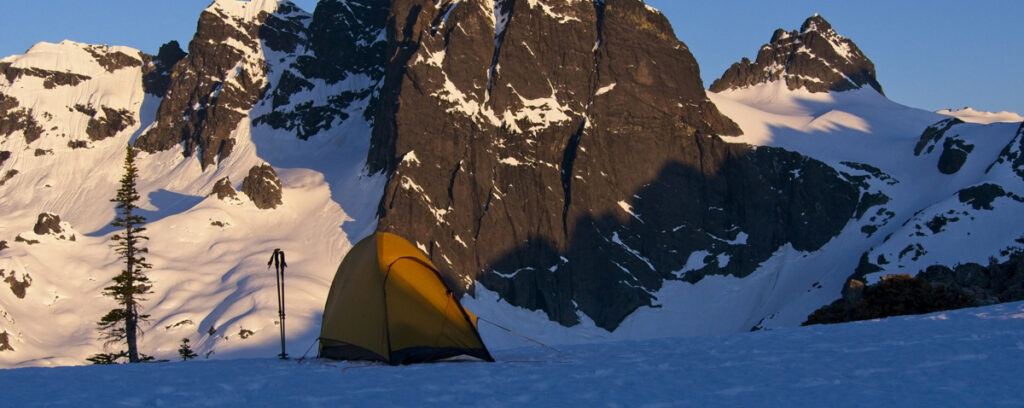
What is the right tent for Winter backpacking?
3-season tents will work on most trips. The main considerations are: will the tent stand up in high winds, is the fly low enough to keep the wind and snow out, and is the design steep enough to shed snow. More about tent designs and examples of 3-season and 4-season tents for winter conditions is available here: 3-Season vs. 4-Season Tents
What is the right water storage for Winter backpacking?
You should avoid pack bladders and water filters in freezing weather. Pack bladders will freeze and you will want a hot water bottle at night anyway, so Nalgene bottles are better. A leaky pack bladder that gets your gear wet in summer is not usually a serious matter, but in winter it can be life-threatening. A wet down sleeping bag will not provide you with the warmth you require in winter. To learn more about water management, read How to Keep Your Water from Freezing.
What to wear when winter backpacking
At the end of the gear list below, I also include a clothing checklist, which includes items I wear while hiking. Typically, I use the same clothes while hiking in winter that I do during the shoulder seasons. Regular summer hiking pants and a t-shirt or fishing shirt (UV shirt with hoodie), a buff, a hat, liner gloves, synthetic underwear (briefs), and two layers of socks (liner socks, plus thick wool socks). When temperatures drop below 25ºF, I may add a synthetic base layer for my legs and my core, and sometimes a fleece pullover. If it is windy, raining, or snowing I may also wear a rain jacket and sometimes rain pants.
When I’m on an all-day steep ascent, I tend to not wear base layers unless it is very cold (20–15ºF or colder), but sometimes on the next day descent, I’ll wear a base layer. I burn much less energy going down, so I sometimes need more warmth. Taking off and adding lower layers while hiking is difficult. If I think I may need to do that, I bring rain pants that have full leg zips so I can avoid taking off my snowshoes and boots.
A major consideration is wind. Minimal wind protection for all trips is a rain jacket, rain pants, buff or ultra-light balaclava, and mid-weight gloves (Double Thermal Winter Gloves). If high winds are likely, I add a heavier balaclava, double layer mittens (Outdoor Research’s Alti Gore-Tex Mitts), and goggles. It is essential to be able to cover all flesh in high winds if you are in cold weather. For more information about trail clothes, see What’s in My Winter Backpack.
For a detailed look at layering, see Layering for Winter Backpacking.
The list below also includes a section for after-the-hike clothes that stay in the car at the trailhead, such as fresh a shirt, socks, and regular shoes. Having a fresh shirt keeps the sweat off the car seats and make stops at restaurants more pleasant.
Pack Weight
I try to keep my pack weight below 30 lbs for 2 and 3-day trips. The one factor that tips this scale sometimes causing my pack weight to reach 30, 32, or even 34 lbs is having to attach my snowshoes to my pack before reaching snow level. So be aware that it is often necessary to strap snowshoes to your backpack (adding an additional 4 lbs). This, of course, may mean that you have to carry some extra cord or straps to make this possible.
IMPORTANT: A heavy pack increases the chances of back and ankle injuries and balance-related accidents on steep terrain. It is important to keep pack weight down as much as possible without sacrificing safety. Use the list below to compare gear weights if you need to find ways to lower your pack weight. My list is a light and ultralight gear list that provides a base weight of around 20–25 lbs. The weight of each item is included in the list.
How to reduce pack weight
Most unnecessary weight can be found in the big three—the pack itself, the tent, and the sleeping bag. Each of these items can be around 3 lbs or less and still be durable enough for winter backpacking. If you have a heavy kit, look first at upgrading the big three.
Next, compare your other gear weights with the weights shown on the list below. Doing this may help you find 5–15 pounds of unnecessary weight that can be eliminated. Pack everything in your pack and use a digital hanging scale to weigh your final total. First, weigh your base weight. “Base weight” refers to everything except fuel, water, and food. Then weigh your total weight.
For a more detailed look at this topic see: How to Lower Your Winter Backpack Weight.
Some trips will require different or additional gear, and it’s fine for people to have different needs and preferences, but if your pack is heavier than you want, use the list below to discover possible weight-saving gear choices.
For more gear loadout images, including images with labels, see my post, “What’s in My Winter Backpack.”
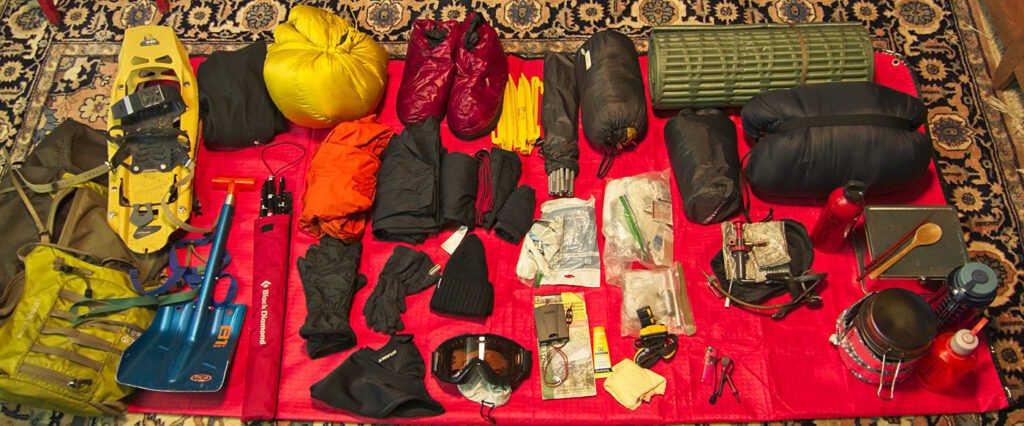
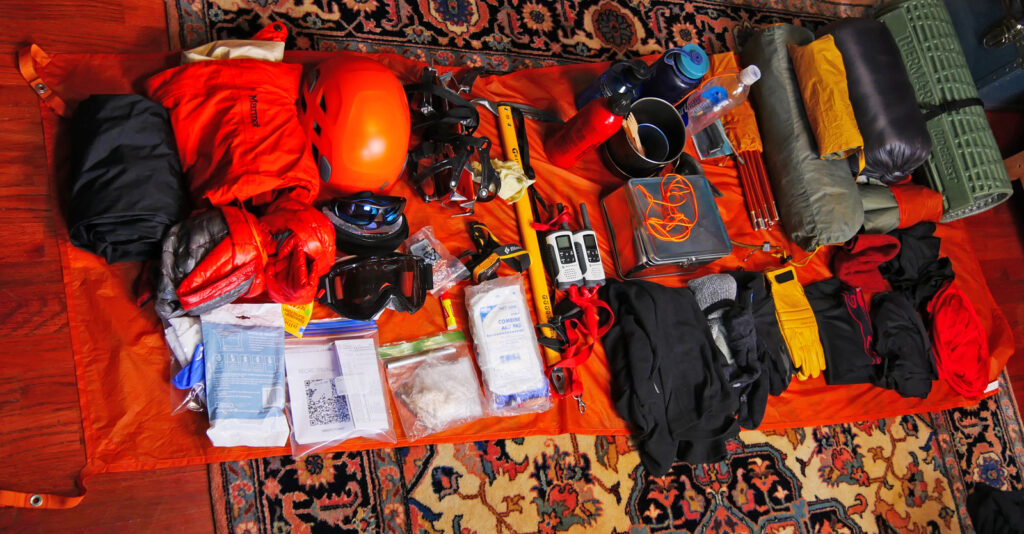
The Gear Checklist
I recommend always laying out your gear and doing a visual check using a written checklist. Missing a critical piece of gear, such as a stove or stove pump, or lighter, can mean being unable to restore your water supply.
The Essentials (5–7 lbs)
For more about the essentials, see The Fifteen Essentials for Winter Backpacking.
First Aid* 4.00 oz.
- Bandage roll (4.5″ x 4YD)
- ABD pads (2 quan.,5″x9″)
- Triple layer pads (3 quan.,3″x4″)
- Large band-aids (3 quan.,2.5″x3″)
- Band-aids (3 quan., 3 inch)
- Band-aids (2 quan., 2 inch)
- Antiseptic towlettes (2 pks)
- Iodine prep pad (1)
- Alcohol prep pad (1)
- Antibiotic ointment pads (4)
- Burn cream (3 pk)
- Burn jell (1 pk)
- Hydrocortisone cream (1 pk)
- Ibuprofen tablets (4)
- Moleskin (5 pre-cut pieces)
- Leukotape (1 yrd)
*All items packed with labels and expiration dates. Burn cream/jell because of stoves. Moleskin and/or Leukotake because of blisters. ABD pads or large bandages because of potential injuries (esp. ice ax, crampons). I build my own first-aid kit. Small packable sizes can be found online at sites such as Rescue Essentials (https://www.rescue-essentials.com/).
Extra First Aid
- Scissors (0.55 oz.)
- Tweezers (0.30 oz.)
- Duck tape 2×50″ (0.60 oz.)
Hygene supplies
- Wag bag or Biffy Bag (2.55 oz.)
- Extra toilet paper (0.55 oz.)
- Sanitary wipes (2) (0.45 oz.)
- Latex gloves
- Toothbrush + paste (1.40 oz.)
Repair kit
- Sewing repair kit (0.50 oz.)
- Air Mattress repair kit (1.05 oz.)
- Tent pole repair sleeve
- Stove maintenance kit (partial) (0.55 oz.)
- Snowshoe clevis pin
Navigation gear
- Compass (2.55 oz.)
- Map (3.30 oz.)
- Altimeter watch
UV Protection
- Sunglasses (1.15 oz.) or Glacier Glasses (category 4)
- Sunscreen (1.10 oz. available in 1 oz containers)
- Chap-stick (0.14 oz.)
Lumination
- Headlamp with batteries 2.55 oz.
Fire-starters (take two types)
- Flint (1.15 oz. or 31 grams)
- Lighter (full .80 oz.)
Cooking Supplies (4–5 lbs)
- Bear vault food container (32.00 oz.)
- Spoon (Bamboo) (0.40 oz.)
- Cooking pot (4.40 oz.)
- Pot lid skillet (2.30 oz.)
- Cup (2.10 oz.)
- Sauce container (occasional use)
Stove Kit (29.05 oz.)
- Stove (8.65 oz.)
- Fuel pump (2.35 oz.)
- Windshield & base plate (2.65 oz.)
- Stove kit bag (0.65 oz.)
- Fuel bottle (11 oz capacity) (12.40 oz.)
- Fuel bottle (20 oz capacity) (18.80 oz.)
Water Supply gear
- Nalgene bottle (32 oz. capacity) (6.15 oz.)
- Narrow Nalgene bottle (16 oz. capacity) (3.65 oz.)
- Metal Thermos (for 15ºF weather or below)
- Water filter (shoulder season, above 32ºF weather)
Wind and rain protection
- Goggles (5.90 oz.)
- Balaclava (2.65 oz. or ultralight option)
- hardshell/rain jacket (10.65 oz.)
- hardshell/rain pants (7.15 oz.) (or full zip option if hiking in high winds)
Avalanche Safety Gear (3 lbs .24oz)
- Snow shovel (20.60 oz.)
- Tour Probe (11.14 oz.)
- Avalanche Transceiver (1) (7.05 oz.)
- Climbing helmet (11.6 oz., recommended for all trips involving snow, ice, and slopes—i.e., standard winter backpacking gear)
- 2-way radio (1, optional) (9.45 oz.)
Packed clothing (3–4 lbs)
- Down jacket (18.55 oz.)
- Shirt (smart wool) (10.10 oz.)
- T-shirt (extra) (4.30 oz.)
- Base-layer underwear—leggings, Capilene (3.60 oz.) or nylon
- Base-layer shirt (Capilene )
- Liner socks (wool 1.60 oz.)
- Socks (thick wool 2.60 oz.)
- Fleece Liner gloves (0.90 oz.)
- Gloves: Waterproof thermal gloves (4.65 oz.)
- Double-layered Mittens (12.8 oz., for deep cold and high winds)
- Wool beanie
- Waterproof stuff sack (0.40 oz.)
The Big Three
Backpack
- 58-liter pack, (48.07 oz., Granite Gear Leopard)
- Granite Gear Crown2 60 liter
- Straps for snowshoes (2.00 oz.)
- Water bottle carabiner (1.25 oz.)
- Camera clip
- Whistle (0.50 oz., many packs have a built-in whistle)
Sleeping system
One sleeping bag based on forecast:
- Sleeping Bag (rated 10º to 15º for 20–35ºF weather) (42.60 oz.)
- Sleeping Bag (rated 0º to –10º for 10–30ºF weather) (53.00 oz.)
- Sleeping Bag (rated –20º for 0 to –10ºF weather) (58.00 oz.)
- Dry sack or plastic bag to protect sleeping bag (0.40 oz.)
- Stuff sack (0.95 oz. or compression sack or strap for compression)
- Sleeping pad (air) (17.50 oz.)
- Solid core foam pad (13.75 oz.)
Tent
- 4-season solo tent (22.15 oz.)
- Tent fly (8.15 oz.)
- Poles with pole sack (14.50 oz.)
- Snow tent stakes (x6) (5.95 oz.)
- Deep snow guylines (x6) (o.70 oz.)
- Stuff sack (0.65 oz)
Traction
- Micro-spikes (13.45 oz., shoulder season)
- Crampons (1 lb. 12.5 oz., rarely taken)
- Ice ax with a leash (14.35 oz., rarely taken)
- Mountain-Terrain Snowshoes (64 oz.) MSR Evo Ascent Snowshoes (4 lbs)
Luxury gear
- Camera tripod (9.3 oz.) (choice depends on purpose)
- Thermometer (0.35 oz.)
- Handheld weather meter, Anemometer (2.20 oz.)
Circumstantial / Miscellaneous gear
Many of the items on my gear list above will only be included in my pack depending on weather and terrain conditions. Here are some other contingent items:
- Extra fuel (As a safety measure, I recommend every team member have a stove, extra fire starter, and extra fuel)
- Hydro Flask (full) (29.50 oz. Important. Use for temperatures below 15–20ºF)
- Ice Ax (16.50 oz. Important for some destinations, especially in the shoulder seasons, but also in winter. Sun and wind can create very hard and icy slopes any time of the year. Not useful in early-season fresh or deep snow.)
- Crampons (28.00 oz. Important for some destinations in the shoulder seasons. Not useful in fresh snow and not recommended for regular hiking boots.)
- Bear-resistant food container (32.00 oz. A generally helpful tool that is required in some locations.)
- Seat pad (2.15 oz. Optional. You can use your full-size pad instead.)
- Water filter (13.75 oz. Good in the shoulder seasons. Problematic and not recommended in freezing weather.)
- Pants, extra. (10.00 oz. Recommended if river forging and/or wet weather is anticipated.)
- Compression bag (3.35 oz. Use for large synthetic or expedition sleeping bags. Be aware that over-compressing sleeping bags is not recommended.)
- Snowshoe extensions (13.05 oz.) (Usually not necessary. Recommended for very deep fresh snow, especially for heavier hikers)
- Alkaline batteries (extra, recommended for winter cloudy trips)
- Lithium batteries (0.80 oz.) (Not recommended for avalanche transceivers because of sudden battery death without warning.)
- Bear spray (12.30 oz. If you want self-defense, this non-lethal tool is the only method I recommend. There has been only one fatal black bear attack in Washington State and that was 40 years ago. The entire state of Washington has an estimated 2000+ cougars and over the past *century*, the state has experienced only two fatal cougar attacks. Accidental hunting incidents in Washington state between the 1950s–2010s were 1,811, most by hunters aged 10–29. A report published by American orthopedic surgeons Randall Loder and Neil Farren in 2014 showed that between 1993 and 2008, 35,970 firearm-related injuries involved in hunting were reported to U.S. hospitals or about 2,400 per year over the 15-year period of the study. If you are concerned about safety, wear bright clothing, and don’t run or bike on trails.)
- Down Booties (3.85 oz. optional)
- River shoes for river crossings (6.15 oz.)
- Dry sack or plastic bags for boots and camera when crossing rivers. This assumes you already have a dry sack for your sleeping bag and extra clothing.
- Cathole Trowel (2.85 oz. Not necessary. Doesn’t achieve appropriate results in snow conditions. Pack your poop out.)
- Pack cover (3.15 oz. Not necessary in temperatures below freezing.)
- Tent ground cloth (4.45 oz. Not necessary on snow.)
- Vapor Barrier Socks (1.80 oz. Intended for highly waterproof boots that cause a lot of sweat, but such boots are unnecessary for the PNW. However, the VB socks work well around camp–an alternative to camp booties—and protect your camp socks from moisture in boots.)
Clothes checklist (wearing)
Rather than search for hiking clothes the morning you will be leaving for the trailhead, use this list or your own list to gather everything you need in one place the day before the event.
- Briefs (2.80 oz.)
- Hiking pants (14.70 oz.)
- T-shirt (4.25 oz.)
- UV shirt with hoody (known as a “fishing shirt” 7.85 oz.)
- Thermal shirt base layer 3.60 oz.)
- Buff (1.45 oz.)
- Liner socks (wool, 1.60 oz.)
- Socks (wool) (2.60 oz.)
- Belt (2.00 oz.)
- Liner gloves (2.60 oz.)
- Cap (1.75 oz., Use a “jogging/running” cap because those are lighter and made of nylon, meaning they will dry off quicker.)
- Gaiters (6.30 oz.)
- Boots (3 lb 2.70 oz.)
- Hiking poles+snow baskets (15.65oz. Attach to your pack to make sure they get to the trailhead the day of the hike.)
Regular Extras
- Camera (wearing) (1 lb 12.90 oz.)
- Lens cover & harness (4.06 oz.)
- Extra battery (1.75 oz.)
- Extra Flash card (0.15 oz.)
- Plastic bag for the camera (0.40 oz.)
- Cell phone (4.00 oz.)
- Keys (0.70 oz.)
- Wallet (1.25 oz.)
- Glasses (+ extra 1.60 oz.)
For the car
- After-hike car clothes
- Shoes
- Socks
- Shirt
- Plastic bag for boots
- Gas money
- Forest/Park/Snow pass
- Cell phone charger cord
- 30″ bow saw (for downed trees)
- Tow straps
- Tire chains (+pliers and gloves)
- Flashlight
If stuck in a storm:
- Run the motor for about 10 minutes each hour for heat.
- Open the window enough to avoid carbon monoxide poisoning.
- Periodically check the exhaust pipe to be sure it does not become blocked because of snow.
What food to take winter backpacking (examples)
These are just a few examples. I tend to carry small meals in general with the strategy of snacking often. Most hikers just use packaged food that only requires adding hot water straight into the package. I prefer dishes with fresh vegetables and sauces on rice noodles, pasta, and bread, homemade muesli, etc. If I am hiking only for 2–3 days, I can manage the extra weight and avoid pre-packaged foods. That said, I will carry a few pre-packaged extra meals for emergency purposes.
Cooking fresh meals does require cleaning a pot or frying pan. To wipe clean pots I recommend using a piece of Lavash bread. In some instances, I will just put the dirty cooking pot in my bear vault and clean it when I get home.
Snacks
- Nutella/Walnut burrito (3.60 oz.)
- Trail bars—Fruit/nut bars (3) (4.50 oz.)
- Snickers (1.95 oz.)
Lunch
- Sandwich (peanut butter & jam) (6.60 oz.)
- Lavash or baguette and hummus
- Lavash and Baba ganoush
- Nuts
- Sushi (first day)
- Burrito (first day, walnut + greens)
Diner options
- Phö or Ramen (broth, rice or wheat noodles, chopped vegetables, peanuts, sesame seeds, cashews, tahini, chili oil, and soy sauce). Soupy meal options are best in deep cold weather because they are easier to keep hot and reheat. Check out recipe strategies in the recipe section.
- Tortellini (spinach) with added sun-dried tomatoes
- Tortillas (bean or cheese) (9.35 oz.)
- Couscous with walnuts, herbs, olive oil
- Tea (0.23 oz.)
- Cookies (2.20 oz.)
Backup meals (pre-packaged)
- Thai noodle soup (2.20 oz.)
- Ramen (2.50 oz.)
- Miso soup (0.45 oz.)
Breakfast options
- Muesli (toasted oats with nuts and dried fruit) (11.00 oz.)
- Oatmeal (plain, 2 packs) with added raisins (2.70 oz.)
- Soy or almond milk for Muesli (9.20 oz.)
- Mocha/Coffee/Cocoa (1.15 oz.)
Lunch
- Sandwich (peanut butter & jam) (6.60 oz.)
- Bagel & Cheese (5.85 oz.)
- Bread and Hummus with dried tomatoes and/or walnuts
8 replies on “A Winter Backpack Under 30 lbs”
This is a great website, and is helpful for the occasional winter camper to make sure you don’t forget something essential. But if you want to save weight, you probably don’t need to bring *three* sleeping bags!
Hi Robert. Good point. 🙂 I only take one sleeping bag. The 3 sleeping bags are listed because I will select one based on the weather forecast. Most often I am taking the zero-degree bag, but sometimes I can save weight and take the 15-degree bag when it is warmer, and on some trips I have no choice but to take the –20º.
Your WEBSITE is so helpful for a beginner like myself. I am learning so much from the resources here. It is overwhelming to figure out what to take with you and the optimal way to get ready for winter outdoors while taking all safety measures along. THANK YOU! and I look forward to backpacking with you.
Thank you! I’m glad the website is helpful. Reach out if you have any questions.
Thank you for taking the time to write this in such detail. I am getting ready for my first winter backpacking trip and needed this teaching!!
Thank you. I hope your trip goes well. You can share your winter backpacking experiences on our Facebook Group Page.
Hi Michael, does the 30lb include food and water?. It is unclear if it refers to the base weight.
Also, how do you decide whether to bring Crampon or not?
This is the most awesome blog ever. Thank you!
Thank you! Yes, the 30 lbs refers to total pack weight, including consumables (fuel, water, food). I am planning to do an update and I will try to parse out things better. Bear in mind that there are items on my gear list that I don’t include in the pack weight. Those are items are what I wear or carry, such as trekking poles, avi transceiver, gaiters, and climbing helmet. Also, I mostly take fresh food, so my food weight is higher than what most hikers bring. My pack is usually 28 lbs, except in deeper cold and high winds when it is 30–32 lbs. The heaviest pack weight for me is when I have snowshoes strapped to the pack (32–34 lbs). Deciding when to bring crampons and ice ax can be tricky. I have been on quite a few trips wishing I had brought them. I rarely bring them in January–February because the snow is usually too soft and floatation is the bigger concern. However, there are times when wind can ice over a ridge or the snow can be hard in the early morning. In most instances, snowshoes or microspikes provide sufficient traction, but if the slope is steep, crampons are safer. So the decision usually depends on the route and weather conditions. Usually near the end of March through early July, we need traction but not floatation so we are switching from snowshoes to crampons or microspikes.