This is just a quick tip to help you stake out your tent on snow. You may already be familiar with snow stakes or pegs and the deadman strategy for securing the pegs in deep soft snow. What I want to explain here is a method of setting up your guy lines so that you don’t have to tie any knots when you set up your tent. That is, the only tieing involved is done at home before you head out to the wilderness. Technically, you do need to tie one knot, a girth hitch to attach the cord to the stake, but this isn’t the kind of knot that requires much finger dexterity or time in cold conditions.
When you get ready to set up camp, you may be tied, it may be getting dark, and the weather may be cold and windy. You’ll want to set up your tent as quickly as possible. Tying knots with gloves on is not easy, so if you can avoid it, why not?
To eliminate this hassle, you can use a 2mm utility cord to prepare guy line extensions. Most 4-season or winter tents don’t come ready-to-use on deep snow. That is, the guylines that ship with the tent are not long enough for the deadman tent stake method. You need to additional utility cord for deep snow.
The corner loops on your tent are too short for staking out a tent in snow. Simply pre-tie six or eight separate loops, or however many your tent requires. Close the loop using a hitch with a quick-release knot or simply make a loop with no hitch. Each of these closed loops needs to be around 2–3 feet long (i.e., about 6 feet of cord each) to allow you to bury the stake at least a foot below the snow surface and a couple of feet away from the tent.
You can buy a 20-meter 2mm Reflective Paracord online.
The key idea is to have the cord tied in a circle or loop so that it can then be attached with simple girth hitches to the main stake straps on the tent and the actual tent stake or peg. No tying at the campsite is required. Simple looping (girth hitches) is all you need to do. If your hands are cold or it is too windy to remove gloves, you’ll appreciate the speed and ease of this technique.
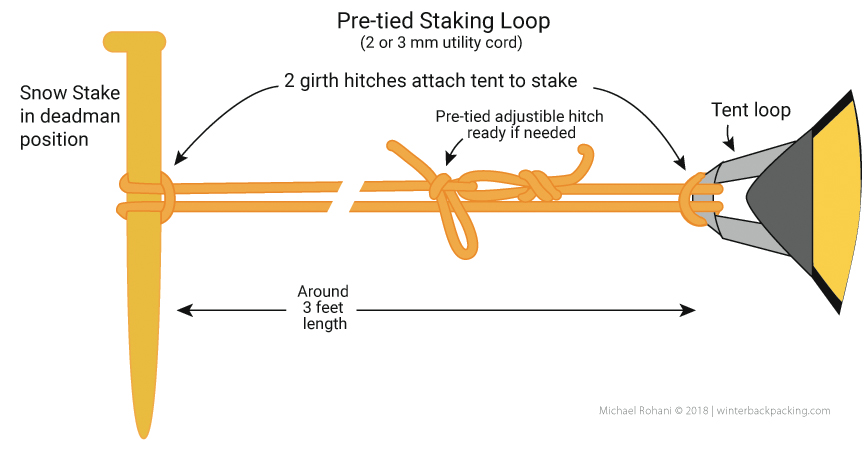

For an adjustable cord, use a pre-tied adjustable hitch. This release can come in handy when removing the peg in the morning when the snow if firmer from colder overnight temperatures. Release the hitch and use the cords to pull up each ped or dig them out with your snow shovel or ice axe if necessary.
Another easy way to remove tent pegs is what I call the “Jackie method,” which is to pour a small amount of hot water on the utility cord. That usually melts the snow and releases the tent peg.
Some winter backpackers will recommend using an ice ax to dig a trench for the peg. In the early season when snow is softest and least compacted, ice axes are usually useless and you may not be carrying one. You will, however, need a snow shovel (necessary for avalanche rescue). Just shove the shovel blade deeply into the snow and pull it out. The shovel blade will leave a narrow trench perfect for the reclining peg. Flip the shovel over and use the handle to push the peg (the peg is in the horizontal deadman position) to the bottom of the trench. Don’t use the shovel blade because this may cut the guy line. Then stomp the snow down to pack it firmly.
If high winds are unlikely and the snow firm I don’t bury the stakes in a deadman position because it is often hard to dig them out in the morning when the snow is frozen solid.
Let me know if you have any questions or suggestions. I’ll be updating this post periodically (including correcting my bad grammar and spelling, etc.).
Don’t forget to subscribe to my blog and leave comments below.